前言 注意 项目为了练习,没有使用mybatisplus的简化写法 统一错误(异常)处理 1 2 3 4 【@ControllerAdvice 与 @RestControllerAdvice 区别:】 @RestControllerAdvice 注解包含了 @ControllerAdvice 与 @ResponseBody 注解。 类似于 @Controller 与 @RestController 的区别。 @RestControllerAdvice 返回 json 数据时不需要添加 @ResponseBody 注解。
自定义一个异常类,用于处理项目中的异常,并收集异常信息。 1 2 3 4 5 6 7 8 9 10 11 12 13 14 15 16 17 18 19 20 21 22 23 24 25 26 27 28 29 30 31 32 33 34 35 36 37 38 39 40 41 42 43 44 45 46 47 48 49 50 51 52 53 54 55 56 57 58 59 60 61 62 63 64 65 66 67 package com.lyh.common.exception;import lombok.Data;import org.apache.http.HttpStatus;@Data public class GlobalException extends RuntimeException { private String message; private Integer code = HttpStatus.SC_INTERNAL_SERVER_ERROR; public GlobalException (String message) { super (message); this .message = message; } public GlobalException (String message, Integer code) { super (message); this .message = message; this .code = code; } public GlobalException (String message, Throwable e) { super (message, e); this .message = message; } public GlobalException (String message, Integer code, Throwable e) { super (message, e); this .message = message; this .code = code; } }
再定义一个全局的异常处理类 GlobalExceptionHandler。 使用 @RestControllerAdvice 注解标记这个类。 内部使用 @ExceptionHandler 注解去捕获异常。 1 2 3 4 5 6 7 8 9 10 11 12 13 14 15 16 17 18 19 20 21 22 23 24 25 26 27 28 29 30 31 32 33 34 35 36 37 38 39 40 41 42 43 44 45 46 47 48 49 50 package com.lyh.common.exception;import com.lyh.common.util.Result;import org.slf4j.Logger;import org.slf4j.LoggerFactory;import org.springframework.web.bind.annotation.ExceptionHandler;import org.springframework.web.bind.annotation.RestControllerAdvice;@RestControllerAdvice public class GlobalExceptionHandler { private Logger logger = LoggerFactory.getLogger(getClass()); @ExceptionHandler(Exception.class) public Result handlerException (Exception e) { logger.error(e.getMessage(), e); return Result.error().message("系统异常" ); } @ExceptionHandler(NullPointerException.class) public Result handlerNullPointerException (NullPointerException e) { logger.error(e.getMessage(), e); return Result.error().message("空指针异常" ); } @ExceptionHandler(GlobalException.class) public Result handlerGlobalException (GlobalException e) { logger.error(e.getMessage(), e); return Result.error().message(e.getMessage()).code(e.getCode()); } }
使用 1 2 3 4 5 6 使用? 修改某个 controller 如下所示: 参数不存在时,抛出 空指针异常。 参数为 -1 时,抛出自定义异常并处理。 查询结果为 null 时,抛出自定义异常并处理。 查询成功时,正确处理并返回。
1 2 3 4 5 6 7 8 9 10 11 12 13 14 @GetMapping("selectOne") public Result selectOne (Integer id) { Emp emp = this .empService.queryById(id); if (id == null ) { throw new NullPointerException (); } if (id == -1 ) { throw new GlobalException ("参数异常" , 400 ); } if (emp == null ) { throw new GlobalException ("未查询到结果,请确认输入是否正确" ); } return Result.ok().data("items" , emp).message("查询成功" ); }
统一结果处理 数据格式? 是否响应成功(success: true / false) 响应状态码(code:200 / 400 / 500 等) 状态码描述(message:访问成功 / 系统异常等) 响应数据(data:处理的数据) 如何处理 1 2 3 4 5 6 7 8 9 10 11 12 13 14 15 16 17 18 19 20 21 22 23 24 25 26 27 28 29 30 31 32 33 34 35 36 37 38 39 40 41 42 43 44 45 46 47 48 49 50 51 52 53 54 55 56 57 58 59 60 61 62 63 64 65 66 67 68 69 70 71 72 73 74 75 76 77 78 79 80 81 82 83 84 85 86 87 88 89 90 91 92 93 94 95 96 97 98 99 100 101 102 103 104 105 106 107 108 109 110 111 112 113 114 115 116 117 118 119 120 121 122 123 124 125 126 127 128 129 130 131 132 133 134 135 136 137 138 139 140 141 142 143 144 145 146 147 148 149 150 151 152 153 package com.lyh.common.util;import lombok.Data;import org.apache.http.HttpStatus;import java.util.HashMap;import java.util.Map;@Data public class Result { private Boolean success; private Integer code; private String message; private Map<String, Object> data = new HashMap <>(); private Result () {} private Result (Boolean success, Integer code, String message) { this .success = success; this .code = code; this .message = message; } public static Result ok () { return new Result (true , HttpStatus.SC_OK, "success" ); } public static Result ok (Boolean success, Integer code, String message) { return new Result (success, code, message); } public static Result error () { return new Result (false , HttpStatus.SC_INTERNAL_SERVER_ERROR, "error" ); } public static Result error (Boolean success, Integer code, String message) { return new Result (success, code, message); } public Result success (Boolean success) { this .setSuccess(success); return this ; } public Result code (Integer code) { this .setCode(code); return this ; } public Result message (String message) { this .setMessage(message); return this ; } public Result data (Map<String, Object> map) { this .data.putAll(map); return this ; } public Result data (String key, Object value) { this .data.put(key, value); return this ; } }
前端传参校验 Post用法 1 2 3 4 5 6 7 8 public class demo { @NotNull(message="用户id不能为空") private Long userId; @NotBlank(message="用户名不能为空") private String userName; @NotBlank(message="年龄不能为空") private String age; }
在controller层添加
@Valid 注解用于告诉 Spring Boot 对 MyRequest 对象进行验证1 2 3 4 5 6 @PostMapping("/xxx") public String createDemo (@RequestBody @Valid Demo demo, BindingResult result) { if (result.hasErrors()) return result.getFieldError().getDefaultMessage(); return "sucess" ; }
Get用法 注意,如果需要使用校验,那么就需要关闭必填项@RequestParam(value = "username",required = false),否则就会出现org.springframework.web.bind.MissingServletRequestParameterException: Required request parameter 'username' for method parameter type String is not present,也就是字段未填写的报错
controller代码
1 2 3 4 5 6 @GetMapping("/test2") public String getUserStr ( @RequestParam(value = "username",required = false) @NotNull(message = "名字不能为空") String name) { return "success" ; }
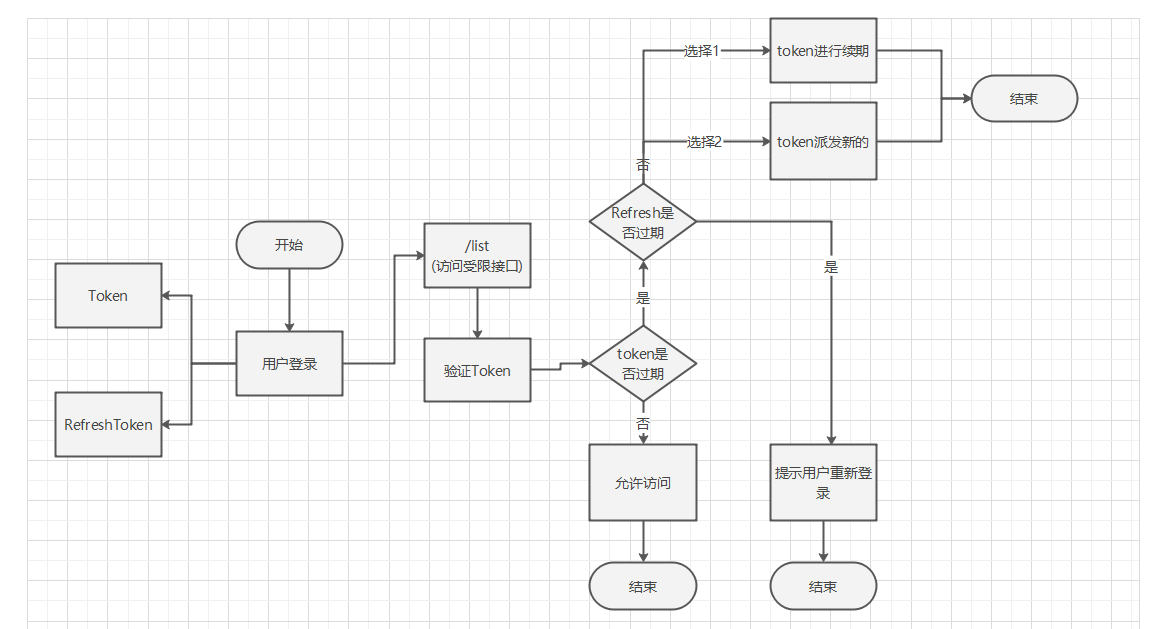
登录态 这里就用jwt来生成一个token并添加在token里面 jwt依赖 1 2 3 4 5 <dependency > <groupId > io.jsonwebtoken</groupId > <artifactId > jjwt-api</artifactId > <version > 0.12.5</version > </dependency >
1 2 3 4 5 6 7 8 9 10 11 12 13 14 15 16 17 18 19 20 21 22 23 24 25 26 27 28 29 30 31 32 33 34 35 36 37 38 39 40 41 42 43 44 45 46 47 48 49 50 51 52 53 54 55 56 57 58 59 60 61 62 63 64 65 66 67 68 69 70 71 72 73 74 75 76 77 78 79 80 81 82 83 84 85 86 87 public class JwtUtil { private static final Logger logger = LoggerFactory.getLogger(JwtUtil.class); private static final String SECRET = "S/4AN9IsSRUC~{0c4]y#$F2XbV8^`#a14vawn<~Kr@(D%3TF-p1s/h{Y9k7y((rR" ; private static final long defaultExpire = 1000 * 60 * 60 * 24 * 7L ; private static final SecretKey key = Jwts.SIG.HS256.key() .random(new SecureRandom (SECRET.getBytes(StandardCharsets.UTF_8))) .build(); private JwtUtil () { } public static String createToken (String username, Map<String, Object> claims) { return createToken(username, claims, defaultExpire); } public static String createToken (String username, Map<String, Object> claims, Long expire) { JwtBuilder builder = Jwts.builder(); Date now = new Date (); builder.id("rQRk$yN:7%*Bw}A_A-]M~4#;yGa:a_F{" ) .issuer("Galaxy" ) .claims(claims) .subject(username) .issuedAt(now) .expiration(new Date (now.getTime() + expire)) .signWith(key); builder.header().add("JWT" , "JSpWdhuPGblNZApVclmX" ); return builder.compact(); } public static Claims claims (String token) { try { return Jwts.parser() .verifyWith(key) .build() .parseSignedClaims(token) .getPayload(); } catch (Exception e) { if (e instanceof ExpiredJwtException) { throw new RunException ("token已过期" ); } if (e instanceof JwtException) { throw new RunException ("token已失效" ); } logger.error("jwt解析失败" + e); throw new RunException ("token解析失败" ); } } public static void main (String[] args) { Map<String, Object> claims = Map.of("name" , "张三" ); String token = createToken("mysterious" , claims, 3L ); System.out.println(token); Claims claims1 = claims(token); System.out.println(claims1); } }
token续签?到时续期?
redis jwt过期判断 1 2 3 4 5 6 7 8 void testJWT1 () { String token = "eyJhbGciOiJIUzI1NiIsInR5cGUiOiJKV1QiLCJ0eXAiOiJKV1QifQ.eyJpYXQiOjE3MTE1Mjg2NjYsImV4cCI6MTcxMTUyODY3NiwianRpIjoiM2RkN2IzNmUtNjQxMS00OGEzLTkwMDMtZDVhZGVlZWQ1OTBhIiwic3ViIjoiYXV0aCIsInVzZXJOYW1lIjoicWl1eWUiLCJpZCI6MTIzfQ.lPbcvtgbI4VEhQZrkhmws-zmZLXlQrysRlAmFnNsVeU" ; try { JWTValidator jwtValidator = JWTValidator.of(token).validateDate(DateUtil.date()); } catch (ValidateException exception) { throw new JWTException ("token已过期" ); } }
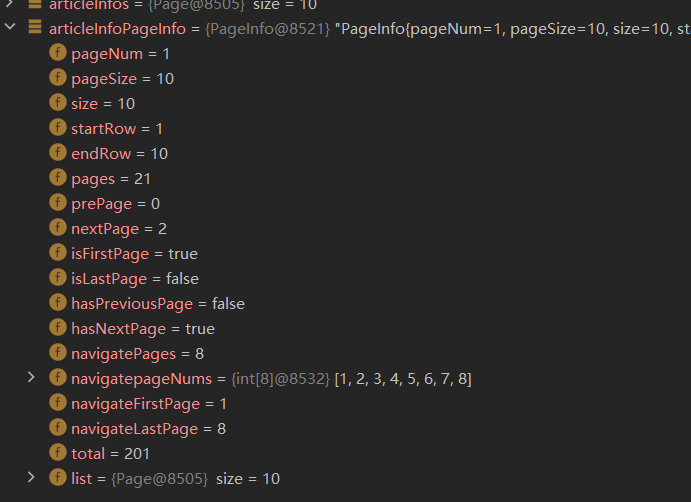
登录注册 用户注册(需返回主键) 分页功能 1 2 3 4 5 6 7 @Test void testPage () { PageHelper.startPage(1 ,10 ); List<ArticleInfo> articleInfos = articleInfoMapper.articleList(); PageInfo<ArticleInfo> articleInfoPageInfo = new PageInfo <>(articleInfos); }
下图展示的是articleInfoPageInfo的信息
问题 cn.hutool.core.convert.NumberWithFormat cannot be cast to java.lang.Integer
需要的类型:Supplier<java.lang.String>提供的类型:String(Required type: Supplier <java.lang.String> Provided: String)
1 2 3 4 5 import org.slf4j.Logger;import org.slf4j.LoggerFactory;
mybatis中的@param什么时候加什么时候不加呢
@RequestBody通常,在处理 HTTP POST 请求时,客户端将请求的数据作为请求体发送到服务器端。服务器端可以使用@RequestBody 注解将请求体的内容绑定到方法的参数上,以便进行处理。
在上述示例中,@RequestBody 注解应用于 User 对象的参数,表示将请求体的内容绑定到 User 对象上。这样,当客户端发送一个包含用户信息的 JSON 请求体时,Spring 框架会自动将该 JSON 数据转换为 User 对象,并将其作为参数传递给 createUser 方法。
需要注意的是,使用 @RequestBody 注解时,Spring 框架 会使用消息转换器(MessageConverter)来处理请求体的数据转换。默认情况下,Spring 支持多种消息转换器,包括处理 JSON、XML、Form 表单等数据格式。
总结来说,@RequestBody 注解用于将 HTTP 请求的内容绑定到方法的参数上,方便在 Spring 控制器中处理请求体的数据。
1
2
3
4
@PostMapping("/users") public ResponseEntity createUser(@RequestBody User user) { // 处理创建用户的逻辑 }
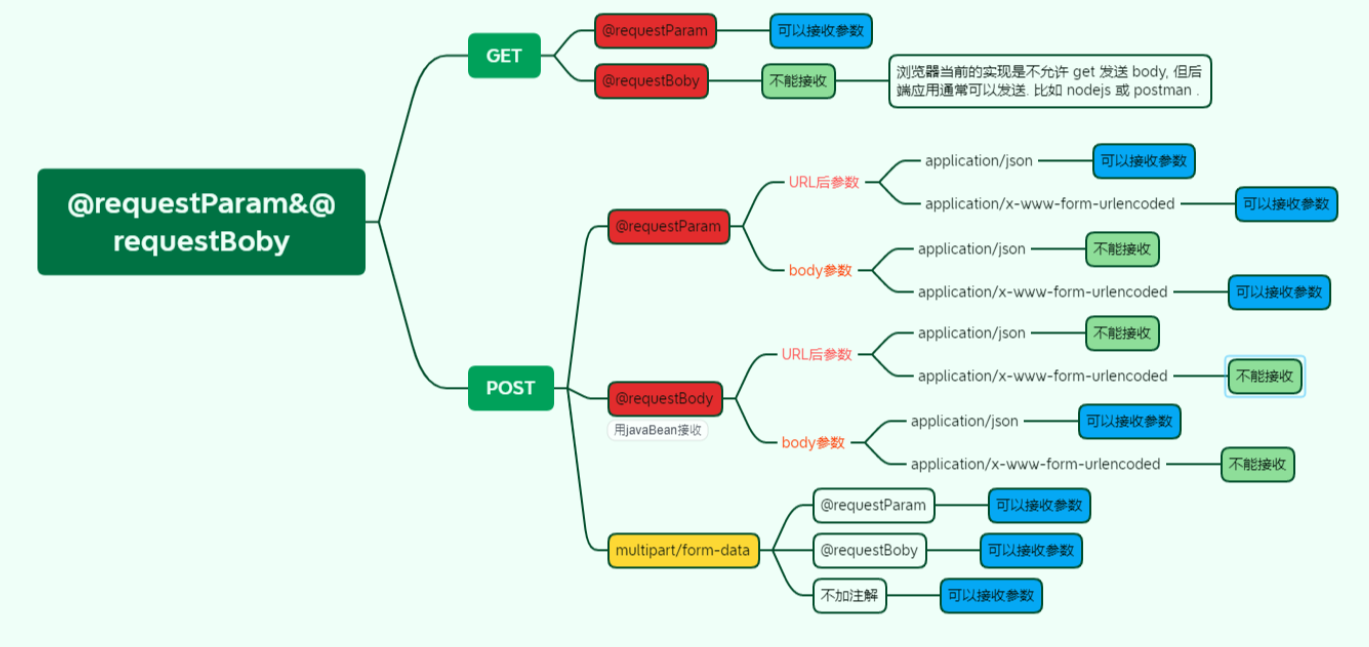
@ResponseBody||@RequestBoby||@requestParam的注解使用和注意事项 1 2 3 4 5 6 总结 @requestParam 1.用来获取URL后面追加的参数 2.POST请求,content-type:application/json 的body中的参数 @requestBoby 1.接收POST ,content-type:application/json的body参数 (后端一般封装成javaBean对象处理)
RequestBody 'application/x-www-form-urlencoded;charset=UTF-8' not supported1 2 3 4 5 6 7 8 9 10 11 12 13 14 15 16 17 18 19 20 21 22 23 问题代码 @PostMapping( "/register") public Result register (@RequestBody UserInfo userInfo) { log.info(userInfo.toString()); return Result.ok(); } 前端接口Content-Type:application/x-www-form-urlencoded 原因 前端请求传Json对象的字符串则后端才使用@RequestBody 。而我前端采用的表单提交的数据,是不能采用@RequestBody 注解的。 解决办法: 第一种解决方式就是修改后端代码,去掉@RequestBody 注解,也可以直接获取到表单提交的POST数据。 @PostMapping( "/register") public Result register (UserInfo userInfo) { log.info(userInfo.toString()); return Result.ok(); } 第二种解决方式就是修改前端代码,前端传递JSON对象的字符串,这里我采用jQuery来发送ajax请求传递JSON对象的字符串数据。 指定contentType: "application/json" ,
过滤器与拦截器 实现多端登录+token自动续期和定期刷新+自定义注解和拦截器实现鉴权(角色和权限校验)