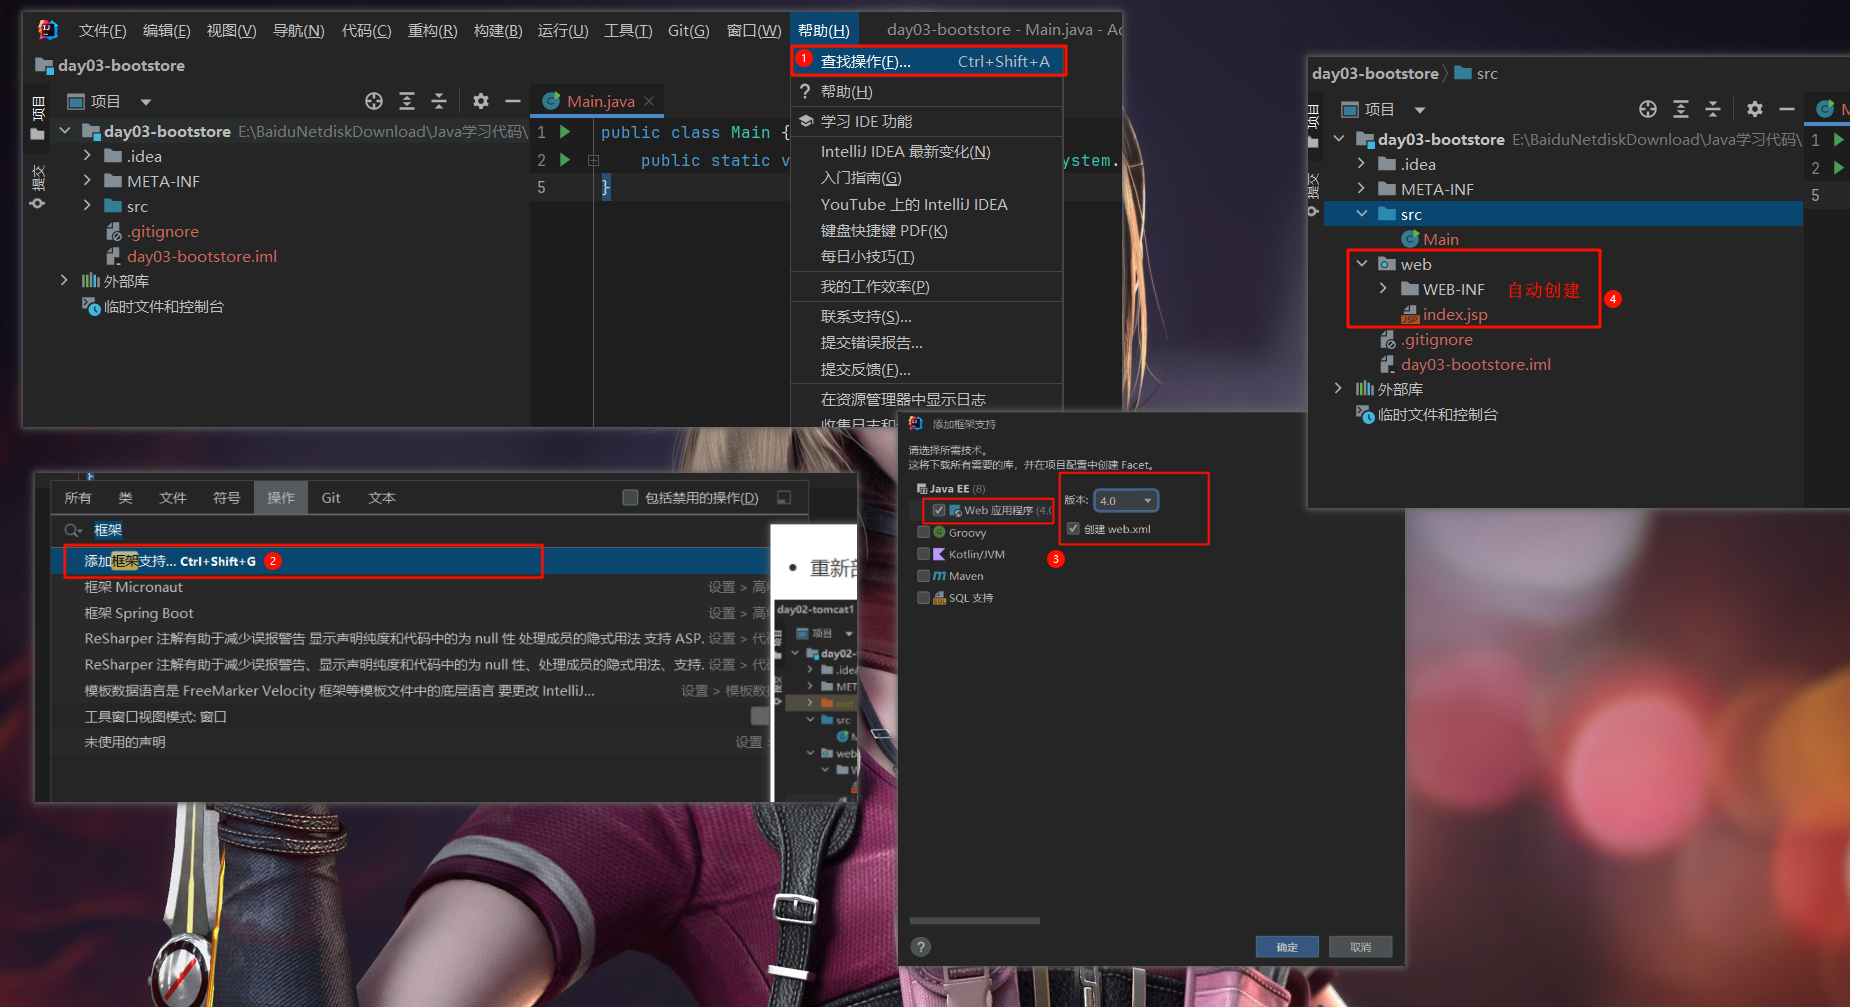
day01 代码的结构 编译javac 要编辑的文件名.java(包含扩展名),生成字节码.class文件cmd需要在HelloWorld.jav文件夹目录下 javac ./HelloWorld.java 1 2 3 4 5 6 7 public class HelloWorld { public static void main (String[] args) { System.out.println("helloWorld" ); } }
1 2 3 4 5 6 7 java 主类名 (也就是 java HelloWorld) java HelloWorld 正确的 java HelloWorld.class 错误的 java ./HelloWorld.class 错误的 java ./HelloWorld 错误的
1 javac -encoding UTF-8 HelloWorld.java
否者容易出现编码 GBK 的不可映射字符
大小写问题 1 2 3 4 5 6 7 8 9 10 11 12 1.java的代码是严格区分大小写的 2.java的文件名是否区分大小写 window操作系统来说 2.1 文件名大小写都可以(即javac 命名后面,文件名大小写都可以) 2.2 比如有一个文件名Problem2.java 可以javac problem2.java 也可以javac Problem2.java 3.编译后的xxx.class文件的文件名是否区分大小写? 区分 因为xxx.class文件的文件名代表的是类目 比如,编译后生成字节码文件 Problem2.class,并且主类名称也为Problem2 运行的命令,就必须是 java Problem2 建议都区分
java注释 单行注释// 多行注释/* 注释内容 */ 文档注释/** 内容 */ 类型 1 final int FULL_MARK = 100 ;
基本数据类型的转换之自动转换 自动转换之隐式转换 当把存储范围小的值(常量值,变量值,表达式的结果值)赋值给存储范围大的变量的时候,就会发生自动类型转换 存储范围从小到大排序如下 byte -> short -> int -> long -> float -> doublechart与short同级boolean不参与 1 2 double d = 1 ;System.out.println(d);
当多种数据类型的数据混合运算时,会自动提升为他们之中最大的 1 2 3 4 5 6 7 8 9 10 double d = 1 ;System.out.println(d); int a = 1 ;byte b = 12 ;char c = 'a' ;double dd = a + b + c + d;
当byte与byte,short与short,char与char进行运算或者他们三个混合运算,会自动提升为int类型顺带一提:字节(byte)数据类型是8位有符号Java原始整数数据类型。其范围是-128至127(-2^7至2^7-1)。 1 2 3 byte a = 1 ;byte b = 2 ;int c = a + b;
当小类型和大类型运算的时候,小类型会优先转化为大类型后参与运算(除开字符串) 1 2 3 4 5 char和double之间相加,char型会转换为double类型 char one = 'a' ; double two = 12.15 ; System .out .println (one + two);
基本数据类型的转换之强制转换 当把存储范围大的值(常量值,变量值,表达式的结果值)赋值给存储范围小的变量的时候,就需要强制类型转换 1 2 3 byte a = 1 ;byte b = 2 ;byte c = (byte )(a + b);
String类型与基本数据类型转换的问题 任何数据 与String进行+拼接,结果都是String其他数据类型进行+是求和 1 2 3 4 5 6 7 8 9 10 11 char c1 = 'a' ;char c2 = 'b' ;System.out.println(c1 + c2); System.out.println("C1 + C2 = " + c1 + c2); System.out.println(c1 + c2 + "" ); System.out.println(c1 + "" + c2);
特别注意 1 2 3 4 5 6 7 8 9 float f = 1.2 ;要么 double f = 1.2 ;或者 float f = 1.2F ;long j = 120 ;double d = 34 ;
赋值运算符 1 2 3 4 5 int a = 1 ;int b = 1 ;b = a + b; b + 1 = a;
=右边的值(常量,变量,表达式)的类型必须要<=左边变量的类型
存储范围从小到大排序如下 byte -> short -> int -> long -> float -> doublechart与short同级=永远是最后算的
扩展的赋值运算符,当最后的赋值结果类型大于左边的变量类型时,会发生自动类型转换
1 2 3 4 5 6 byte b1 = 10 ;byte b2 = 2 ;b1 = b1 + b2; b1 += b2; System.out.println(b1);
day02 编码,同一个模块下,所有文件保持同一个编码,否则文件可以不同编码,使用System.out.println输出中文会出现乱码问题
自动导包Alt + Enter
几种输出语句 1 2 3 4 5 6 System.out.println(输出内容); System.out.println(); System.out.print(内容);
格式化输出 使用System.out.printf(内容,变量列表) 内容需要使用占位符,占位符如下 %d 整形%f小数%.nf小数点留n位(四舍五入)%c单个字符%s字符串%bboolean1 2 3 4 5 6 7 8 int a = 10 ;double b = 12.5885 ;char c = 'd' ;boolean f = true ;System.out.printf("a=%d,b=%f,b=%.2f,c=%c,f=%b" ,a,b,b,c,f); a=10 ,b=12.588500 ,b=12.59 ,c=d,f=true
输入 next 遇到空白或者其他空白字符的时候,就会认为输入结束,后面的数据就不会接收了 比如输入张 空格 三,那么只会接收张 1 2 3 4 5 6 7 8 9 10 11 12 13 java.util.Scanner input = new java .util.Scanner(System.in); import java.util.Scanner;Scanner input = new Scanner (System.in);System.out.print("请输入一个整数" ); int num = input.nextInt();System.out.println("num = " + num); input.close()
注意,如果要接收数据的变量类型和用户输入数据的数据类型不符合,会报错
input.nextDouble()输入小数
input.nextBoolean()输入布尔值
input.nextLong();输入大整形
input.next();输入字符串
input.next().chartAt(0):输入单个字符(从多个字符串截取第一个字符)
注意,最后最好关闭input.close()
示例
1 2 3 4 5 6 7 8 9 10 11 12 13 14 15 16 17 18 19 20 21 22 23 24 25 26 27 28 29 30 31 import java.util.Scanner;public class input { public static void main (String[] args) { Scanner input = new Scanner (System.in); System.out.printf("请输入字符串:" ); String a = input.next(); System.out.println("a = " + a); System.out.printf("请输入小数:" ); double b = input.nextDouble(); System.out.println("b = " + b); System.out.printf("请输布尔值:" ); boolean c = input.nextBoolean(); System.out.println("c = " + c); System.out.printf("请输入大整形:" ); long d = input.nextLong(); System.out.println("d = " + d); System.out.printf("请输入单个字符:" ); char e = input.next().charAt(0 ); System.out.println("e = " + e); input.close(); } }
nextLine 在读取用户输入的数据时,遇到回车换行符合才会认为输入结束 需要注意 1 2 3 4 5 6 7 8 9 10 11 12 13 14 import java.util.Scanner;public class input_attention { public static void main (String[] args) { Scanner input = new Scanner (System.in); System.out.printf("请输入姓名" ); String name = input.next(); System.out.println("name = " + name); String other = input.nextLine(); System.out.printf("请输入其他信息" ); System.out.println("other = " + other); } }
day03 数组 1 2 3 4 5 6 7 8 元素的数据类型[] 数组的名称 char [] temp;元素的数据类型 数组的名称[]; int temp[]
初始化 一维数组静态初始化 1 2 3 4 5 6 7 8 9 元素数据类型[] 变量名 = { 数据A,数据B,数据C }; 元素数据类型[] 变量名 = new 元素数据类型[]{ 数据A,数据B,数据C }; 元素数据类型[] 变量名; 变量名 = new 元素数据类型[]{ 数据A,数据B,数据C }
1 2 3 4 5 6 7 int [] achievement1 = {1 ,2 ,3 };int [] achievement2 = new int []{1 ,2 ,3 ,};int [] achievement3;achievement3 = new int []{1 ,2 ,3 };
一维数组动态初始化 适用于一组数据是未知的,或需要通过计算得到,或者通过键盘输入得到 1 元素数据类型[] 变量名 = new 元素数据类型[长度]
1 2 int[] achievement4 = new int[10 ];
二维数组动态初始化 静态初始化不多说,参考一维数组初始化
动态初始化
规则的矩阵,每一行的列数是相同的 不规则的二维表(每一行的列数不相同,也就是一行有长有短) 1 2 3 4 int [][] arr = new int [5 ][];System.out.println(arr[0 ]);
初始化的值 1 2 3 4 整数类型数组: 里面填充为0 小数类型数组: 里面填充为0.0 boolean类型数组: 里面填充false char类型数组: 里面填充\u000
return new int[0]; 的意义 这个 return new int[0]; 就是防止编译器报错,返回一个垃圾值 1 2 3 4 5 6 7 8 9 10 11 12 13 14 15 16 17 18 19 class Solution { public int[] twoSum (int[] nums, int target ) { for (int i = 0 ;i < nums.length ;i++){ for (int j = i + 1 ;j < nums.length ;j++){ if (target == (nums[i] + nums[j])){ return new int[]{i,j}; } } } return new int[0 ]; } }
面向对象 以类和对象为核心 代码的结构以类为单位,程序是由一个一个的类组成的 数据是在类里面的,数据分为在类中方法(函数)外,类中方法(函数)内 数据在类中的方法外,称为 成员变量/成员数据 .要么属于某个类共享,要么是每一个对象独立的. 1 2 3 4 5 6 public class class_study { int a = 100 ; public static void main (String[] args) { int b = 100 ; } }
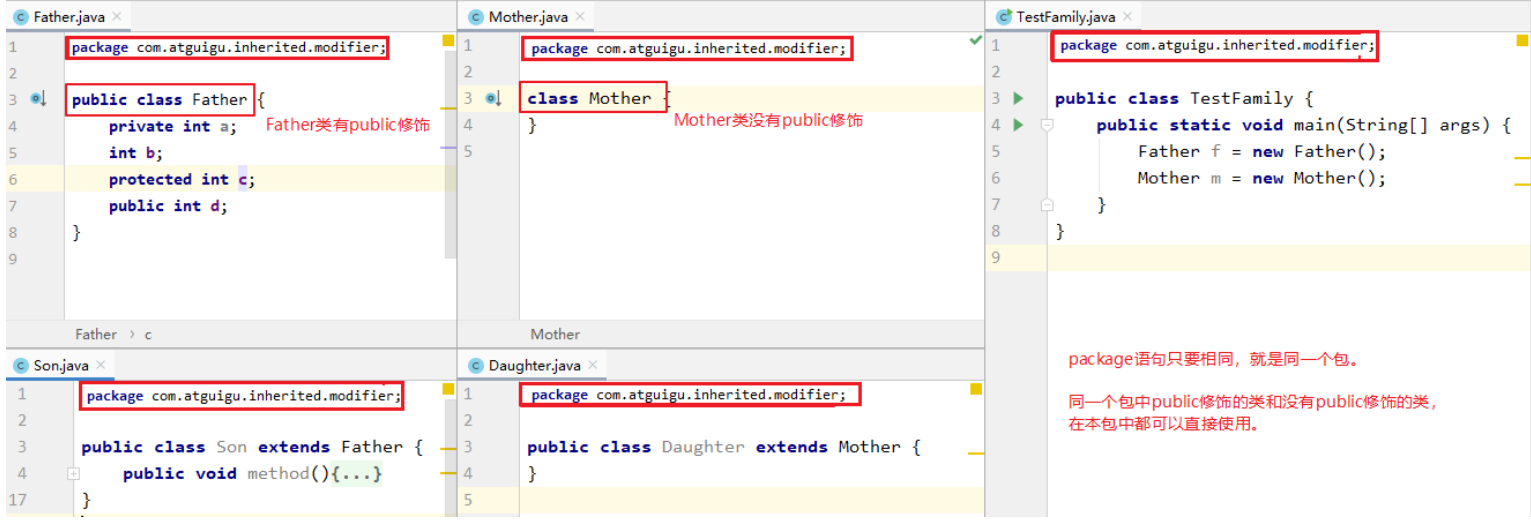
数据在类中的方法内,称为局部变量/局部数据.局部变量无法共享,每一个方法独立 类的定义 1 2 3 4 5 6 7 8 9 10 11 12 13 14 15 [修饰符] class 类名{ } [修饰符] 可以缺省 public和缺省public有什么区别? (1) 如果class前面有public,要求.java文件名称必须要和class后面的类名相同(包括单词和大小写) 一个.java文件只能有一个public的类 如果class前面没有public,则不要求类名与.java文件名相同 建议大家一个.java只写一个类,类名和.java文件名相同,方便维护 (2)如果class是public,可以跨包使用, 如果class没有public,那么不能跨包使用
对象的创建 1 2 3 4 5 6 7 8 new 类名();new 类名(实参列表)匿名对象,如果没有把对象赋值给一个变量,那么这样子的对象称为匿名对象, 如果希望这个对象反复使用,那么最好把这个对象给一个变量,就像下面这样子 类名 变量名 = new 类名();
类的成员 1 2 3 4 5 6 7 8 9 10 11 12 13 14 15 16 类的成员有: 成员变量 成员方法 构造器 代码块 成员内部类 成员变量 1.成员变量声明的位置,必须要在类中方法外 2.成员变量声明的格式 [修饰符] class 类名{ //下面就是成员变量 [修饰符] 数据类型 变量名 } 成员变量修饰符:public,protected,private,static,final,transient,volatile等 数据类型:可以是8种基本数据类型,也可以是引用数据类型
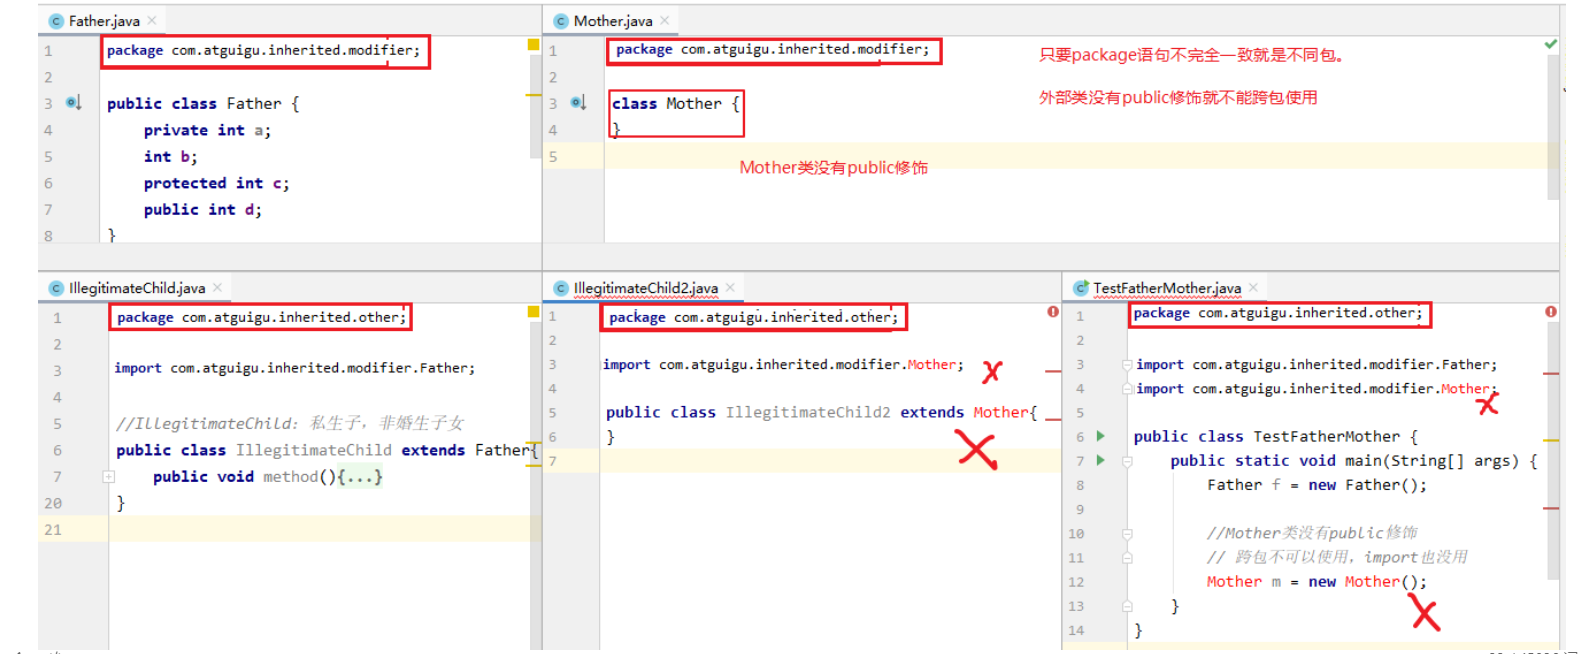
包 必须在源文件的代码首行 一个包名对应的是一个目录 一个源文件只能有一个声明包的package语句 关键字为package package语句只要不是一模一样的,就不是同一个包 包的命名规范和习惯:所有的单词都小写,每一个单词之间使用.分割 习惯用公司的域名倒置开头 和具体功能模块进行命名,比如com.atguigu.xxx;因为尚硅谷官网是atguigui.com,倒过来就是com.atguigu 建议大家取包名时不要使用java.xx包
包的作用域 位于同一个包的类,可以访问作用域的字段和方法 不用public,protected,private修饰的字段和方法就是包的作用域 1 2 3 4 5 6 7 8 9 10 11 12 13 14 15 16 17 18 19 20 不用public ,protected ,private 修饰的字段和方法就是包的作用域,具有代码目录结构如下 均在默认包下(也就是缺省包) Student.java TestStudent.java public class Student { String name; } public class TestStudent { public static void main (String[] args) { Student stu1 = new Student (); stu1.name = "李白" ; System.out.println("stu1 = " + stu1.name); } }
如果文件目录更改,也就是将Student.java移动到top.dreamlove包下Student的成员变量添加了Public,才可以被其他类所访问,否者只是在top.dreamlove包下才可以使用,也就是包的作用域下 1 2 3 4 5 6 7 8 9 10 11 12 13 14 15 16 17 18 19 20 21 22 23 -top.dreamlove --Student.java -TestStudent.java public class Student { Public String name; } import top.dreamlove.Student;public class TestStudent { public static void main (String[] args) { Student stu1 = new Student (); stu1.name = "李白" ; System.out.println("stu1 = " + stu1.name); } }
如何跨包使用类 注意:
使用java.lang包下的类,不需要import语句,就直接可以使用简名称
import语句必须在package下面,class的上面
当使用两个不同包的同名类时,例如:java.util.Date和java.sql.Date。一个使用全名称,一个使用简名称
方法 方法必须要先声明后使用,不调用不执行,调用一次执行一次。 声明的正确示范如下 1 2 3 4 5 6 7 8 9 //正确示范 类{ 方法1(){ } 方法2(){ } }
1 2 3 4 5 6 7 8 //错误示范 类{ 方法1(){ 方法2(){ //位置错误 } } }
格式修饰符也很多,public,protected,private,static,final,native,如果需要跨包使用 ,需要使用public修饰符 1 2 3 【修饰符】 返回值类型 方法名(【形参列表 】)【throws 异常列表】{ 方法体的功能代码 }
如果类中的方法没有使用public修饰符,那么这个方法只能在本包的其他类使用,不能跨包使用(同理,属性也是一样的)
实例变量与局部变量的区别 1、声明位置和方式
2、在内存中存储的位置不同 实例变量:堆 局部变量:栈
3、生命周期
4、作用域
5、修饰符(后面来讲)实例变量:public,protected,private,final,volatile,transient等 局部变量:final
6、默认值
参数 形参和实参 形参:在声明方法时,()中声明的变量,每调用这个方法之前,它的值是不确定的 1 2 3 4 public int max (int a,int b) { return a > b ? a : b; }
实参,在”调用”方法时,()中传入的数据,这个数据可能是常量值,也可能是变量,还可以是表达式 可变参数 当定义一个方法时,形参的类型可以确定,但是形参的个数不确定,那么可以考虑使用可变参数。可变参数的格式: 1 2 3 4 【修饰符】 返回值类型 方法名(【非可变参数部分的形参列表,】参数类型... 形参名){ } //貌似这样子也可以 【修饰符】 返回值类型 方法名(【非可变参数部分的形参列表,】参数类型 ...形参名){ }
1 2 3 4 5 6 7 8 9 10 11 12 13 14 15 16 17 18 19 20 21 22 23 24 25 26 27 28 29 package top.dreamlove.param;public class Sum { public double getAll (int ... all) { int sum = 0 ; for (int i = 0 ; i < all.length; i++) { int i1 = all[i]; sum+=i1; } return sum; } } package top.dreamlove.param;public class Test1 { public static void main (String[] args) { Sum s1 = new Sum (); double temp1 = s1.getAll(new int []{1 , 2 , 3 , 4 , 5 }); double temp2 = s1.getAll(1 ,2 ,3 ,4 ,5 ); System.out.println("temp1 = " + temp1); System.out.println("temp2 = " + temp2); } }
方法的重载(Overload) 一个类中出现了方法名相同,形参列表不同的二个或多个方法,称为方法的重载 方法名必须要相同 形参列表必须不同 返回值类型:无关紧要(可相同,可不同) 对象数组 数组是用来存储一组数据的容器,一组基本数据类型的数据可以用数组装,那么一组对象也可以使用数组来装。即数组的元素可以是基本数据类型,也可以是引用数据类型。当元素是引用数据类型是,我们称为对象数组。 注意:对象数组,首先要创建数组对象本身,即确定数组的长度,然后再创建每一个元素对象,如果不创建,数组的元素的默认值就是null,所以很容易出现空指针异常NullPointerException。
1 2 3 4 5 6 7 8 9 10 11 12 13 14 15 16 17 18 19 20 21 22 23 24 25 26 27 28 29 30 31 32 33 34 35 36 37 38 39 40 41 42 public class Rectangle { double length; double width; double area () { return length * width; } double perimeter () { return 2 * (length + width); } String getInfo () { return "长:" + length + ",宽:" + width + ",面积:" + area() + ",周长:" + perimeter(); } } public class ObjectArrayTest { public static void main (String[] args) { Rectangle[] array = new Rectangle [3 ]; for (int i = 0 ; i < array.length; i++) { array[i] = new Rectangle (); array[i].length = (i+1 ) * 10 ; array[i].width = (2 *i+1 ) * 5 ; System.out.println(array[i].getInfo()); } } }
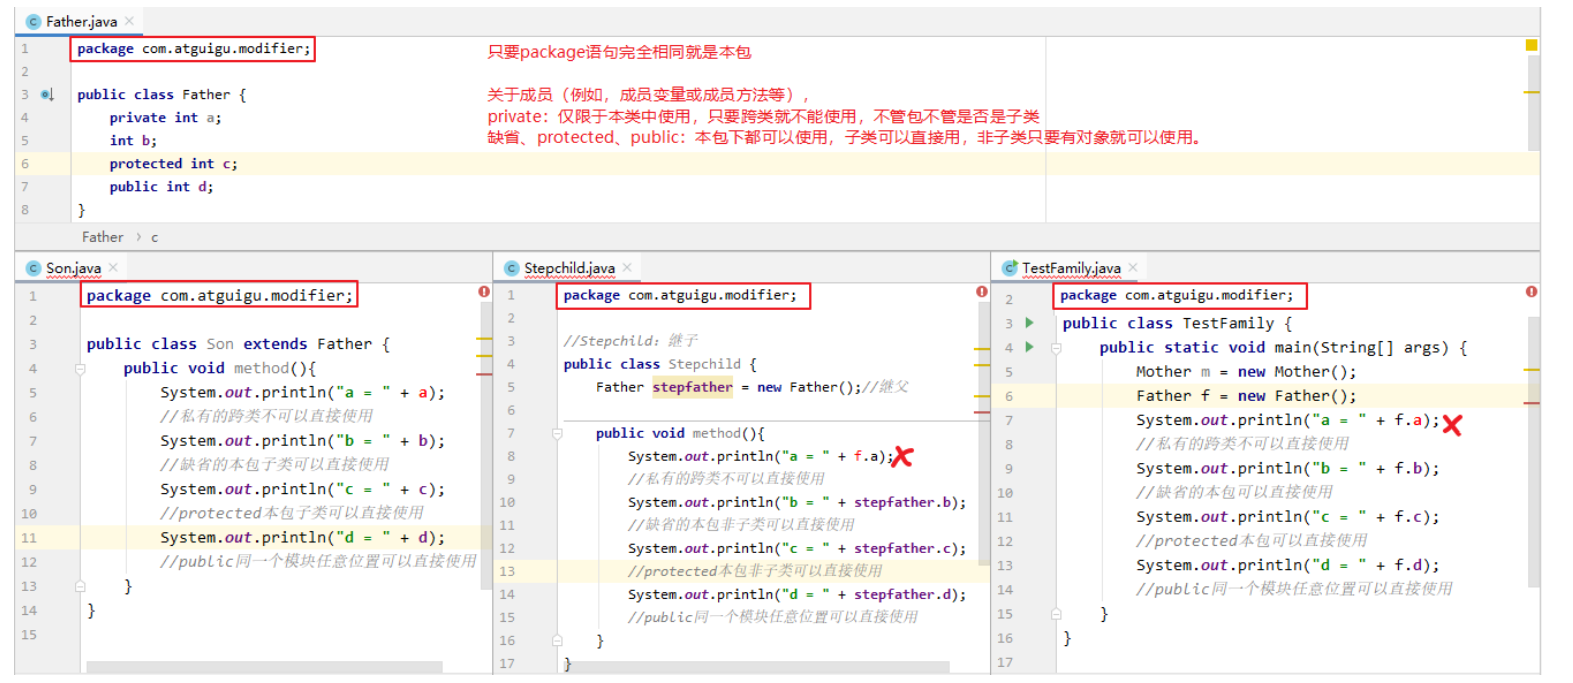
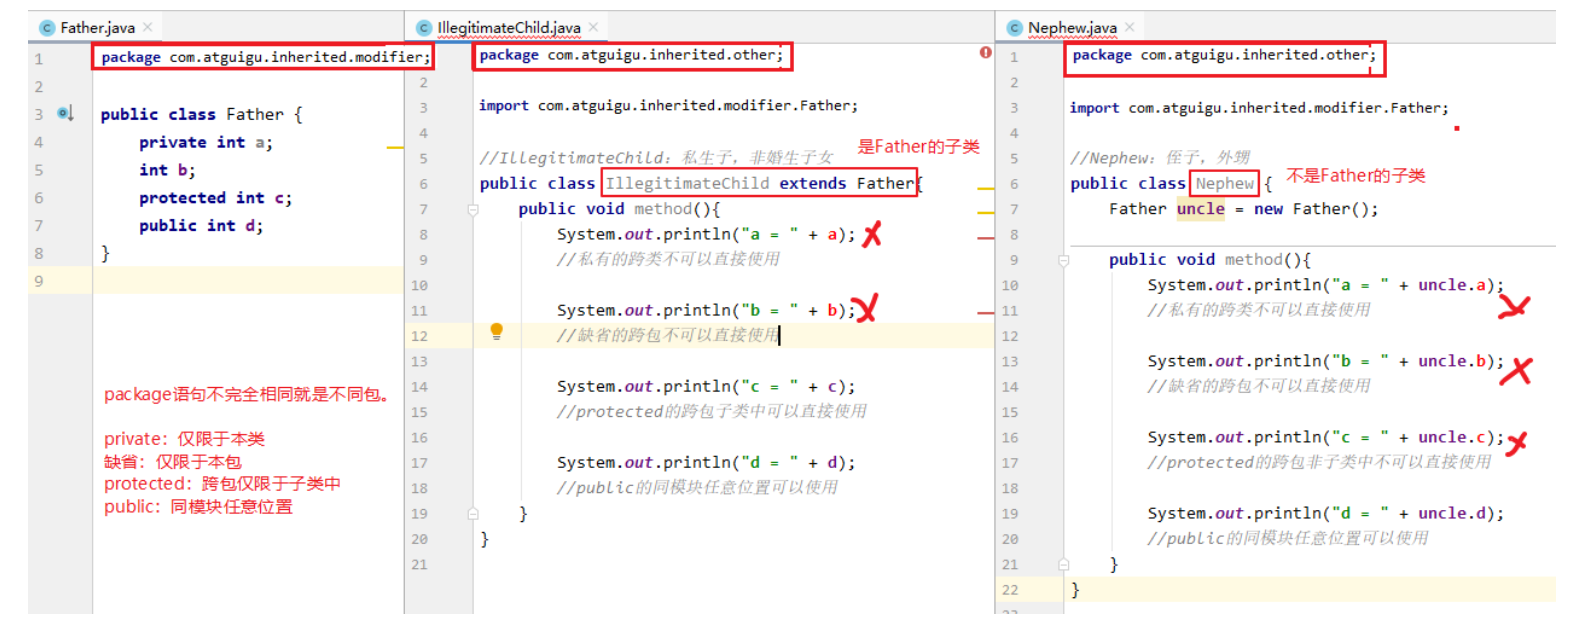
面向对象的基本特征 封装 隐藏对象内部的复杂性,只对外公开简单和可控的访问方式,从而提高系统的可扩展性、可维护性。通俗的讲,把该隐藏的隐藏起来,该暴露的暴露出来。这就是封装性的设计思想。(只关心使用,不关心如何实现,就和手机一个道理,你不会去关心手机如何实现的,只会在意手机卡不卡) 实现封装 依赖于权限修饰符,或者又称为访问控制符,修饰符如下,可用与成员方法或者成员属性 修饰符 本类 本包 其他包子类 其他包非子类 private √ × × × 缺省 √ √ × × protected √ √ √ × public √ √ √ √
1 2 3 4 5 6 7 private只能被本类访问 public 子类和其他包非子类都可以访问 protected 子类才可以访问,其他包非子类不可以访问 缺省 本包和本类才可以访问
成员变量选择哪种权限修饰符?实际上,习惯上,先声明为private,如果这个成员变量需要扩大它的可见性访问,那么可以把private修改为其他合适的修饰符 扩大到本包,可以使用缺省 扩大到其他包的子类,可以使用protected 扩大到任意位置,可以使用public 为什么? 其他包子类 1 2 3 4 5 6 7 8 9 10 11 12 13 14 15 16 17 18 package test1;public class Person { protected String name; } package test1.son;import test1.Person;public class Test2 extends Person { public void method () { System.out.println(name); } }
1 2 3 4 5 6 7 8 9 10 11 12 13 14 15 16 17 18 19 20 package test1;public class Person { protected String name; } package test1.noson;import test1.Person;public class Test3 { public static void main (String[] args) { Person s1 = new Person (); System.out.println(s1.name); } }
如何使用私有化的属性? 继承 1 2 3 4 Student is a Person Teacher is a Person //注意,下面的就不是is - a的关系 Car is not a Person
1 2 3 [修饰符] class 子类名 extends 父类名{ }
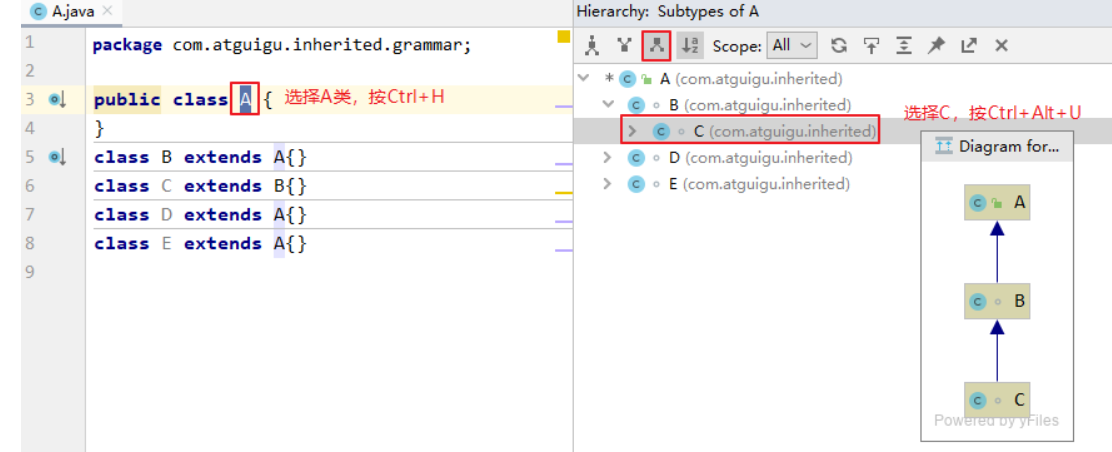
子类表示的事物范围大还是父类表示事物的范围大?Person类是父类 Student类是子类 子类的事物范围 < 父类的事物范围 子类更具体,里面的成员描述更多了 父类更抽象,笼统的描述信息更少 继承有什么特点 子类会继承父类的实例变量和实现方法 当子类对象被创建时,在堆中给对象申请内存时,就要看子类和父类都声明了什么实例变量,这些实例变量 都要分配内存(不管能不能访问的到)。 Java只支持单继承,不支持多重继承 1 2 3 4 5 6 public class A {}class B extends A {}class C extends B {} class C extends A ,B...
1 2 3 class A {}class B extends A {}class C extends B {}
1 2 3 4 class A {}class B extends A {}class D extends A {}class E extends A {}
例如:选择A类名,按Ctrl + H就会显示A类的继承树。
例如:在类继承目录树中选中某个类,比如C类,按Ctrl+ Alt+U就会用图形化方式显示C类的继承祖宗
权限修饰符问题 权限修饰符:public,protected,缺省,private
修饰符 本类 本包 其他包子类 其他包非子类 private √ × × × 缺省 √ √(本包子类非子类都可见) × × protected √ √(本包子类非子类都可见) √(其他包仅限于子类中可见) × public √ √ √ √
外部类:public和缺省
成员变量、成员方法等:public,protected,缺省,private
1.外部类要跨包使用必须是public,否则仅限于本包使用 (1)外部类的权限修饰符如果缺省,本包使用没问题
(2)外部类的权限修饰符如果缺省,跨包使用有问题
2.成员的权限修饰符问题 (1)本包下使用:成员的权限修饰符可以是public、protected、缺省
(2)跨包下使用:要求严格
(3)跨包使用时,如果类的权限修饰符缺省,成员权限修饰符>类的权限修饰符也没有意义
3.父类成员变量私有化(private)
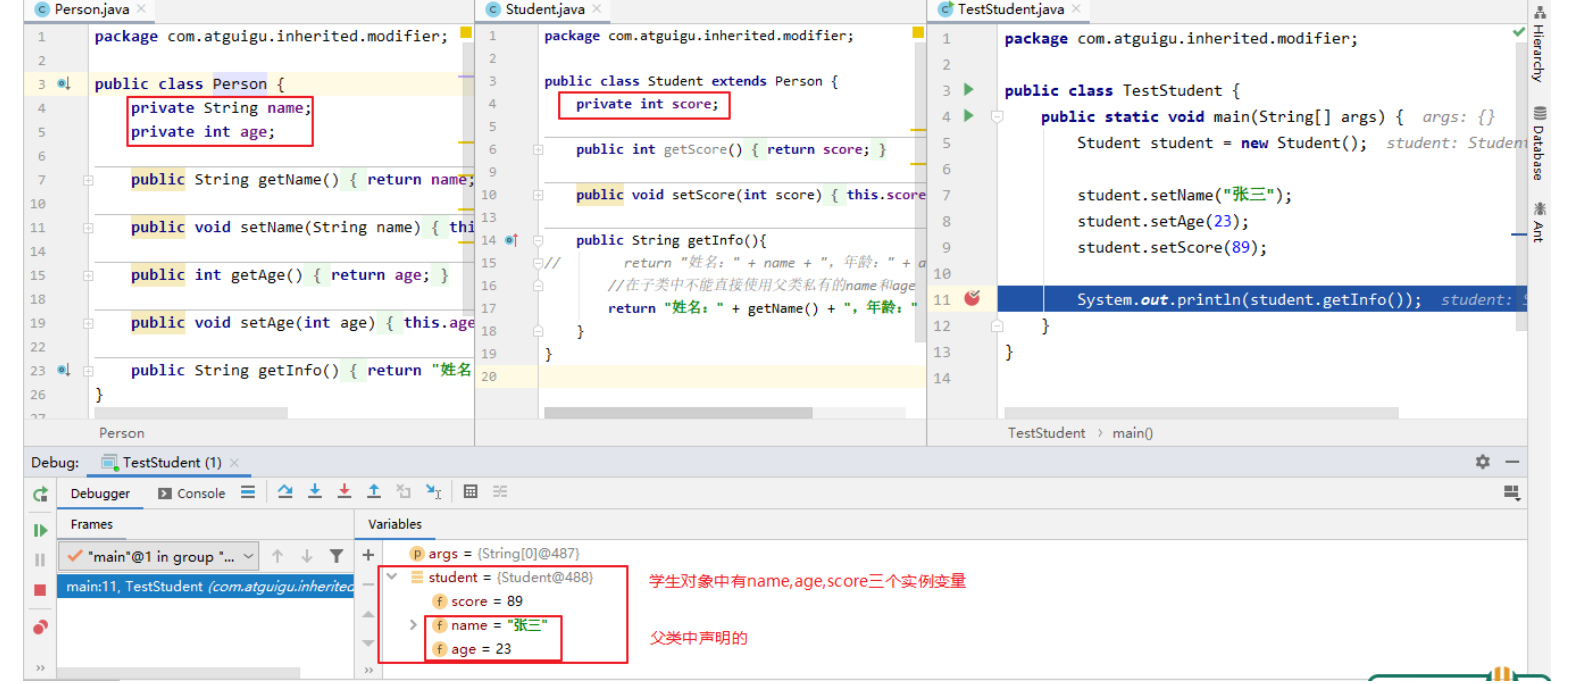
子类虽会继承父类私有(private)的成员变量,但子类不能对继承的私有成员变量直接进行访问,可通过继承的get/set方法进行访问。如图所示: 父类代码:
1 2 3 4 5 6 7 8 9 10 11 12 13 14 15 16 17 18 19 20 21 22 23 24 25 26 27 package com.atguigu.inherited.modifier;public class Person { private String name; private int age; public String getName () { return name; } public void setName (String name) { this .name = name; } public int getAge () { return age; } public void setAge (int age) { this .age = age; } public String getInfo () { return "姓名:" + name + ",年龄:" + age; } }
子类代码
1 2 3 4 5 6 7 8 9 10 11 12 13 14 15 16 17 18 19 20 package com.atguigu.inherited.modifier;public class Student extends Person { private int score; public int getScore () { return score; } public void setScore (int score) { this .score = score; } public String getInfo () { return "姓名:" + getName() + ",年龄:" + getAge(); } }
测试类代码:
1 2 3 4 5 6 7 8 9 10 11 12 13 package com.atguigu.inherited.modifier;public class TestStudent { public static void main (String[] args) { Student student = new Student (); student.setName("张三" ); student.setAge(23 ); student.setScore(89 ); System.out.println(student.getInfo()); } }
IDEA在Debug模式下查看学生对象信息:
重写(Override) 我们说父类的所有方法子类都会继承,但是当某个方法被继承到子类之后,子类觉得父类原来的实现不适合于子类,该怎么办呢?我们可以进行方法重写 (Override)
重写过程中,如果需要调用父类的方法,需要使用super关键字
1 2 3 4 5 6 7 8 9 10 11 12 13 14 15 package com.atguigu.inherited.method;public class Phone { public void sendMessage () { System.out.println("发短信" ); } public void call () { System.out.println("打电话" ); } public void showNum () { System.out.println("来电显示号码" ); } }
1 2 3 4 5 6 7 8 9 10 11 12 13 14 15 16 17 18 19 20 package com.atguigu.inherited.method;public class Smartphone extends Phone { public void showNum () { System.out.println("显示来电姓名" ); System.out.println("显示头像" ); super .showNum(); } @Override public void call () { super .call(); System.out.println("视频通话" ); } }
重写的要求 父类和子类之间,重写方法的名称相同
父类和子类之间,参数列表也要完全相同
返回值类型
如果是void和基本数据类型,返回值必须要相同 如果是引用数据类型子类重写方法的返回值类型必须要小于等于 父类方法的返回值类型父类的菜,你子类重写就应该小于等于菜,不能说重写返回值返回一个人类 子类方法的权限必须【大于等于】父类方法的权限修饰符。 注意:public > protected > 缺省 > private
父类私有方法不能重写
跨包的父类缺省的方法也不能重写
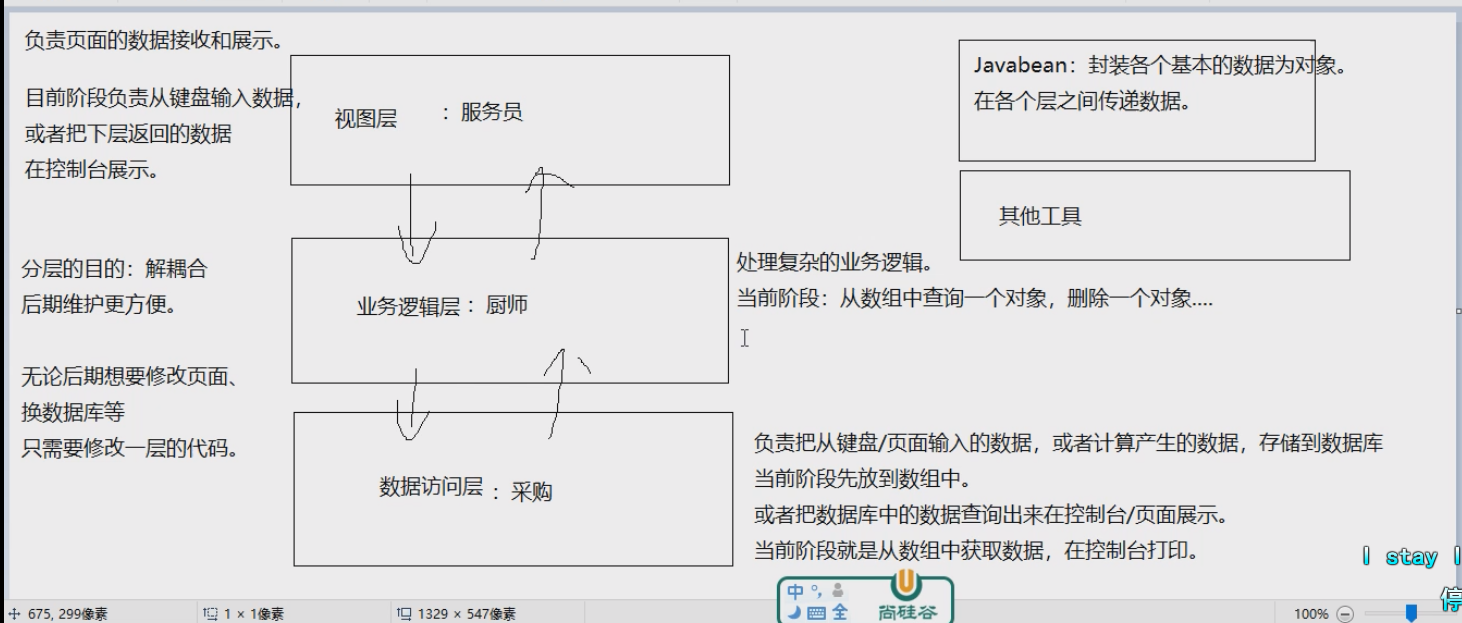
EMS项目结构
也就是视图层(view)包 业务逻辑层(service)包 数据访问层(dao)包 bean包或者domain包 多态 1 2 父类类型 变量名 = 子类对象; 且在调用的时候只能调用父类声明的方法,不能调用子类扩展的方法
编译类型取决于定义对象时 =号的左边,运行类型取决于 =号的右边 向上转型 1 2 3 只要满足对象是这个要赋值变量的子类型即可 Person p1 = new Man(); //Man继承了Person类
向下转型 如果需要调用子类扩展的方法 的时候,必须要向下转型,通过强制类型转换完成,这样才能通过编译,对象的本质类型从头到尾都没有变化,只是骗编译器的 1 2 父类类型 变量名 = 子类对象; 且在调用的时候只能调用父类声明的方法,不能调用子类扩展的方法,但是在堆当中已经有对应的方法了,只是编译器不让你调用
怎么才能成功向下转型? 运行类型类型怎么看?就是new单词后面的类型 大小可以理解为范围的大小,比如人类的范围肯定比男人要大,所以男人<人类 1 2 3 4 5 6 7 8 9 10 11 12 13 14 15 16 17 18 19 20 21 22 23 24 25 对象的运行类型必须要 <= ()中向下转的类型 Person p1 = new Man ();Man temp1 = (Man) p1;Person p2 = new ChineseMan ();Man temp2 = (Man)p2;Person p3 = new Man ();Man temp3 = (Woman)p3;Person p4 = new Person ();Man temp4 = (Man)p4;
如何避免向下转型编译通过,运行发生ClassCastException? 1 2 3 4 语法格式 变量/对象 instanceof 类型 instanceof的作用是判断某个变量/对象的运行类型是否<=instanceof后面写的类型 (前端作用是:instanceof 运算符用于检测构造函数的 prototype 属性是否出现在某个实例对象的原型链上。)
注意 在成员变量:没有多态的概念,变量的寻找只看编译时类型,没有编译时类型和运行时类型不一致这个说法 在成员方法:有多态的概念,编译时看父类,运行时看子类,如果子类重写了,一定是执行子类重写的方法体; 构造器 构造器的修饰符只能是public,protected,缺省,private,不能有static,final
构造器的名称不能随意乱写,只能也一定要和类名完全一致,包括大小写
如果没有创建任何构造器,那么编译器会添加一个和class类前面的权限修饰符一致的默认构造器(如果手动写了任意一个构造器,则不会添加默认构造器)
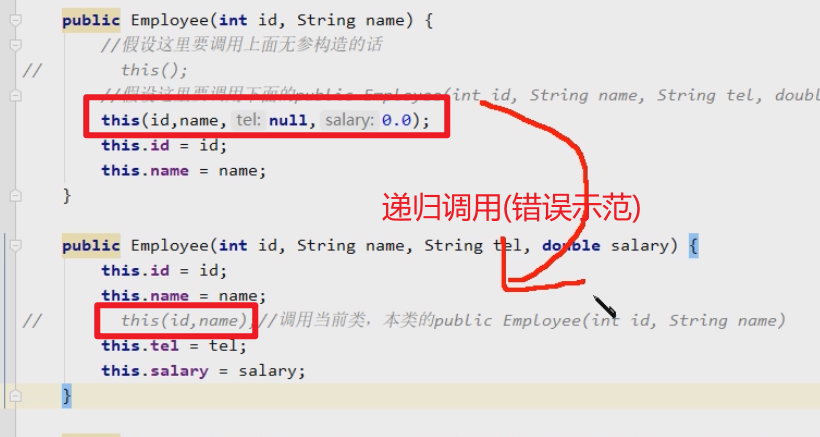
同一个类中构造器相互调用 this()调用本类的无参构造器this(实参列表)调用本类的有参构造器this()和this(实参列表)只能出现在构造器首行 不能出现递归调用
构造器在继承时的要求 父类构造器不会继承到子类中
父类的构造器和子类有没有关系?
子类在继承父类的时,默认会在子类的构造器首行加一句代码super(),表示调用父类的无参构造器 父类中只有无参构造或者没有写构造函数(默认构造函数)
父类中只有有参构造
子类首行必须要添加super(父类所有实参列表),否则会调用(也就是要调用父类的构造函数) 父类中既有无参构造函数,又有有参构造函数
写了super(),就表示调用父类的无参构造 写了super(实参列表),就表示调用父类的有参构造 为什么子类的构造器一定要调用父类的构造器呢?
因为子类会继承父类所有的成员变量,那么在new子类对象的时候,必须要为这些继承成员变量”初始化” super()表示调用父类的无参构造,可以省略
super(实参列表),表示调用父类的有参构造,不能省略
如果要写他们,都必须要在构造器的首行,而且不能与this(),this(实参列表)在同一个构造器中出现
非静态代码块 作用:用来给实例变量初始化的
意义:把多个构造器的代码抽离出来,写到代码块中,减少代码冗余
特点:
代码块中的代码会自动执行 当new对象时,会自动执行,不new对象不会执行 每new一个对象,执行一次 无论它写在哪里,都是比构造器先执行 比如需要n个构造器都执行一段代码,怎么办?难不成n个构造器都写入代码吗?太不方便了,所以可以这样子
1 2 3 4 5 6 7 8 9 10 11 12 13 14 public class Student { { System.out.println("新用户注册" ); this .currentTime = System.currentTimeMillis(); } public Student () { } public Student (String name) { } }
1 2 3 4 5 6 7 8 9 10 11 【修饰符】 class 类{ { 非静态代码块 } 【修饰符】 构造器名(){ } 【修饰符】 构造器名(参数列表){ } }
实例初始化过程 new调用构造器,本质上是执行它对应的<init>方法 每一个构造器都会有自己对应的<init>方法,它由下面这些代码组成:A:super()或者super(实参列表)(已经不仅仅代表父类的构造器,而且还代码父类构造器对应的init方法) B:当前类的 实例变量声明后的显式赋值表达式语句和非静态代码块 (这二个按照代码块编写的顺序依次组装) C:构造器剩下的代码(除了super()或者super(实参列表)的代码) final 在类前,代表这个类都不能被继承 在方法名前,代表方法只能被继承,不能被重写 在变量名前,代表这个变量不能被修改,也就是常量 1 2 3 4 class MyDate { private final int year; }
Object根父类 既然Object是所有类的父类,那么Object类型的变量,可以和任意类型的对象构成”多态引用” 1 2 3 Object obj1 = "hello" ;Object obj2 = new Student ();Object obj3 = new Scanner (System.in);
java规定,Object[]数组,可以接收任意类型的对象数组 java规定,int[],char[]等,它们之间是不能互相转换,它们和Object[]之间也不能互相转换 1 2 3 4 5 6 7 Object[] arr1 = new String [5 ]; Object[] arr2 = new int [10 ]; Object[] arr3 = new char [10 ]; Object arr4 = new int [5 ];
Object类中方法 public String toString(); 用法
说明
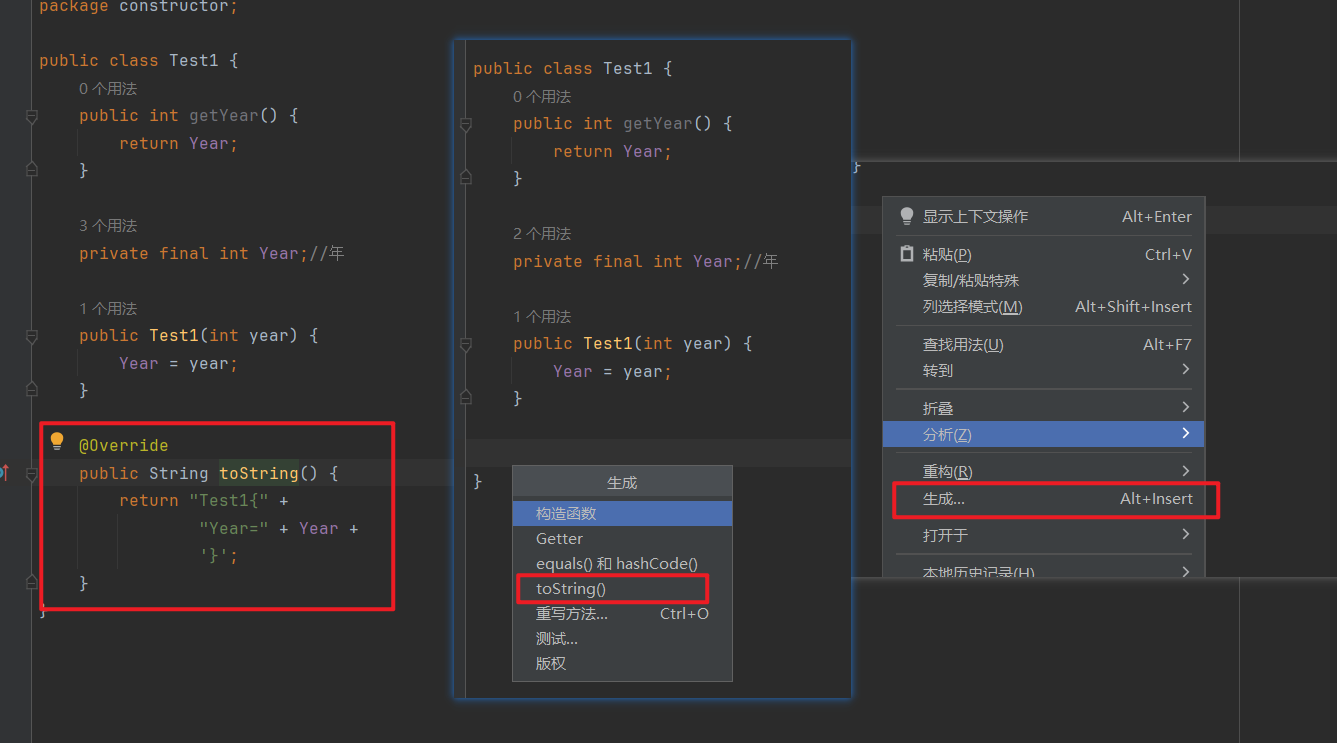
如果子类没有重写,继承的Object类的toString默认返回的是 对象的运行时类型@对象的hashCode值的十六进制值 重写toString方法
public final Class<?> getClass() 1 2 3 4 5 6 7 Object o1 = new Student ("李白" ,"男" );System.out.println(o1.getClass()); Student temp1 = new Student ("李黑" ,"男" );System.out.println(temp1.getClass());
public boolean equals(Object obj); 用于判断当前对象this和指定对象obj是否”相等” 默认情况下,equals方法的实现等价于与“==”,比较的是对象的地址值 我们可以选择重写,重写有些要求:自反性 自己和自己比较一定返回true x.equals(x)一定返回true 对程序x.equals(y)如果返回true,那么y.equals(x)也要返回true 传递性 一致性:x.equals(y)如果在前面调用时返回true,这2个对象参与equals比较的属性没有修改的话,那么在后面调用结果也要返回true 非空对象与null比较,永远是falsex.equals(null)一定是false null.equals(x)错误,会报空指针异常 public native int hashCode() 1 2 3 4 5 6 7 8 9 10 11 12 13 14 15 16 17 18 19 20 21 22 23 24 25 26 public native int hashCode():返回该对象的哈希码值。支持此方法是为了提高哈希表(例如 java.util.Hashtable 提供的哈希表)的性能。 哈希表示一个数组+链表或数组+链表/红黑树的结构。 数组的优点: 根据[下标]可以快速的定位到某个元素。 哈希表是一个容器,用来装对象。当哈希表中的对象有很多的时候,要查询到某个对象是否存在,工作会很大。 如何提高查询的效率?希望能够充分利用数组的优点。 但是,对于任意一个对象来说,它在查找之前,并不知道它的[下标]。 问题就转换为,如何找到快速的计算下标的方式。 [下标】 = 对象的hashCode值 & (数组的长度 - 1)。 哈希表存储对象就是这个公式来定位存储位置。 hashCode值 & (数组的长度 - 1) 计算的结果范围[0, 数组的长度-1] 因为Java中hashCode值是通过某个“算法”计算出来的一个int值,那么这个算法,可能是某个散列函数,可能是某个JVM地址值等。 本类Java希望,不同的对象,它的hashCode值是不同的,但是现实中,可能出现,两个不同的Java对象,它的hashCode相等了。 (1)如果两个对象equals返回true,那么这两个的hashCode一定要相同。 (2)如果两个对象hashCode值不相同,那么这两个对象equals也一定要不相等。 (3)如果两个对象的hashCode相同的,那么这个两个对象equals不一定相同 在重写equals方法时,一定要一起重写hashCode方法,保持它俩的上述规定。
public int hashCode():返回每个对象的hash值。 如果重写equals,那么通常会一起重写hashCode()方法,hashCode()方法主要是为了当对象存储到哈希表(后面集合章节学习)等容器中时提高存储和查询性能用的,这是因为关于hashCode有两个常规协定:
①如果两个对象的hash值是不同的,那么这两个对象一定不相等; ②如果两个对象的hash值是相同的,那么这两个对象不一定相等。 重写equals和hashCode方法时,要保证满足如下要求:
①如果两个对象调用equals返回true,那么要求这两个对象的hashCode值一定是相等的;
②如果两个对象的hashCode值不同的,那么要求这个两个对象调用equals方法一定是false;
③如果两个对象的hashCode值相同的,那么这个两个对象调用equals可能是true,也可能是false
1 2 3 4 public static void main (String[] args) { System.out.println("Aa" .hashCode()); System.out.println("BB" .hashCode()); }
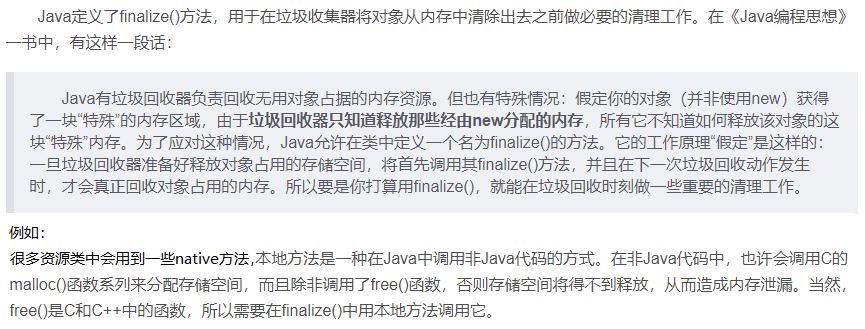
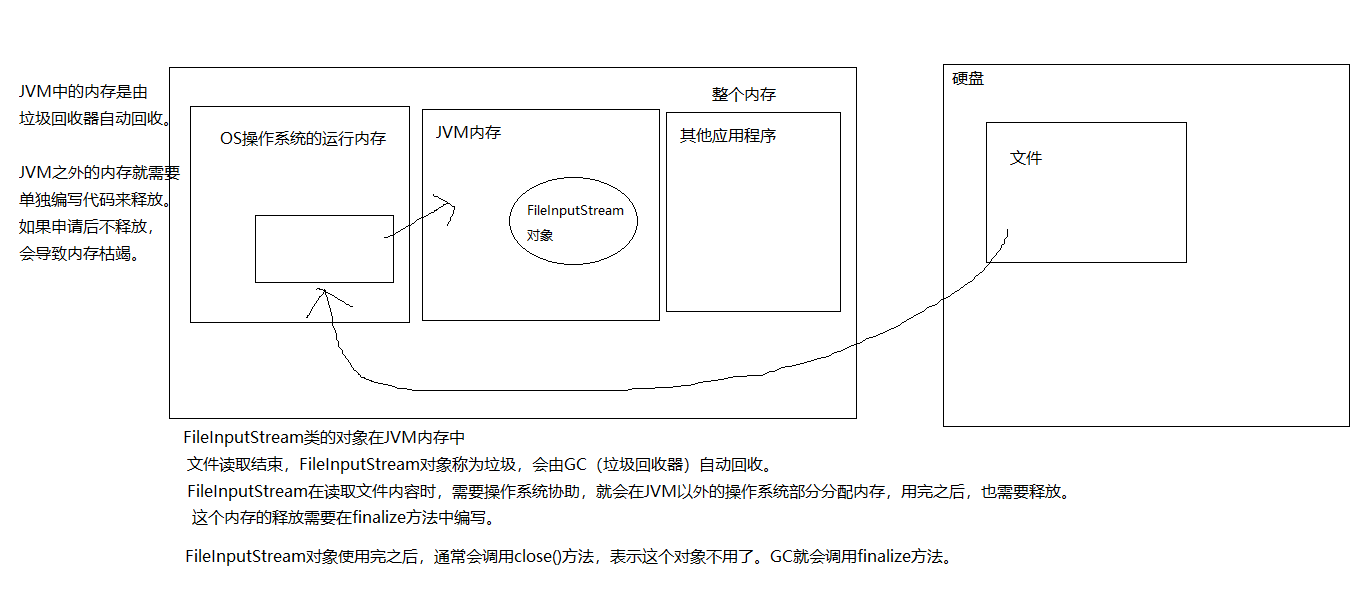
finalize protected void finalize():用于最终清理内存的方法
演示finalize()方法被调用:
1 2 3 4 5 6 7 8 9 10 11 12 13 14 15 16 17 18 19 20 21 22 23 24 25 26 27 28 29 30 31 32 33 34 35 36 package com.atguigu.api;public class TestFinalize { public static void main (String[] args) throws Throwable{ for (int i=1 ; i <=10 ; i++){ MyDemo my = new MyDemo (i); } System.gc(); Thread.sleep(5000 ); } } class MyDemo { private int value; public MyDemo (int value) { this .value = value; } @Override public String toString () { return "MyDemo{" + "value=" + value + '}' ; } @Override protected void finalize () throws Throwable { System.out.println(this + "轻轻的走了,不带走一段代码...." ); } }
每一个对象的finalize()只会被调用一次,哪怕它多次被标记为垃圾对象。当一个对象没有有效的引用/变量指向它,那么这个对象就是垃圾对象。GC(垃圾回收器)通常会在第一次回收某个垃圾对象之前,先调用一下它的finalize()方法,然后再彻底回收它。但是如果在finalize()方法,这个垃圾对象“复活”了(即在finalize()方法中意外的又有某个引用指向了当前对象,这是要避免的),被“复活”的对象如果再次称为垃圾对象,GC就不再调用它的finalize方法了,避免这个对象称为“僵尸”。
1 2 3 4 5 6 7 8 9 10 11 12 13 14 15 16 17 18 19 20 21 22 23 24 25 26 27 28 29 30 31 32 33 34 35 36 37 38 39 40 41 42 43 44 45 46 47 48 49 50 51 52 53 54 55 56 57 58 59 60 61 package com.atguigu.api;public class TestFinalize { private static MyDemo[] arr = new MyDemo [10 ]; private static int total; public static void add (MyDemo demo) { arr[total++] = demo; } public static void main (String[] args) throws Throwable{ for (int i=1 ; i <=10 ; i++){ MyDemo my = new MyDemo (i); } System.gc(); Thread.sleep(5000 ); for (int i = 0 ; i < arr.length; i++) { System.out.println(arr[i]); } for (int i = 0 ; i < arr.length; i++) { arr[i] = null ; System.out.println(arr[i]); } arr = null ; System.gc(); Thread.sleep(5000 ); } } class MyDemo { private int value; public MyDemo (int value) { this .value = value; } @Override public String toString () { return "MyDemo{" + "value=" + value + '}' ; } @Override protected void finalize () throws Throwable { System.out.println("我轻轻的走了,不带走一段代码...." ); TestFinalize.add(this ); } }
面试题:对finalize()的理解?
当对象被GC确定为要被回收的垃圾,在回收之前由GC帮你调用这个方法,不是由程序员手动调用。
这个方法与C语言的析构函数不同,C语言的析构函数被调用,那么对象一定被销毁,内存被回收,而finalize方法的调用不一定会销毁当前对象,因为可能在finalize()中出现了让当前对象“复活”的代码
每一个对象的finalize方法只会被调用一次,就算对象在finalize方法中被复活了,下次GC就不调用它的finalize方法了。
子类可以选择重写,一般用于彻底释放一些资源对象,而且这些资源对象往往时通过C/C++等代码申请的资源内存
静态 7.1.1 静态关键字(static) 在类中声明的实例变量,其值是每一个对象独立的。但是有些成员变量的值不需要或不能每一个对象单独存储一份,即有些成员变量和当前类的对象无关。
在类中声明的实例方法,在类的外面必须要先创建对象,才能调用。但是有些方法的调用和当前类的对象无关,那么创建对象就有点麻烦了。
此时,就需要将和当前类的对象无关的成员变量、成员方法声明为静态的(static)。
7.1.2 静态变量 1、语法格式 有static修饰的成员变量就是静态变量。
1 2 3 【修饰符】 class 类{ 【其他修饰符】 static 数据类型 静态变量名; }
2、静态变量的特点 静态变量的默认值规则和实例变量一样。
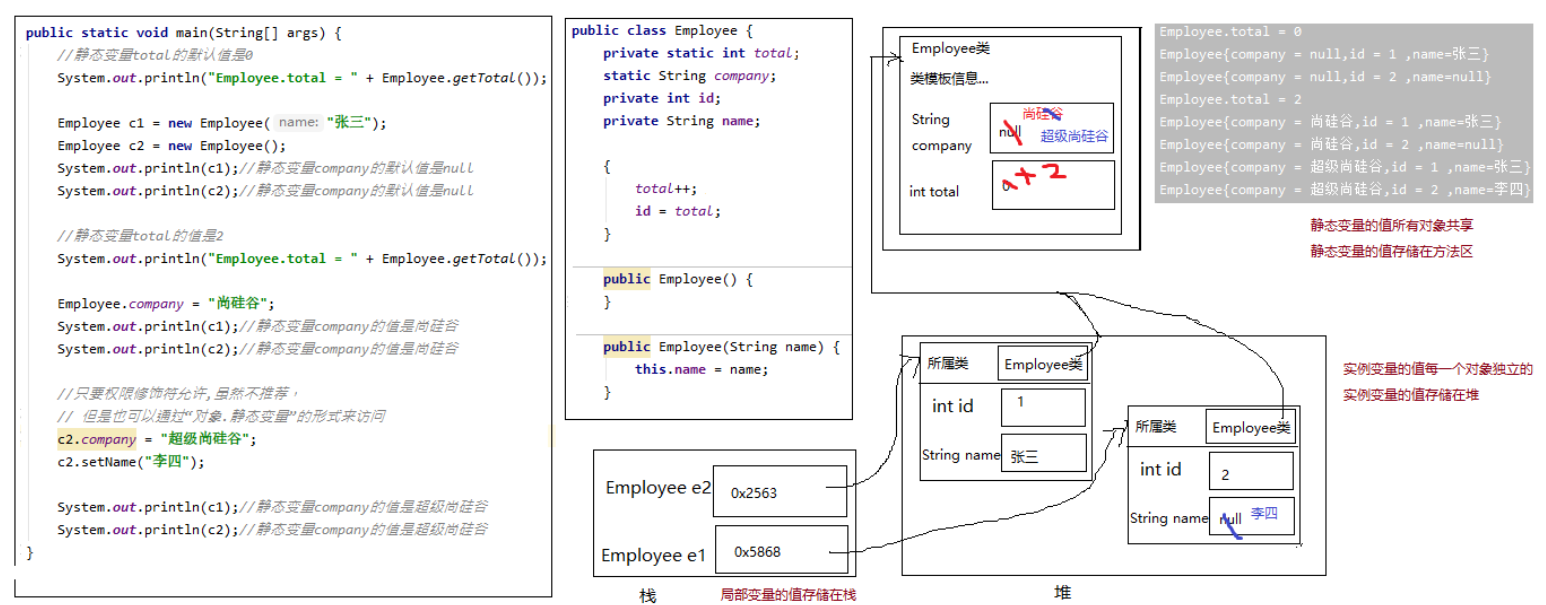
静态变量值是所有对象共享。
静态变量的值存储在方法区 。
静态变量在本类中,可以在任意方法、代码块、构造器中直接使用。
如果权限修饰符允许,在其他类中可以通过“类名.静态变量”直接访问,也可以通过“对象.静态变量”的方式访问(但是更推荐使用类名.静态变量的方式)。
静态变量的get/set方法也静态的,当局部变量与静态变量重名时,使用“类名.静态变量”进行区分。
分类 数据类型 默认值 基本类型 整数(byte,short,int,long) 0 浮点数(float,double) 0.0 字符(char) ‘\u0000’ 布尔(boolean) false 数据类型 默认值 引用类型 数组,类,接口 null
演示:
1 2 3 4 5 6 7 8 9 10 11 12 13 14 15 16 17 18 19 20 21 22 23 24 25 26 27 28 29 30 31 32 33 34 35 36 37 38 39 40 41 42 43 44 45 46 47 48 49 50 package com.atguigu.keyword;public class Employee { private static int total; static String company; private int id; private String name; { total++; id = total; } public Employee () { } public Employee (String name) { this .name = name; } public void setId (int id) { this .id = id; } public int getId () { return id; } public String getName () { return name; } public void setName (String name) { this .name = name; } public static int getTotal () { return total; } public static void setTotal (int total) { Employee.total = total; } @Override public String toString () { return "Employee{company = " + company + ",id = " + id + " ,name=" + name +"}" ; } }
1 2 3 4 5 6 7 8 9 10 11 12 13 14 15 16 17 18 19 20 21 22 23 24 package com.atguigu.keyword;public class TestStaticVariable { public static void main (String[] args) { System.out.println("Employee.total = " + Employee.getTotal()); Employee c1 = new Employee ("张三" ); Employee c2 = new Employee (); System.out.println(c1); System.out.println(c2); System.out.println("Employee.total = " + Employee.getTotal()); Employee.company = "尚硅谷" ; System.out.println(c1); System.out.println(c2); c1.company = "超级尚硅谷" ; System.out.println(c1); System.out.println(c2); } }
3、静态变量内存分析
4、静态类变量和非静态实例变量、局部变量 静态类变量(简称静态变量):存储在方法区,有默认值,所有对象共享,生命周期和类相同,还可以有权限修饰符、final等其他修饰符 非静态实例变量(简称实例变量):存储在堆中,有默认值,每一个对象独立,生命周期每一个对象也独立,还可以有权限修饰符、final等其他修饰符 局部变量:存储在栈中,没有默认值,每一次方法调用都是独立的,有作用域,只能有final修饰,没有其他修饰符 注意下 ,局部变量是在{}中的,形参,代码块{}中,而成员变量是类中方法外7.1.3 静态方法 1、语法格式 有static修饰的成员方法就是静态方法。
1 2 3 4 5 【修饰符】 class 类{ 【其他修饰符】 static 返回值类型 方法名(形参列表){ 方法体 } }
2、静态方法的特点 静态方法在本类的任意方法、代码块、构造器中都可以直接被调用。 只要权限修饰符允许 ,静态方法在其他类中可以通过“类名.静态方法“的方式调用。也可以通过”对象.静态方法“的方式调用(但是更推荐使用类名.静态方法的方式)。 静态方法可以被子类继承,但不能被子类重写 。静态方法的调用都只看编译时类型。 1 2 3 4 5 6 7 8 9 10 11 package com.atguigu.keyword;public class Father { public static void method () { System.out.println("Father.method" ); } public static void fun () { System.out.println("Father.fun" ); } }
1 2 3 4 5 6 7 8 package com.atguigu.keyword;public class Son extends Father { public static void fun () { System.out.println("Son.fun" ); } }
1 2 3 4 5 6 7 8 9 10 11 package com.atguigu.keyword;public class TestStaticMethod { public static void main (String[] args) { Father.method(); Son.method(); Father f = new Son (); f.method(); } }
7.1.4 静态代码块 如果想要为静态变量初始化,可以直接在静态变量的声明后面直接赋值,也可以使用静态代码块。
1、语法格式 在代码块的前面加static,就是静态代码块 。
1 2 3 4 5 【修饰符】 class 类{ static { 静态代码块 } }
2、静态代码块的特点 每一个类的静态代码块只会执行一次 。(注意区分普通的代码块)
静态代码块的执行优先于非静态代码块和构造器。
1 2 3 4 5 6 7 8 9 10 11 12 13 14 15 16 17 18 19 20 21 package com.atguigu.keyword;public class Chinese { private static String country; private String name; { System.out.println("非静态代码块,country = " + country); } static { country = "中国" ; System.out.println("静态代码块" ); } public Chinese (String name) { this .name = name; } }
1 2 3 4 5 6 7 8 9 package com.atguigu.keyword;public class TestStaticBlock { public static void main (String[] args) { Chinese c1 = new Chinese ("张三" ); Chinese c2 = new Chinese ("李四" ); } }
3、静态代码块和非静态代码块 静态代码块在类初始化时执行,只执行一次
非静态代码块在实例初始化时执行,每次new对象都会执行
7.1.5 类初始化 (1)类的初始化就是为静态变量初始化。实际上,类初始化的过程时在调用一个()方法,而这个方法是编译器自动生成的。编译器会将如下两部分的所有 代码,按顺序 合并到类初始化()方法体中。
(2)每个类初始化只会进行一次,如果子类初始化时,发现父类没有初始化,那么会先初始化父类。
(3)类的初始化一定优先于实例初始化。
1、类初始化代码只执行一次 1 2 3 4 5 6 7 8 9 10 11 12 13 14 15 16 package com.atguigu.keyword;public class Fu { static { System.out.println("Fu静态代码块1,a = " + Fu.a); } private static int a = 1 ; static { System.out.println("Fu静态代码块2,a = " + a); } public static void method () { System.out.println("Fu.method" ); } }
1 2 3 4 5 6 7 package com.atguigu.keyword;public class TestClassInit { public static void main (String[] args) { Fu.method(); } }
2、父类优先于子类初始化 1 2 3 4 5 6 7 package com.atguigu.keyword;public class Zi extends Fu { static { System.out.println("Zi静态代码块" ); } }
1 2 3 4 5 6 7 package com.atguigu.keyword;public class TestZiInit { public static void main (String[] args) { Zi z = new Zi (); } }
3、类初始化优先于实例初始化 1 2 3 4 5 6 7 8 9 10 11 12 13 14 15 16 17 18 19 20 21 22 23 package com.atguigu.keyword;public class Fu { static { System.out.println("Fu静态代码块1,a = " + Fu.a); } private static int a = 1 ; static { System.out.println("Fu静态代码块2,a = " + a); } { System.out.println("Fu非静态代码块" ); } public Fu () { System.out.println("Fu构造器" ); } public static void method () { System.out.println("Fu.method" ); } }
1 2 3 4 5 6 7 8 9 10 11 12 13 package com.atguigu.keyword;public class Zi extends Fu { static { System.out.println("Zi静态代码块" ); } { System.out.println("Zi非静态代码块" ); } public Zi () { System.out.println("Zi构造器" ); } }
1 2 3 4 5 6 7 8 package com.atguigu.keyword;public class TestZiInit { public static void main (String[] args) { Zi z1 = new Zi (); Zi z2 = new Zi (); } }
7.1.6 静态和非静态的区别 1、本类中的访问限制区别 静态的类变量和静态的方法可以在本类的任意方法、代码块、构造器中直接访问。
非静态的实例变量和非静态的方法==只能==在本类的非静态的方法、非静态代码块、构造器中直接访问。
即:
静态直接访问静态,可以 非静态直接访问非静态,可以 非静态直接访问静态,可以 静态直接访问非静态 ,不可以比如在main方法无法调用非静态的方法,只能调用实例身上的方法或者是静态方法 2、在其他类的访问方式区别 静态的类变量和静态的方法可以通过“类名.”的方式直接访问;也可以通过“对象.”的方式访问。(但是更推荐使用==”类名.”==的方式)
非静态的实例变量和非静态的方法==只能==通过“对象.”方式访问。
3、this和super的使用 静态的方法和静态的代码块中,==不允许==出现this和super关键字,如果有重名问题,使用“类名.”进行区别。
非静态的方法和非静态的代码块中,可以使用this和super关键字。
7.1.7 静态导入 如果大量使用另一个类的静态成员,可以使用静态导入,简化代码。
1 2 import static 包.类名.静态成员名;import static 包.类名.*;
演示:
1 2 3 4 5 6 7 8 9 10 11 12 13 14 15 16 17 18 package com.atguigu.keyword;import static java.lang.Math.*;public class TestStaticImport { public static void main (String[] args) { System.out.println(Math.PI); System.out.println(Math.sqrt(9 )); System.out.println(Math.random()); System.out.println("----------------------------" ); System.out.println(PI); System.out.println(sqrt(9 )); System.out.println(random()); } }
枚举 7.2.1 概述 某些类型的对象是有限的几个,这样的例子举不胜举:
星期:Monday(星期一)……Sunday(星期天) 性别:Man(男)、Woman(女) 月份:January(1月)……December(12月) 季节:Spring(春节)……Winter(冬天) 支付方式:Cash(现金)、WeChatPay(微信)、Alipay(支付宝)、BankCard(银行卡)、CreditCard(信用卡) 员工工作状态:Busy(忙)、Free(闲)、Vocation(休假) 订单状态:Nonpayment(未付款)、Paid(已付款)、Fulfilled(已配货)、Delivered(已发货)、Checked(已确认收货)、Return(退货)、Exchange(换货)、Cancel(取消) 枚举类型本质上也是一种类,只不过是这个类的对象是固定的几个,而不能随意让用户创建。
在JDK1.5之前,需要程序员自己通过特殊的方式来定义枚举类型。
在JDK1.5之后,Java支持enum关键字来快速的定义枚举类型。
7.2.2 JDK1.5之前 在JDK1.5之前如何声明枚举类呢?
构造器加private私有化 本类内部创建一组常量对象,并添加public static修饰符,对外暴露这些常量对象 示例代码:
1 2 3 4 5 6 7 8 9 10 11 12 13 14 15 16 17 18 19 20 21 22 public class Season { public static final Season SPRING = new Season (); public static final Season SUMMER = new Season (); public static final Season AUTUMN = new Season (); public static final Season WINTER = new Season (); private Season () { } public String toString () { if (this == SPRING){ return "春" ; }else if (this == SUMMER){ return "夏" ; }else if (this == AUTUMN){ return "秋" ; }else { return "冬" ; } } }
1
2
3
4
5
6
public class TestSeason { public static void main (String[] args) { Season spring = Season.SPRING; System.out.println(spring); } }
7.2.3 JDK1.5之后 1、enum关键字声明枚举 1 2 3 4 5 6 7 8 9 【修饰符】 enum 枚举类名{ 常量对象列表 } 【修饰符】 enum 枚举类名{ 常量对象列表; 其他成员列表; }
示例代码:
1 2 3 4 5 package com.atguigu.enumeration;public enum Week { MONDAY,TUESDAY,WEDNESDAY,THURSDAY,FRIDAY,SATURDAY,SUNDAY }
1 2 3 4 5 6 public class TestEnum { public static void main (String[] args) { Season spring = Season.SPRING; System.out.println(spring); } }
2、枚举类的要求和特点 枚举类的要求和特点:
枚举类的常量对象列表必须在枚举类的首行,因为是常量,所以建议大写。 如果常量对象列表后面没有其他代码,那么“;”可以省略,否则不可以省略“;”。 编译器给枚举类默认提供的是private的无参构造,如果枚举类需要的是无参构造,就不需要声明,写常量对象列表时也不用加参数, 如果枚举类需要的是有参构造,需要手动定义,有参构造的private可以省略,调用有参构造的方法就是在常量对象名后面加(实参列表)就可以。 枚举类默认继承的是java.lang.Enum类,因此不能再继承其他的类型。 JDK1.5之后switch,提供支持枚举类型,case后面可以写枚举常量名。 枚举类型如有其它属性,建议(不是必须 )这些属性也声明为final的,因为常量对象在逻辑意义上应该不可变。 示例代码:
1 2 3 4 5 6 7 8 9 10 11 12 13 14 15 16 17 18 19 20 21 22 package com.atguigu.enumeration;public enum Week { MONDAY("星期一" ), TUESDAY("星期二" ), WEDNESDAY("星期三" ), THURSDAY("星期四" ), FRIDAY("星期五" ), SATURDAY("星期六" ), SUNDAY("星期日" ); private final String description; private Week (String description) { this .description = description; } @Override public String toString () { return super .toString() +":" + description; } }
1 2 3 4 5 6 7 8 9 10 11 12 13 14 15 16 17 18 19 20 21 22 23 24 25 package com.atguigu.enumeration;public class TestWeek { public static void main (String[] args) { Week week = Week.MONDAY; System.out.println(week); switch (week){ case MONDAY: System.out.println("怀念周末,困意很浓" );break ; case TUESDAY: System.out.println("进入学习状态" );break ; case WEDNESDAY: System.out.println("死撑" );break ; case THURSDAY: System.out.println("小放松" );break ; case FRIDAY: System.out.println("又信心满满" );break ; case SATURDAY: System.out.println("开始盼周末,无心学习" );break ; case SUNDAY: System.out.println("一觉到下午" );break ; } } }
3、枚举类型常用方法 1 2 3 4 5 1. String toString () : 默认返回的是常量名(对象名),可以继续手动重写该方法!2. String name () :返回的是常量名(对象名)3. int ordinal () :返回常量的次序号,默认从0 开始4. 枚举类型[] values():返回该枚举类的所有的常量对象,返回类型是当前枚举的数组类型,是一个静态方法5. 枚举类型 valueOf(String name):根据枚举常量对象名称获取枚举对象
示例代码:
1 2 3 4 5 6 7 8 9 10 11 12 13 14 15 16 17 18 19 20 21 22 23 24 25 26 package com.atguigu.enumeration;import java.util.Scanner;public class TestEnumMethod { public static void main (String[] args) { Week[] values = Week.values(); for (int i = 0 ; i < values.length; i++) { System.out.println((values[i].ordinal()+1 ) + "->" + values[i].name()); } System.out.println("------------------------" ); Scanner input = new Scanner (System.in); System.out.print("请输入星期值:" ); int weekValue = input.nextInt(); Week week = values[weekValue-1 ]; System.out.println(week); System.out.print("请输入星期名:" ); String weekName = input.next(); week = Week.valueOf(weekName); System.out.println(week); input.close(); } }
技巧 快速输出println 快速输出printf 上一个值打印输出 1 2 3 4 5 String a = input.next();soutv System.out.println("a = " + a);
遍历数组
1 2 3 for (int i = 0; i < nums.length; i++) { int num = nums[i]; }
迭代可迭代的对象或数组
1 2 3 for (int num : nums) { }
for循环当中可以定义多个变量~
1 2 3 4 5 6 7 8 9 10 public int [] getAllPrimeNumber(){ if (value <=0 ) return new int [0 ]; int [] tempArray = new int [approximateNumberCount()]; for (int i = 1 ,index = 0 ; i <= value; i++){ if (value % i == 0 ){ tempArray[index++] = i; } } return tempArray; }
查看调用方法的形参可以输入哪些,快捷键Ctrl + p
让当前程序歇一会Thread.sleep(5000);传入的为毫秒 System.gc()通知gc来回收一下垃圾对象 如果不用构造器有相同代码,可以使用代码块功能 1 2 3 4 5 6 7 8 9 10 11 12 13 14 15 16 17 18 19 20 public abc(){ this.a = 100; this.b = 10; } public abc(String a){ this.a = 100; this.b = 666 } //简写为 { this.a = 100; } public abc(){ this.b = 10; } public abc(String a){ this.b = 666 }
包装类 将基本数据类型转化为包装类,这样子就可以调用对象里面的方法了 抽象类 接口 注解 异常 1 2 3 4 5 6 7 8 try{ 可能发生xx异常的代码 }catch(异常类型1 e){ 处理异常的代码1 }catch(异常类型2 e){ 处理异常的代码2 } ....
多线程 并行:同一个时刻,同时处理多项任务
并发:同一个时刻,只能处理一个任务,其他任务交替执行
如果需要停止运行线程,有下面几种方法
wait() 必须搭配 synchronized 来使用,wait()必须写到synchronized代码块里面(notify 方法也必须在synchronized代码块中使用)。脱离 synchronized 使用 wait() 会直接抛出异常
同步方法:synchronized 关键字直接修饰方法,表示同一时刻只有一个线程能进入这个方法,其他线程在外面等着。
1 2 3 public synchronized void method () { 可能会产生线程安全问题的代码 }
同步代码块:synchronized 关键字可以用于某个区块前面,表示只对这个区块的资源实行互斥访问。 1 2 3 synchronized(同步锁){ 需要同步操作的代码 }
wait和notifywait释放占用的资源,并进入阻塞等待阶段 notify通知阻塞等待阶段的线程,可以过来竞争资源 流 1 2 3 4 5 6 7 OutputStream out = socket.getOutputStream(); PrintStream ps = new PrintStream(out); 为什么有了OutputStream还需要new一个PrintStream ? 回答: 在给服务器发送数据时,确实可以直接使用 OutputStream 来进行写操作。但是,在这个例子中使用了 PrintStream 的主要原因可能是为了方便输出字符串。 PrintStream 是 OutputStream 的子类,它提供了一些方便的方法来处理字符数据。使用 PrintStream,你可以使用 println() 方法直接输出字符串,并且它会自动添加换行符。这在处理文本数据时比较方便,特别是在网络通信中。
注意 1 2 3 4 5 6 7 8 9 10 11 12 13 14 15 16 17 18 19 20 21 package top.dreamlove.circle;public class Circle { double r; public double area () { return r * r * Math.PI; } public double perimeter () { return 2 * r * Math.PI; } public String getInfo () { return "半径:" + r + "周长:" + perimeter() + "面积:" + area(); } }
main方法中的String [] args其实写成String... args也是一样的,因为可变参数是jdk1.5才有的,而main方法jdk1.0就有了 main方法当中可以获取系统编码 JDBC 1 2 MySQL5.7:mysql-connector-java-5.1.36-bin.jar MySQL8.0:mysql-connector-java-8.0.19.jar
实现增删改查 增 1 2 3 4 5 6 7 8 9 10 11 12 13 14 15 16 17 18 19 20 21 22 23 24 25 package top.dreamlove.jdbc;import java.sql.Connection;import java.sql.DriverManager;import java.sql.PreparedStatement;import java.sql.SQLException;public class TestJDBC { public static void main (String[] args) throws ClassNotFoundException, SQLException { Class.forName("com.mysql.cj.jdbc.Driver" ); String url = "jdbc:mysql://127.0.0.1:3306/atguigu?serverTimezone=UTC" ; Connection connection = DriverManager.getConnection(url,"root" ,"root" ); String sql = "insert into t_department values(null,'测试部门数据','测试数据部门简介')" ; PreparedStatement PreparedStatement = connection.prepareStatement(sql); int len = PreparedStatement.executeUpdate(); System.out.println("影响的条数" + len); PreparedStatement.close(); connection.close(); } }
删 1 2 3 4 5 6 7 8 9 10 11 12 13 14 15 16 17 18 19 20 21 22 23 24 package top.dreamlove.jdbc;import java.sql.Connection;import java.sql.DriverManager;import java.sql.PreparedStatement;import java.sql.SQLException;public class TESTJDBCDelete { public static void main (String[] args) throws ClassNotFoundException, SQLException { Class.forName("com.mysql.cj.jdbc.Driver" ); String url = "jdbc:mysql://127.0.0.1:3306/atguigu?serverTimezone=UTC" ; Connection connection = DriverManager.getConnection(url,"root" ,"root" ); String sql = "delete from t_department where did = 7" ; PreparedStatement pst = connection.prepareStatement(sql); int len = pst.executeUpdate(); System.out.println("执行成功" + len); pst.close(); connection.close(); } }
改 1 2 3 4 5 6 7 8 9 10 11 12 13 14 15 16 17 18 19 20 21 22 23 24 package top.dreamlove.jdbc;import java.sql.Connection;import java.sql.DriverManager;import java.sql.PreparedStatement;import java.sql.SQLException;public class TestJDBCUpdate { public static void main (String[] args) throws ClassNotFoundException, SQLException { Class.forName("com.mysql.cj.jdbc.Driver" ); String url = "jdbc:mysql://127.0.0.1:3306/atguigu?serverTimezone=UTC" ; Connection connection = DriverManager.getConnection(url,"root" ,"root" ); String sql = "update t_department set description = '我是修改后的' where did = 7" ; PreparedStatement pst = connection.prepareStatement(sql); int len = pst.executeUpdate(); System.out.println("执行成功" + len); pst.close(); connection.close(); } }
查 结果值有一个元数据,对数据进行描述的信息,比如数据列有多少列,数据的列名称等 1 2 ResultSetMetaData metaData = rs.getMetaData();int columnCount = metaData.getColumnCount();
1 2 3 4 5 6 7 8 9 10 11 12 13 14 15 16 17 18 19 20 21 22 23 24 25 26 27 28 29 30 31 32 33 package top.dreamlove.jdbc;import java.sql.*;public class TestJDBCQuery { public static void main (String[] args) throws ClassNotFoundException, SQLException { Class.forName("com.mysql.cj.jdbc.Driver" ); String url = "jdbc:mysql://127.0.0.1:3306/atguigu?serverTimezone=UTC" ; Connection connection = DriverManager.getConnection(url,"root" ,"root" ); String sql = "select * from t_department" ; PreparedStatement pst = connection.prepareStatement(sql); ResultSet rst = pst.executeQuery(); while (rst.next()){ int did = rst.getInt("did" ); String dname = rst.getString("dname" ); String desc = rst.getString("description" ); System.out.println(did + dname + " 描述:" + desc); Object did1 = rst.getInt(1 ); Object dname1 = rst.getString(2 ); Object desc1 = rst.getString(3 ); System.out.println("did1 = " + did1); System.out.println("dname1 = " + dname1); System.out.println("desc1 = " + desc1); } rst.close(); connection.close(); } }
sql拼接-使用?代替值 如果不适用?代替值,如果出现了很多个参数,很不方便 1 2 3 4 5 6 7 8 9 10 11 12 13 14 15 16 17 18 19 20 21 22 23 24 25 26 27 28 29 30 31 32 33 34 35 36 37 38 39 40 41 42 43 44 45 46 47 48 49 50 51 52 53 package top.dreamlove.problem;import java.sql.*;import java.util.Date;import java.util.Scanner;public class Demo1 { public static void main (String[] args) throws ClassNotFoundException, SQLException { Scanner input = new Scanner (System.in); System.out.print("请输入姓名:" ); String ename = input.next(); System.out.print("请输入薪资:" ); double salary = input.nextDouble(); System.out.print("请输入出生日期:" ); String birthday = input.next(); System.out.print("请输入性别:" ); char gender = input.next().charAt(0 ); System.out.print("请输入手机号码:" ); String tel = input.next(); System.out.print("请输入邮箱:" ); String email = input.next(); input.close(); Class.forName("com.mysql.cj.jdbc.Driver" ); String url = "jdbc:mysql://127.0.0.1:3306/atguigu?serverTimezone=UTC" ; Connection connection = DriverManager.getConnection(url,"root" ,"root" ); String sql = "INSERT INTO t_employee(ename,salary,birthday,gender,tel,email,hiredate)VALUES(?,?,?,?,?,?,?);" ; PreparedStatement pst = connection.prepareStatement(sql); pst.setObject(1 ,ename); pst.setObject(2 ,salary); pst.setObject(3 ,birthday); pst.setObject(4 ,gender + "" ); pst.setObject(5 ,tel); pst.setObject(6 ,email); pst.setObject(7 , new Date ()); int len = pst.executeUpdate(); System.out.println("执行成功" + len); pst.close(); connection.close(); } }
sql注入-防sql注入 如果我们采用拼接的写法,很容易sql注入,比如我们使用SELECT * FROMt_employeeWHERE eid = + 用户输入的用户id,如果用户输入1 or 1=1,那么就会返回所有的数据 1 2 SELECT * FROM `t_employee` WHERE eid = 1 or 1 = 1 ;
1 2 3 4 5 6 7 8 9 10 11 12 13 14 15 16 17 18 19 20 21 22 23 24 25 26 27 28 29 30 31 32 33 34 35 36 37 package top.dreamlove.jdbc;import java.sql.*;import java.util.Scanner;public class TestJDBCQuery1 { public static void main (String[] args) throws ClassNotFoundException, SQLException { Class.forName("com.mysql.cj.jdbc.Driver" ); String url = "jdbc:mysql://127.0.0.1:3306/atguigu?serverTimezone=UTC" ; Connection connection = DriverManager.getConnection(url,"root" ,"root" ); Scanner input = new Scanner (System.in); System.out.print("请输入你要查询的员工的编号:" ); String id = input.nextLine(); input.close(); String sql = "select * from t_employee where eid=?" ; PreparedStatement pst = connection.prepareStatement(sql); pst.setString(1 ,id); ResultSet rst = pst.executeQuery(); ResultSetMetaData metaData = rst.getMetaData(); int columnLength = metaData.getColumnCount(); while (rst.next()){ for (int i = 1 ;i<=columnLength;i++){ System.out.print(rst.getObject(i) + "\t" ); } System.out.println(); } rst.close(); connection.close(); } }
1 2 3 4 5 6 7 8 9 10 11 12 13 14 15 16 17 18 19 20 21 22 23 24 25 26 27 28 29 30 31 32 33 34 package top.dreamlove.jdbc;import java.sql.*;import java.util.Scanner;public class TestJDBCQuery1 { public static void main (String[] args) throws ClassNotFoundException, SQLException { Class.forName("com.mysql.cj.jdbc.Driver" ); String url = "jdbc:mysql://127.0.0.1:3306/atguigu?serverTimezone=UTC" ; Connection connection = DriverManager.getConnection(url,"root" ,"root" ); Scanner input = new Scanner (System.in); System.out.print("请输入你要查询的员工的编号:" ); String id = input.nextLine(); input.close(); String sql = "select * from t_employee where eid = " + id; PreparedStatement pst = connection.prepareStatement(sql); ResultSet rst = pst.executeQuery(); ResultSetMetaData metaData = rst.getMetaData(); int columnLength = metaData.getColumnCount(); while (rst.next()){ for (int i = 1 ;i<=columnLength;i++){ System.out.print(rst.getObject(i) + "\t" ); } System.out.println(); } rst.close(); connection.close(); } }
图片上传 如果图片过大,限制了,需要到Mysql配置文件修改max_allowed_packet变量的值 1 2 3 4 5 6 7 8 9 10 11 12 13 14 15 16 17 18 19 20 21 22 23 24 25 26 27 28 29 30 31 32 33 34 35 36 37 38 39 40 41 42 43 44 45 46 47 package top.dreamlove.problem;import java.io.FileInputStream;import java.io.FileNotFoundException;import java.io.FileReader;import java.sql.Connection;import java.sql.DriverManager;import java.sql.PreparedStatement;import java.sql.SQLException;import java.util.Scanner;public class Demo2 { public static void main (String[] args) throws ClassNotFoundException, SQLException, FileNotFoundException { Scanner input = new Scanner (System.in); System.out.print("请输入用户名:" ); String username = input.next(); System.out.print("请选择照片:" ); String path = input.next(); System.out.print("请输入密码:" ); String password = input.next(); Class.forName("com.mysql.cj.jdbc.Driver" ); String url = "jdbc:mysql://127.0.0.1:3306/atguigu?serverTimezone=UTC" ; Connection connection = DriverManager.getConnection(url,"root" ,"root" ); String sql = "insert into t_user values(null,?,?,?)" ; PreparedStatement pst = connection.prepareStatement(sql); pst.setObject(1 ,username); pst.setObject(2 ,new FileInputStream (path)); pst.setObject(3 ,password); int len = pst.executeUpdate(); System.out.println("影响的条数" + len); pst.close(); connection.close(); } }
获取自增键值 传入一个枚举值为Statement.RETURN_GENERATED_KEYS 1 2 import java.sql.*;PreparedStatement pst = connection.prepareStatement(sql, Statement.RETURN_GENERATED_KEYS);
1 2 3 4 5 6 7 8 9 10 11 12 13 14 15 16 17 18 19 20 21 22 23 24 25 26 27 28 29 30 31 32 33 34 35 36 37 38 39 40 41 42 43 44 45 46 47 48 49 50 51 52 53 54 55 56 57 58 59 60 61 62 63 64 package top.dreamlove.problem;import java.io.FileInputStream;import java.io.FileNotFoundException;import java.sql.*;import java.util.Date;import java.util.Scanner;public class Demo3 { public static void main (String[] args) throws ClassNotFoundException, SQLException, FileNotFoundException { Scanner input = new Scanner (System.in); System.out.print("请输入姓名:" ); String ename = input.next(); System.out.print("请输入薪资:" ); double salary = input.nextDouble(); System.out.print("请输入出生日期:" ); String birthday = input.next(); System.out.print("请输入性别:" ); String gender = input.next(); System.out.print("请输入手机号码:" ); String tel = input.next(); System.out.print("请输入邮箱:" ); String email = input.next(); input.close(); Class.forName("com.mysql.cj.jdbc.Driver" ); String url = "jdbc:mysql://127.0.0.1:3306/atguigu?serverTimezone=UTC" ; Connection connection = DriverManager.getConnection(url,"root" ,"root" ); String sql = "INSERT INTO t_employee(ename,salary,birthday,gender,tel,email,hiredate)VALUES(?,?,?,?,?,?,?)" ; PreparedStatement pst = connection.prepareStatement(sql, Statement.RETURN_GENERATED_KEYS); pst.setObject(1 ,ename); pst.setObject(2 ,salary); pst.setObject(3 ,birthday); pst.setObject(4 ,gender); pst.setObject(5 ,tel); pst.setObject(6 ,email); pst.setObject(7 , new Date ()); int len = pst.executeUpdate(); ResultSet generatedKeys = pst.getGeneratedKeys(); if (generatedKeys.next()){ System.out.println(generatedKeys.getObject(1 )); } System.out.println("影响的条数" + len); pst.close(); connection.close(); } }
批处理 注意不要把values写成了value 如何实现批处理? url中加rewriteBatchedStatements=truejdbc:mysql://localhost:3306/atguigu?serverTimezone=UTC&rewriteBatchedStatements=true PreparedStatement对象调用addBatch()先赞着这些数据,设置后后sql会重新编译下,生成一条完整的sqlexecuteBatch()设置一次,执行一次 1 2 3 4 5 6 7 8 9 10 11 12 13 14 15 16 17 18 19 20 21 22 23 24 25 26 27 28 29 30 31 32 33 34 35 36 37 package top.dreamlove.problem;import java.sql.Connection;import java.sql.DriverManager;import java.sql.PreparedStatement;import java.sql.SQLException;public class Demo4 { public static void main (String[] args) throws ClassNotFoundException, SQLException { long start = System.currentTimeMillis(); Class.forName("com.mysql.cj.jdbc.Driver" ); String url = "jdbc:mysql://127.0.0.1:3306/atguigu?serverTimezone=UTC&rewriteBatchedStatements=true" ; Connection connection = DriverManager.getConnection(url,"root" ,"root" ); String sql = "insert into t_department values(null,?,?)" ; PreparedStatement pst = connection.prepareStatement(sql); for (int i = 1 ; i <= 1000 ;i++){ pst.setObject(1 ,"测试" + i); pst.setObject(2 ,"测试简介" + i); pst.addBatch(); } int [] lenList = pst.executeBatch(); long end = System.currentTimeMillis(); System.out.println("耗费时间" + (end - start)); System.out.println("影响的条数" + lenList.length); pst.close(); connection.close(); } }
事物处理 JDBC如何管理事务?mysql默认是自动提交事务,每执行一条语句成功后,自动提交 。需要开启手动提交模式。 Connection连接对象.setAutoCommit(false);//取消自动提交模式,开始手动提交模式sql执行成功,别忘了提交事务Connection连接对象.commit(); sql执行失败,回滚事务 Connection连接对象.rollback(); 1 2 3 4 5 6 7 8 9 10 11 12 13 14 15 16 17 18 19 20 21 22 23 24 25 26 27 28 29 30 31 32 33 34 35 36 37 38 39 40 41 package top.dreamlove.problem;import java.sql.Connection;import java.sql.DriverManager;import java.sql.PreparedStatement;import java.sql.SQLException;public class Demo5 { public static void main (String[] args) throws Exception { Class.forName("com.mysql.cj.jdbc.Driver" ); String url = "jdbc:mysql://127.0.0.1:3306/atguigu?serverTimezone=UTC" ; Connection connection = DriverManager.getConnection(url,"root" ,"root" ); connection.setAutoCommit(false ); String sql1 = "update t_department set description = 'xxx' where did = 2" ; String sql2 = "update t_department set1 description = 'xxx' where did = 3" ; PreparedStatement pst1 = connection.prepareStatement(sql1); PreparedStatement pst2 = connection.prepareStatement(sql2); try { pst1.executeUpdate(); pst2.executeUpdate(); connection.commit(); }catch (Exception e){ connection.rollback(); System.out.println("执行回滚操作" ); } pst1.close(); pst2.close(); connection.setAutoCommit(true ); connection.close(); } }
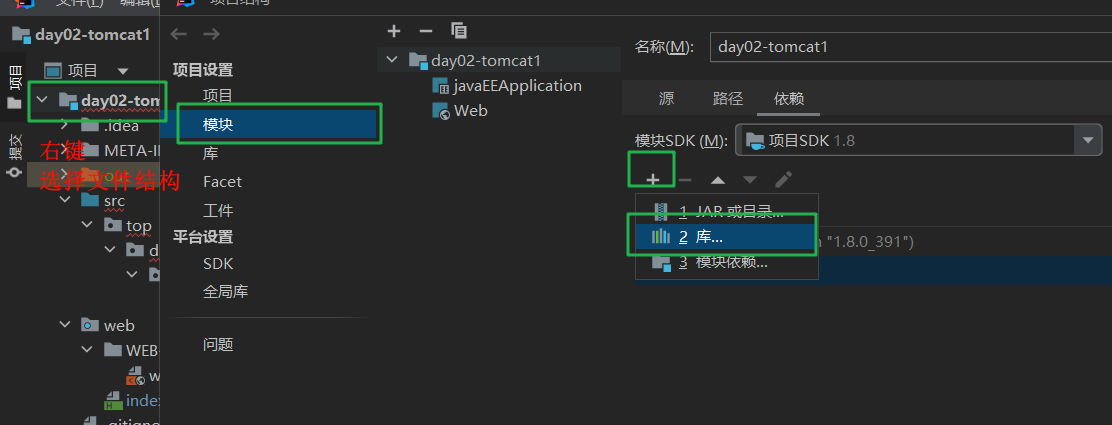
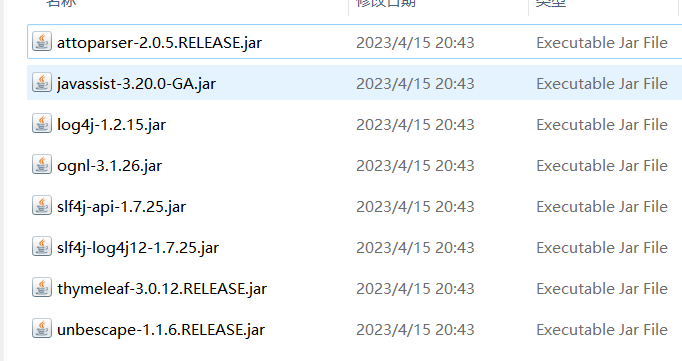
数据库连接池 使用阿里的德鲁伊 引入jar
编写配置文件
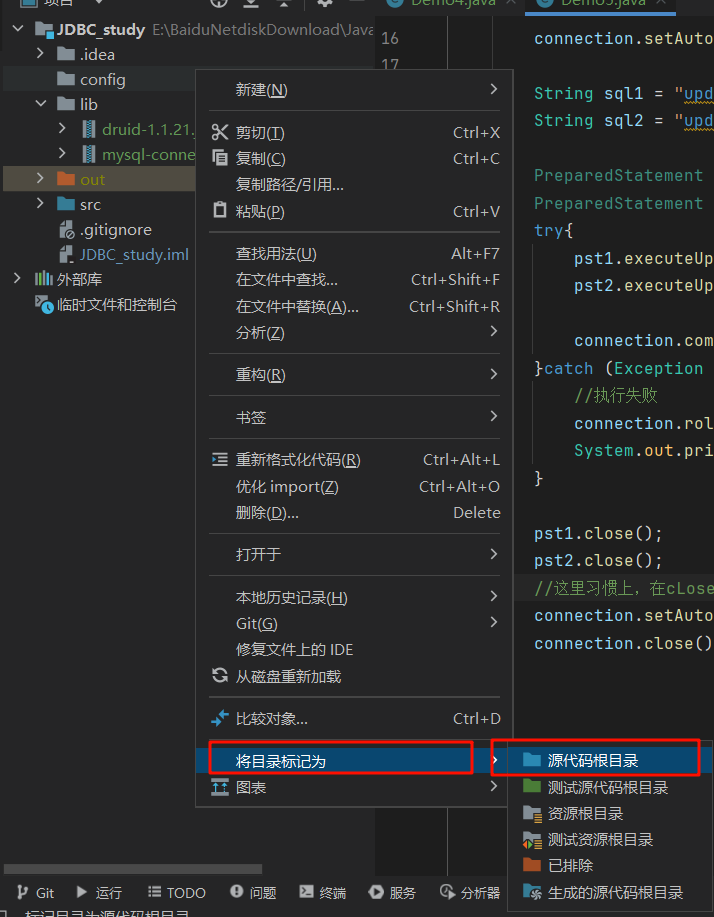
src下加一个druid.properties 文件 或者在模块根目录下,再建立一个文件夹叫config,把config文件夹设置为源代码文件夹,再在config文件夹建一个druid.properties文件
填写内容
1 2 3 4 5 6 7 8 #key=value driverClassName=com.mysql.cj.jdbc.Driver url=jdbc:mysql://localhost:3306/atguigu?serverTimezone=UTC&rewriteBatchedStatements=true username=root password=123456 initialSize=5 maxActive=10 maxWait=1000
从数据库连接池中获取连接通过德鲁伊的数据库连接的工厂类创建数据库连接池,再从池中获取连接 加载器加载资源文件 1 2 3 4 5 6 7 8 9 10 11 12 13 14 15 16 17 18 19 20 21 22 23 24 25 26 27 28 package top.dreamlove.pool;import com.alibaba.druid.pool.DruidDataSourceFactory;import javax.sql.DataSource;import java.io.IOException;import java.sql.Connection;import java.util.Properties;public class TestDruid { public static void main (String[] args) throws Exception { Properties properties = new Properties (); properties.load(TestDruid.class.getClassLoader().getResourceAsStream("druid.properties" )); DataSource ds = DruidDataSourceFactory.createDataSource(properties); for (int i = 1 ; i<= 11 ;i++){ try { Connection con = ds.getConnection(); System.out.println(i + "连接池" + con); }catch (Exception e){ e.printStackTrace(); } } } }
配置 缺省 说明 name 配置这个属性的意义在于,如果存在多个数据源,监控的时候可以通过名字来区分开来。 如果没有配置,将会生成一个名字,格式是:”DataSource-” + System.identityHashCode(this) jdbcUrl 连接数据库的url,不同数据库不一样。例如:mysql : jdbc:mysql://10.20.153.104:3306/druid2 oracle : jdbc:oracle:thin:@10.20.149.85:1521:ocnauto username 连接数据库的用户名 password 连接数据库的密码。如果你不希望密码直接写在配置文件中,可以使用ConfigFilter。详细看这里:https://github.com/alibaba/druid/wiki/%E4%BD%BF%E7%94%A8ConfigFilter driverClassName 根据url自动识别 这一项可配可不配,如果不配置druid会根据url自动识别dbType,然后选择相应的driverClassName(建议配置下) initialSize 0 初始化时建立物理连接的个数。初始化发生在显示调用init方法,或者第一次getConnection时 maxActive 8 最大连接池数量 maxIdle 8 已经不再使用,配置了也没效果 minIdle 最小连接池数量 maxWait 获取连接时最大等待时间,单位毫秒。配置了maxWait之后,缺省启用公平锁,并发效率会有所下降,如果需要可以通过配置useUnfairLock属性为true使用非公平锁。 poolPreparedStatements false 是否缓存preparedStatement,也就是PSCache。PSCache对支持游标的数据库性能提升巨大,比如说oracle。在mysql下建议关闭。 maxOpenPreparedStatements -1 要启用PSCache,必须配置大于0,当大于0时,poolPreparedStatements自动触发修改为true。在Druid中,不会存在Oracle下PSCache占用内存过多的问题,可以把这个数值配置大一些,比如说100 validationQuery 用来检测连接是否有效的sql,要求是一个查询语句。如果validationQuery为null,testOnBorrow、testOnReturn、testWhileIdle都不会其作用。 testOnBorrow true 申请连接时执行validationQuery检测连接是否有效,做了这个配置会降低性能。 testOnReturn false 归还连接时执行validationQuery检测连接是否有效,做了这个配置会降低性能 testWhileIdle false 建议配置为true,不影响性能,并且保证安全性。申请连接的时候检测,如果空闲时间大于timeBetweenEvictionRunsMillis,执行validationQuery检测连接是否有效。 timeBetweenEvictionRunsMillis 有两个含义: 1)Destroy线程会检测连接的间隔时间2)testWhileIdle的判断依据,详细看testWhileIdle属性的说明 numTestsPerEvictionRun 不再使用,一个DruidDataSource只支持一个EvictionRun minEvictableIdleTimeMillis connectionInitSqls 物理连接初始化的时候执行的sql exceptionSorter 根据dbType自动识别 当数据库抛出一些不可恢复的异常时,抛弃连接 filters 属性类型是字符串,通过别名的方式配置扩展插件,常用的插件有: 监控统计用的filter:stat日志用的filter:log4j防御sql注入的filter:wall proxyFilters 类型是List,如果同时配置了filters和proxyFilters,是组合关系,并非替换关系
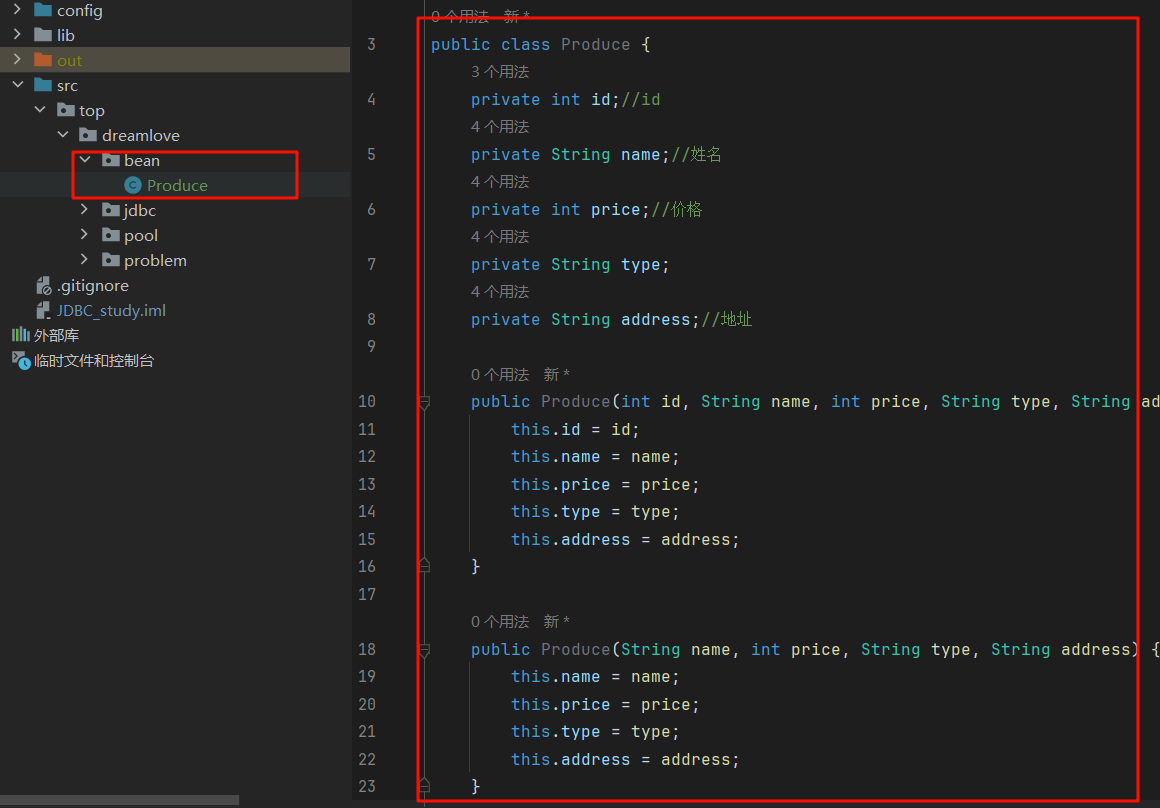
DAO层 把访问数据库的代码封装起来,这些类称为DAO,相当与是一个数据访问接口,夹在业务逻辑与数据库资源中间 建立bean包 里面的内容是数据库表中的字段,具有构造方法,和getter和setter为的是返回对应的对象(还可以有toString方法,方便输出查看)
建立dao包 里面为impl和对应的DAO包
DAO包为接口,为应该具有的方法,比如增加,修改,删除
impl为实现对应DAO包的方法
除了每一个DAO包的实现外,还需要有一个基础的DAOBaseDAOImpl,用做共同的impl父类,提供基础的方法 使用Dbutils
commons-dbutils 是 Apache 组织提供的一个开源 JDBC工具类库,它是对JDBC的简单封装,学习成本极低,并且使用dbutils能极大简化jdbc编码的工作量,同时也不会影响程序的性能。
其中QueryRunner类封装了SQL的执行,是线程安全的。
(1)可以实现增、删、改、查、批处理、
(2)考虑了事务处理需要共用Connection。
(3)该类最主要的就是简单化了SQL查询,它与ResultSetHandler组合在一起使用可以完成大部分的数据库操作,能够大大减少编码量。
(4)不需要手动关闭连接,runner会自动关闭连接,释放到连接池中
(1)更新
public int update(Connection conn, String sql, Object… params) throws SQLException:用来执行一个更新(插入、更新或删除)操作。
……
(2)插入
publicT insert(Connection conn,String sql,ResultSetHandlerrsh, Object… params) throws SQLException:只支持INSERT语句,其中 rsh - The handler used to create the result object from the ResultSet of auto-generated keys. 返回值: An object generated by the handler.即自动生成的键值
….
(3)批处理
public int[] batch(Connection conn,String sql,Object[][] params)throws SQLException: INSERT, UPDATE, or DELETE语句
publicT insertBatch(Connection conn,String sql,ResultSetHandlerrsh,Object[][] params)throws SQLException:只支持INSERT语句
…..
(4)使用QueryRunner类实现查询
public Object query(Connection conn, String sql, ResultSetHandler rsh,Object… params) throws SQLException:执行一个查询操作,在这个查询中,对象数组中的每个元素值被用来作为查询语句的置换参数。该方法会自行处理 PreparedStatement 和 ResultSet 的创建和关闭。
….
ResultSetHandler接口用于处理 java.sql.ResultSet,将数据按要求转换为另一种形式。ResultSetHandler 接口提供了一个单独的方法:Object handle (java.sql.ResultSet rs)该方法的返回值将作为QueryRunner类的query()方法的返回值。
该接口有如下实现类可以使用:
BeanHandler:将结果集中的第一行数据封装到一个对应的JavaBean实例中。 BeanListHandler:将结果集中的每一行数据都封装到一个对应的JavaBean实例中,存放到List里。 ScalarHandler:查询单个值对象 MapHandler:将结果集中的第一行数据封装到一个Map里,key是列名,value就是对应的值。 MapListHandler:将结果集中的每一行数据都封装到一个Map里,然后再存放到List ColumnListHandler:将结果集中某一列的数据存放到List中。 KeyedHandler(name):将结果集中的每一行数据都封装到一个Map里,再把这些map再存到一个map里,其key为指定的key。 ArrayHandler:把结果集中的第一行数据转成对象数组。 ArrayListHandler:把结果集中的每一行数据都转成一个数组,再存放到List中。 使用Dbutils组件封装BaseDAOImpl 1 2 3 4 5 6 7 8 9 10 11 12 13 14 15 16 17 18 19 20 21 22 23 24 25 26 27 28 29 30 31 32 33 34 35 36 37 38 39 40 41 42 43 44 45 46 47 package top.dreamlove.tools;import com.alibaba.druid.pool.DruidDataSourceFactory;import javax.sql.DataSource;import java.sql.Connection;import java.sql.SQLException;import java.util.Properties;public class JDBCTools { private static DataSource ds; static { Properties pro = new Properties (); try { pro.load(JDBCTools.class.getClassLoader().getResourceAsStream("druid.properties" )); ds = DruidDataSourceFactory.createDataSource(pro); }catch (Exception e){ e.printStackTrace(); } } private static ThreadLocal<Connection> threadLocal = new ThreadLocal <>(); public static Connection getConnection () throws SQLException { Connection connection = threadLocal.get(); if (connection == null ){ connection = ds.getConnection(); threadLocal.set(connection); } return connection; } public static void freeConnection () throws SQLException { Connection connection = threadLocal.get(); if (connection != null ){ connection.setAutoCommit(false ); threadLocal.remove(); connection.close(); } } }
1 2 3 4 5 6 7 8 9 10 11 12 13 14 15 16 17 18 19 20 21 22 23 24 25 26 27 28 29 30 31 32 33 34 35 36 37 38 39 40 41 42 43 44 45 46 47 48 49 50 51 52 53 54 55 package top.dreamlove.dao;import org.apache.commons.dbutils.QueryRunner;import org.apache.commons.dbutils.handlers.BeanListHandler;import top.dreamlove.tools.JDBCTools;import java.sql.SQLException;import java.util.List;public class BaseDAOImpl { private QueryRunner queryRunner = new QueryRunner (); protected int update (String sql,Object... args) { try { return queryRunner.update(JDBCTools.getConnection(),sql,args); } catch (SQLException e) { throw new RuntimeException (e); } } protected <T> T getBean (Class<T> clazz, String sql, Object... args) { return getList(clazz,sql,args).get(0 ); } protected <T> List<T> getList (Class<T> clazz, String sql, Object... args) { try { return queryRunner.query(JDBCTools.getConnection(),sql,new BeanListHandler <T>(clazz),args); } catch (SQLException e) { throw new RuntimeException (e); } } }
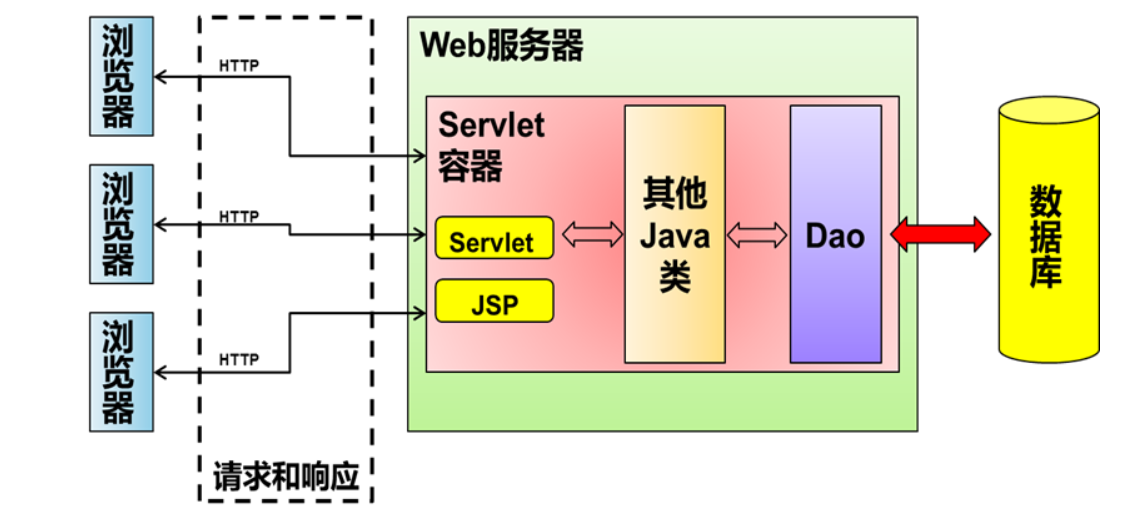
Servlet HelloServlet Servlet(Server Applet )作为服务器端的一个组件,它的本意是“服务器端的小程序”。
Servlet的实例对象由Servlet容器负责创建; Servlet的方法由容器在特定情况下调用; Servlet容器会在Web应用卸载时销毁Servlet对象的实例。 步骤
1 2 3 4 5 6 7 8 9 10 11 12 <html> <head> <meta charset="UTF-8" > <meta name="viewport" content="width=device-width, user-scalable=no, initial-scale=1.0, maximum-scale=1.0, minimum-scale=1.0" > <meta http-equiv="X-UA-Compatible" content="ie=edge" > <title>管理员页面</title> </head> <body> <a href="hello" >点击我跳转发送请求</a> </body> </html>
实现接口中的所有抽象方法 为HelloServlet设置访问路径注意:web.xml 因为有约束文件,所以不可以乱写了,并且还约束了顺序 1 2 3 4 5 6 7 8 9 10 11 12 13 14 <?xml version="1.0" encoding="UTF-8" ?> <web-app xmlns ="http://xmlns.jcp.org/xml/ns/javaee" xmlns:xsi ="http://www.w3.org/2001/XMLSchema-instance" xsi:schemaLocation ="http://xmlns.jcp.org/xml/ns/javaee http://xmlns.jcp.org/xml/ns/javaee/web-app_4_0.xsd" version ="4.0" > <servlet > <servlet-name > abc</servlet-name > <servlet-class > top.dreamlove.servlet.HelloServlet</servlet-class > </servlet > <servlet-mapping > <servlet-name > abc</servlet-name > <url-pattern > /hello</url-pattern > </servlet-mapping > </web-app >
注意点
网页必须要在web目录下(不可以放在WEB-INF下),暂时也不可以放置在目录下(后面就可以) web.xml中的url-pattern的值必须要以/开头 请求url中暂时不能以/开头 找不到servlet解决办法
作用 接收请求 【解析请求报文中的数据:请求参数】
处理请求 【DAO和数据库交互】
完成响应 【设置响应报文】
servlet生命周期 init 只在创建对象时候执行一次,以后再接收到请求,就不会执行了 service destroy 第二种创建servlet的方法-GenericServlet
1 2 3 4 5 6 7 8 9 10 11 12 13 14 15 package top.dreamlove.servlet;import javax.servlet.GenericServlet;import javax.servlet.ServletException;import javax.servlet.ServletRequest;import javax.servlet.ServletResponse;import java.io.IOException;public class MyFirstServlet extends GenericServlet { @Override public void service (ServletRequest servletRequest, ServletResponse servletResponse) throws ServletException, IOException { System.out.println("这是我第一个Servlet" ); } }
第三种创建servlet-HttpServlet
HttpServlet主要功能是实现service方法,然后对请求进行分发的操作(不同的请求方式调用不同的方法) 如get请求调用doGet方法 post请求调用doPost方法 1 2 3 4 5 6 7 8 9 10 11 12 13 14 15 16 17 18 19 20 package top.dreamlove.servlet;import javax.servlet.*;import javax.servlet.http.*;import javax.servlet.annotation.WebServlet;import java.io.IOException;public class LoginServlet extends HttpServlet { @Override protected void doGet (HttpServletRequest request, HttpServletResponse response) throws ServletException, IOException { System.out.println("你好,世界,我是LoginServlet" ); } @Override protected void doPost (HttpServletRequest request, HttpServletResponse response) throws ServletException, IOException { } }
ServletConfig 一个Servlet对象对应唯一的一个ServletConfig配置对象 ServletConfig对象如何获得?在init方法的形参位置 ServletConfig是在当前Servlet进行初始化的时候,传递给init方法的 功能获取Servlet名称:web.xml中配置servlet-name的值 获取全局上下文ServletContext对象 获取Servlet初始化参数 1 2 3 4 5 6 7 8 9 10 11 12 public void init (ServletConfig servletConfig) throws ServletException { System.out.println("执行了初始化操作" ); String name = servletConfig.getServletName(); System.out.println("name = " + name); ServletContext context = servletConfig.getServletContext(); System.out.println("context = " + context); String path = servletConfig.getInitParameter("path" ); System.out.println(path); }
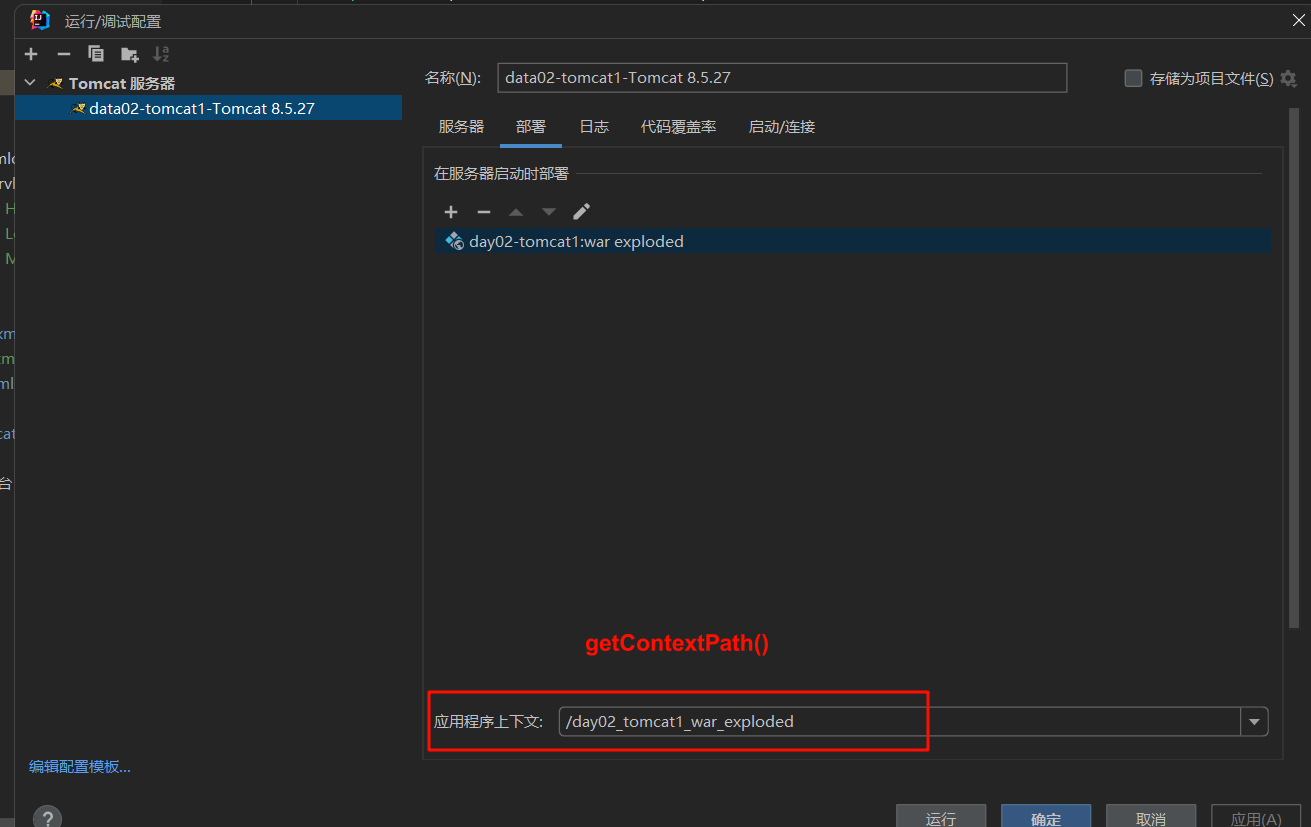
ServletContext 全局上下文对象:一个web项目只有一个ServletContext对象 功能 getContextPath()-获取项目的上下文路径 1 2 String contextPath = servletContext.getContextPath(); System.out.println("contextPath = " + contextPath);
getRealPath()-(根据相对路径获取绝对路径) 不管有没有这个文件或者文件夹,都会返回路径,只是路径而已 1 2 String upload = servletContext.getRealPath("upload" );System.out.println("upload = " + upload);
获取WEB应用程序的全局初始化参数 顾名思义,也就是全部Servlet可以访问的初始化参数 1 2 3 4 5 6 7 8 9 10 11 12 web.xml <web-app> <!-- Web应用初始化参数 --> <context-param> <param-name>ParamName</param-name> <param-value>ParamValue</param-value> </context-param> </web-app> java代码 String paramKey = servletContext.getInitParameter("ParamKey" );System.out.println("paramKey = " + paramKey);
作为域对象共享数据 1 2 3 servletContext.setAttribute("globalParams" ,"这是全局的参数" ); Object globalParams = servletContext.getAttribute("globalParams" );System.out.println("globalParams = " + globalParams);
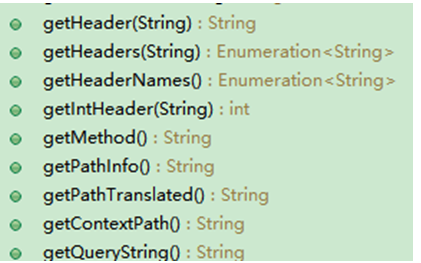
HttpServletRequest 获取请求头的信息 request.getHeader(String key)传入指定的请求头,返回请求头字符串 1 2 3 4 5 protected void doGet (HttpServletRequest request, HttpServletResponse response) throws ServletException, IOException { String header1 = request.getHeader("Referer" ); System.out.println("header1 = " + header1); }
获取URL地址信息 request.getRequestContext()//获取上下文路径request.getServerName()request.getServePort()request.getMethod()1 2 3 4 5 6 7 8 9 String path = request.getContextPath();System.out.println("path = " + path); int serverPort = request.getServerPort();System.out.println("serverPort = " + serverPort); String serverName = request.getServerName();System.out.println("serverName = " + serverName); String scheme = request.getScheme();System.out.println("scheme = " + scheme);
获取请求头信息
获取请求的参数 request.getParameter(String key)//根据key值返回一个valuerequest.getParameterValues(String key)//根据key值返回多个valuerequest.getParameterMap()//将整个表单的所有数据都放在map集合内1 2 3 4 5 6 7 8 9 10 String username = request.getParameter("username" );System.out.println("username = " + username); String password = request.getParameter("password" );System.out.println("password = " + password); String gender = request.getParameter("gender" );System.out.println("gender = " + gender); String[] soccerTeams = request.getParameterValues("soccerTeam" ); for (String soccerTeam : soccerTeams){ System.out.println("soccerTeam = " + soccerTeam); }
使用BeanUtils
1 2 3 4 5 6 7 8 9 Map<String, String[]> parameterMap = request.getParameterMap(); Users users = new Users ();try { BeanUtils.populate(users,parameterMap); } catch (IllegalAccessException e) { throw new RuntimeException (e); } catch (InvocationTargetException e) { throw new RuntimeException (e); }
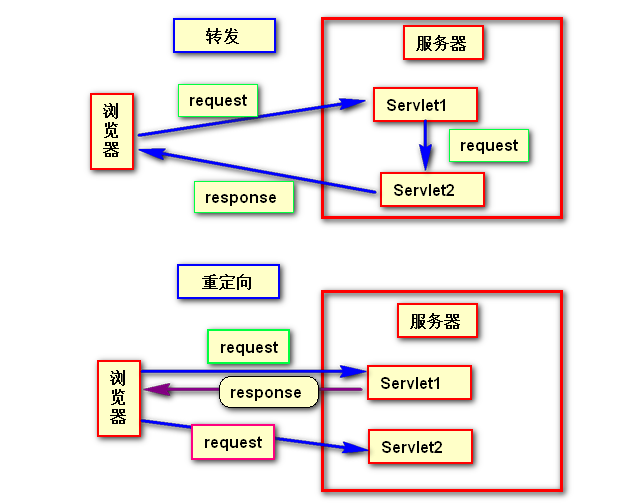
请求的转发
1 2 3 4 5 6 7 8 9 10 11 12 13 protected void doPost (HttpServletRequest req, HttpServletResponse resp) throws ServletException, IOException { String name = req.getParameter("name" ); System.out.println("第一个name = " + name); String sex = req.getParameter("sex" ); System.out.println("第一个sex = " + sex); req.setAttribute("hobby" ,"吃饭" ); req.getRequestDispatcher("forwardSecond" ).forward(req,resp); }
重定向 1 2 3 4 5 protected void doGet (HttpServletRequest request,HttpServletResponse response) throws ServletException, IOException { response.sendRedirect("index.html" ); }
response 1 2 3 4 resp.setCharacterEncoding("utf-8" ); resp.setHeader("Content-Type" ,"text/html;character=utf-8" );
web项目的路径问题 url(URL)
uri(URI)
在web项目中,路径前面用/,就是采用绝对路径
Thymeleaf
1 2 3 4 5 6 7 8 9 10 11 12 13 14 15 <?xml version="1.0" encoding="UTF-8" ?> <web-app xmlns ="http://xmlns.jcp.org/xml/ns/javaee" xmlns:xsi ="http://www.w3.org/2001/XMLSchema-instance" xsi:schemaLocation ="http://xmlns.jcp.org/xml/ns/javaee http://xmlns.jcp.org/xml/ns/javaee/web-app_4_0.xsd" version ="4.0" > <context-param > <param-name > view-prefix</param-name > <param-value > /pages</param-value > </context-param > <context-param > <param-name > view-suffix</param-name > <param-value > .html</param-value > </context-param > </web-app >
1 2 3 4 5 6 7 8 9 10 11 12 13 14 15 16 17 18 19 20 21 22 23 24 25 26 27 28 29 30 31 32 33 34 35 36 37 38 39 40 41 42 43 44 45 46 47 48 49 50 51 52 53 54 55 56 57 58 59 60 61 62 63 64 65 66 67 68 69 package top.dreamlove;import org.thymeleaf.TemplateEngine;import org.thymeleaf.context.WebContext;import org.thymeleaf.templatemode.TemplateMode;import org.thymeleaf.templateresolver.ServletContextTemplateResolver;import javax.servlet.ServletContext;import javax.servlet.ServletException;import javax.servlet.http.HttpServlet;import javax.servlet.http.HttpServletRequest;import javax.servlet.http.HttpServletResponse;import java.io.IOException;public class ViewBaseServlet extends HttpServlet { private TemplateEngine templateEngine; @Override public void init () throws ServletException { ServletContext servletContext = this .getServletContext(); ServletContextTemplateResolver templateResolver = new ServletContextTemplateResolver (servletContext); templateResolver.setTemplateMode(TemplateMode.HTML); String viewPrefix = servletContext.getInitParameter("view-prefix" ); templateResolver.setPrefix(viewPrefix); String viewSuffix = servletContext.getInitParameter("view-suffix" ); templateResolver.setSuffix(viewSuffix); templateResolver.setCacheTTLMs(60000L ); templateResolver.setCacheable(true ); templateResolver.setCharacterEncoding("utf-8" ); templateEngine = new TemplateEngine (); templateEngine.setTemplateResolver(templateResolver); } protected void processTemplate (String templateName, HttpServletRequest req, HttpServletResponse resp) throws IOException { resp.setContentType("text/html;charset=UTF-8" ); WebContext webContext = new WebContext (req, resp, getServletContext()); templateEngine.process(templateName, webContext, resp.getWriter()); } }
1 2 3 4 5 6 7 8 9 10 11 12 <html xmlns:th ="http://www.thymeleaf.org" > <head > <meta charset ="UTF-8" > <meta name ="viewport" content ="width=device-width, user-scalable=no, initial-scale=1.0, maximum-scale=1.0, minimum-scale=1.0" > <meta http-equiv ="X-UA-Compatible" content ="ie=edge" > <title > Document</title > </head > <body > <h2 th:text ="${msg}" > 放服务器传递过来的字段为msg的数据</h2 > </body > </html >
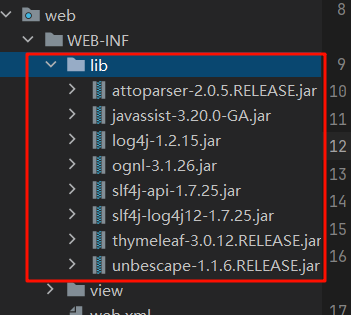
如果出现了org.apache.catalina.LifecycleException: Failed to start component,看看是不是lib包没有放在WEB-INF目录下的问题
基本语法 1 <html xmlns:th ="http://www.thymeleaf.org" >
1 <p th:属性名 ="${服务器设置的属性变量}" > 原始网页内容</p >
1 <p th:属性名 ="${服务器设置的属性变量}" > 原始网页内容</p >
1 <a th:href="@{/hello(id=100,name='李白',age=100)}">跳转2</a>
操作请求域 Servlet中代码:
1 2 3 4 String requestAttrName = "helloRequestAttr" ;String requestAttrValue = "helloRequestAttr-VALUE" ;request.setAttribute(requestAttrName, requestAttrValue);
Thymeleaf表达式:
1 <p th:text="${helloRequestAttr}" >request field value</p>
操作应用域 Servlet中代码:
1 2 3 4 5 String requestAttrName = "helloRequestAttr"; String requestAttrValue = "helloRequestAttr-VALUE"; ServletContext application = request.getServletContext(); application.setAttribute(requestAttrName,requestAttrValue)
Thymeleaf表达式:
1 <p th:text ="${application.helloRequestAttr}" > request field value</p >
获取请求参数 1 2 3 4 5 <h1 th:text ="${param.id + param.name + param.age}" > </h1 > //访问http://localhost:8080/day03_thymeleaf_war_exploded/params?id=100&name=李白&age=100 //输出100李白100
1 2 3 4 5 6 7 8 <h1 th:text ="${param.hobby}" > </h1 > //访问http://localhost:8080/day03_thymeleaf_war_exploded/params?hobby=吃饭&hobby=睡觉 //输出 [吃饭, 睡觉] 如果需要精准获取,就用 <h1 th:text ="${params.hobby[0]}" > </h1 >
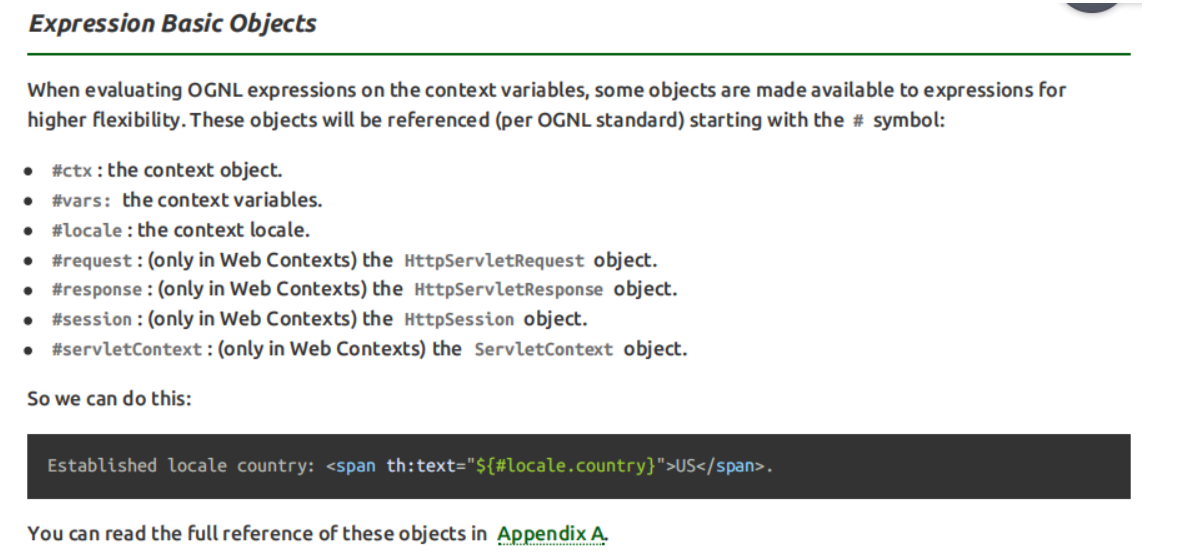
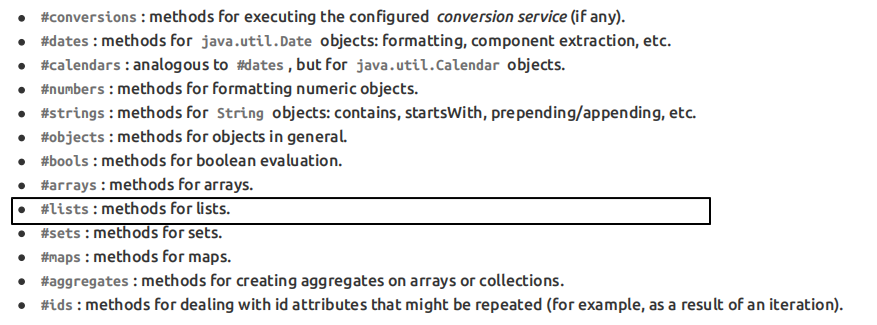
内置对象 所谓内置对象其实就是在Thymeleaf的表达式中可以直接使用 的对象 基本内置对象 #request就是Servlet中的HttpServletRequest对象#response就是Servlet中的HttpServletResponse对象
1 2 3 <h3 > 表达式的基本内置对象</h3 > <p th:text ="${#request.getContextPath()}" > 调用#request对象的getContextPath()方法</p > <p th:text ="${#request.getAttribute('helloRequestAttr')}" > 调用#request对象的getAttribute()方法,读取属性域</p >
公共内置对象
ognl-分支 1 2 3 4 5 6 7 8 9 10 11 12 13 14 15 16 <table > <tr > <th > 员工编号</th > <th > 员工姓名</th > <th > 员工工资</th > </tr > <tr th:if ="${#lists.isEmpty(employeeList)}" > <td colspan ="3" > 抱歉!没有查询到你搜索的数据!</td > </tr > <tr th:if ="${not #lists.isEmpty(employeeList)}" > <td colspan ="3" > 有数据!</td > </tr > <tr th:unless ="${#lists.isEmpty(employeeList)}" > <td colspan ="3" > 有数据!</td > </tr > </table >
1 2 3 4 5 6 7 <h3 > 测试switch</h3 > <div th:switch ="${user.memberLevel}" > <p th:case ="level-1" > 银牌会员</p > <p th:case ="level-2" > 金牌会员</p > <p th:case ="level-3" > 白金会员</p > <p th:case ="level-4" > 钻石会员</p > </div >
1 2 3 4 5 6 7 8 9 10 11 12 13 14 15 16 17 18 19 20 21 22 23 24 25 26 27 28 29 30 31 32 <table border ="1" cellspacing ="0" width ="500" > <tr > <th > 编号</th > <th > 姓名</th > </tr > <tbody th:if ="${#lists.isEmpty(teacherList)}" > <tr > <td colspan ="2" > 教师的集合是空的!!!</td > </tr > </tbody > <tbody th:unless ="${#lists.isEmpty(teacherList)}" > <tr th:each ="teacher,status : ${teacherList}" > <td th:text ="${status.count}" > 这里显示编号</td > <td th:text ="${teacher.teacherName}" > 这里显示老师的名字</td > </tr > </tbody > </table >
小练习 1 2 3 4 5 Class c = this .getClass();Method method = c.getDeclaredMethod('要调用的方法' ,Class参数1 ,Class参数2 ,Class参数3 ,....);method.setAccessible(true ); method.invoke(由谁调用:this ,参数1 ,参数2 )
1 request.setCharacterEncoding("uft-8")
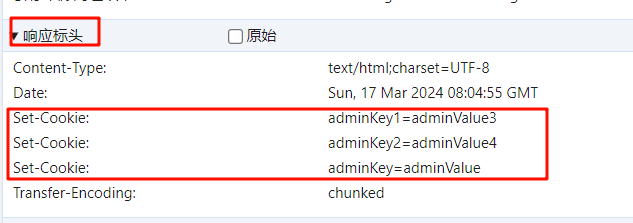
Cookie和Session Cookie(客户端的会话技术) Session(服务端的存储技术) Cookie 如何将数据保存到Cookie中 一旦cookie被保存到客户端,在以后的每次请求中都会带着所有的cookie 此时添加cookie被称为瞬时cookie,浏览器关闭cookie就消失 1 2 3 4 5 6 7 8 Cookie testCooke = new Cookie ("adminKey" ,"adminValue" );Cookie testCooke1 = new Cookie ("adminKey1" ,"adminValue3" );Cookie testCooke2 = new Cookie ("adminKey2" ,"adminValue4" );resp.addCookie(testCooke1); resp.addCookie(testCooke2); resp.addCookie(testCooke);
如何将数据从Cookie中取出来 1 2 Cookie[] reqCookies = req.getCookies();
Cookie中的数据的有效时间 1 2 3 4 Cookie testCooke = new Cookie ("adminKey" ,"adminValue" );testCooke.setMaxAge(60 );
设置Cookie的携带条件 比如为user设置了20个Cookie,为book设置了20个Cookie,我们不希望访问任意的时候都携带上,就可以设置携带条件 比如只希望xxxx/user下的URI可以访问,就需要设置下方数据 1 testCooke.setPath(req.getContextPath() + "/user" );
Session 数据存储在服务器端 服务器端的会话从第一次获得HttpSession对象开始的,直到HttpSession对象销毁结束 服务器会为每一个客户端创建对应的Session 服务器是如何办到客户端和session对应关系?是通过cookie办到的!session是依赖于cookie 当客户端第一次访问服务器,调用getSession(),新建一个session对象,并且设置一个cookie给浏览器 当客户端第二次访问服务器,调用getSession(),就去获得请求中的jsessionid这个Cookie,通过Cookie判断 会话什么时候结束?客户端关闭(jsessionid这个Cookie消息) 强制失效 自动失效(达到最大空闲时间)默认是半小时,可以通过setMaxInactiveInterval 1 2 3 4 5 6 7 8 9 10 11 12 HttpSession session = req.getSession();session.setAttribute("sessionMsg" ,"value" ); Object sessionMsg = session.getAttribute("sessionMsg" );session.removeAttribute("sessionMsg" ); session.invalidate() session.setMaxInactiveInterval(60 );
后台响应JSON 使用JSON数据作为响应数据(JSON格式的字符串 ) 可以借助gson帮助我们将JAVA对象转换为json字符串 1 2 3 4 5 6 7 8 9 10 11 12 13 14 15 16 17 18 19 20 21 22 23 Gson gson = new Gson ();Books books = new Books ("a" ,"b" ,20.0 ,10 ,30 ,"f" );String s1 = gson.toJson(books);System.out.println("s1 = " + s1); Map<String,Books> map = new HashMap <>(); map.put("one1" ,new Books ("a" ,"b" ,20.0 ,10 ,30 ,"f" )); map.put("one2" ,new Books ("a" ,"b" ,20.0 ,10 ,30 ,"f" )); map.put("one3" ,new Books ("a" ,"b" ,20.0 ,10 ,30 ,"f" )); String s2 = gson.toJson(map);System.out.println("s2 = " + s2); List<Books> booksList = new ArrayList <>(); booksList.add(new Books ("a" ,"b" ,20.0 ,10 ,30 ,"f" )); booksList.add(new Books ("a" ,"b" ,20.0 ,10 ,30 ,"f" )); booksList.add(new Books ("a" ,"b" ,20.0 ,10 ,30 ,"f" )); String s3 = gson.toJson(booksList);System.out.println("s3 = " + s3); PrintWriter writer = resp.getWriter();writer.write(s2);
CommonResult Maven Maven之Helloworld Maven工程目录结构约束 项目名src(书写源代码)main【书写主程序代码】java【书写java源代码】 resources【书写配置文件代码】 test(书写测试代码) pom.xml(书写Maven配置) Maven的坐标【重要】 坐标应用
Maven的依赖管理 依赖语法<scope>
compile【默认值】:在main、test、Tomcat【服务器】下均有效。 test1 2 3 4 5 6 7 8 <dependencies > <dependency > <groupId > junit</groupId > <artifactId > junit</artifactId > <version > 3.8.2</version > <scope > test</scope > </dependency > </dependencies >
provided在main、test下均有效,Tomcat【服务器】无效。 servlet-api(因为Tomcat服务器有了,如果再提供就冲突了) 依赖传递性
统一管理版本号
1 2 3 4 5 6 7 8 9 10 <properties > <spring-version > 5.3.17</spring-version > </properties > <dependencies > <dependency > <groupId > org.springframework</groupId > <artifactId > spring-beans</artifactId > <version > ${spring-version}</version > </dependency > </dependencies >
Maven继承和聚合 继承 1 2 3 4 5 6 7 8 9 <packaging > pom</packaging > <dependencies > <dependency > <groupId > junit</groupId > <artifactId > junit</artifactId > <version > 4.12</version > <scope > test</scope > </dependency > </dependencies >
第二种:在父工程中导入jar包【pom.xml】注意标签使用dependencyManagement 1 2 3 4 5 6 7 8 9 10 11 <packaging > pom</packaging > <dependencyManagement > <dependencies > <dependency > <groupId > junit</groupId > <artifactId > junit</artifactId > <version > 4.12</version > <scope > test</scope > </dependency > </dependencies > </dependencyManagement >
在子工程引入父工程的相关jar包<relativePath>../pom.xml</relativePath> 1 2 3 4 5 6 7 8 9 10 11 12 <parent > <artifactId > maven_demo</artifactId > <groupId > com.atguigu</groupId > <version > 1.0-SNAPSHOT</version > <relativePath > ../pom.xml</relativePath > </parent > <dependencies > <dependency > <groupId > junit</groupId > <artifactId > junit</artifactId > </dependency > </dependencies >
聚合 为什么使用Maven的聚合
优势:只要将子工程聚合到父工程中,就可以实现效果:安装或清除父工程时,子工程会进行同步操作。 注意:Maven会按照依赖顺序自动安装子工程 1 2 3 4 5 <modules > <module > maven_helloworld</module > <module > HelloFriend</module > <module > MakeFriend</module > </modules >
Maven在IDEA创建
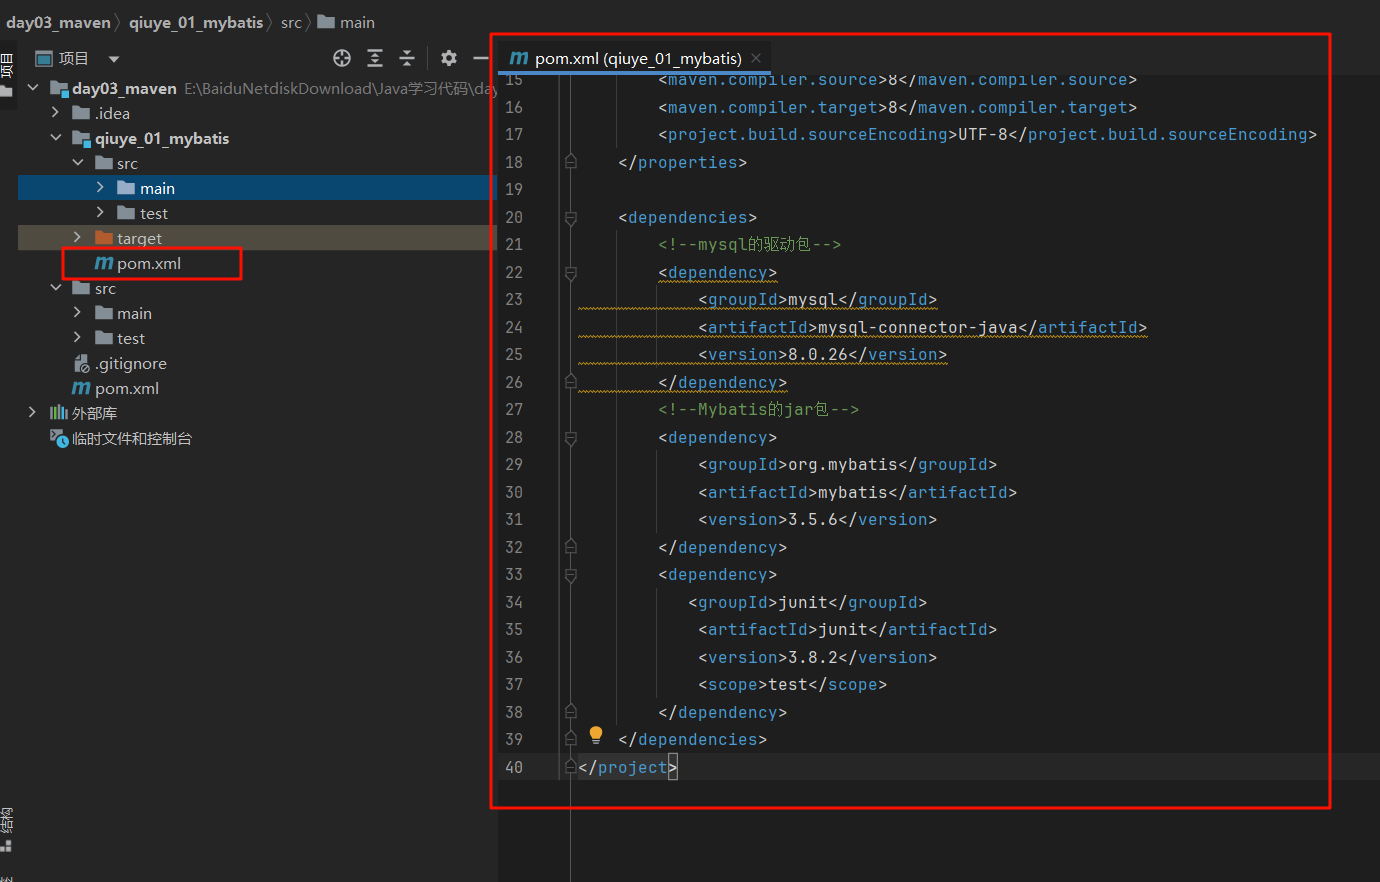
Mybatis Mybatis是一个半自动化持久化层ORM框架 ORM:Object Relational Mapping [对象 关系 映射] 搭建Mybatis框架 1.导入jar包 1 2 3 4 5 6 7 8 9 10 11 12 13 14 15 16 17 18 19 20 21 22 23 24 25 26 27 28 29 30 31 32 33 34 35 36 37 38 39 40 <?xml version="1.0" encoding="UTF-8" ?> <project xmlns ="http://maven.apache.org/POM/4.0.0" xmlns:xsi ="http://www.w3.org/2001/XMLSchema-instance" xsi:schemaLocation ="http://maven.apache.org/POM/4.0.0 http://maven.apache.org/xsd/maven-4.0.0.xsd" > <modelVersion > 4.0.0</modelVersion > <parent > <groupId > top.dreamlove</groupId > <artifactId > day03_maven</artifactId > <version > 1.0-SNAPSHOT</version > </parent > <artifactId > qiuye_01_mybatis</artifactId > <properties > <maven.compiler.source > 8</maven.compiler.source > <maven.compiler.target > 8</maven.compiler.target > <project.build.sourceEncoding > UTF-8</project.build.sourceEncoding > </properties > <dependencies > <dependency > <groupId > mysql</groupId > <artifactId > mysql-connector-java</artifactId > <version > 8.0.26</version > </dependency > <dependency > <groupId > org.mybatis</groupId > <artifactId > mybatis</artifactId > <version > 3.5.6</version > </dependency > <dependency > <groupId > junit</groupId > <artifactId > junit</artifactId > <version > 3.8.2</version > <scope > test</scope > </dependency > </dependencies > </project >
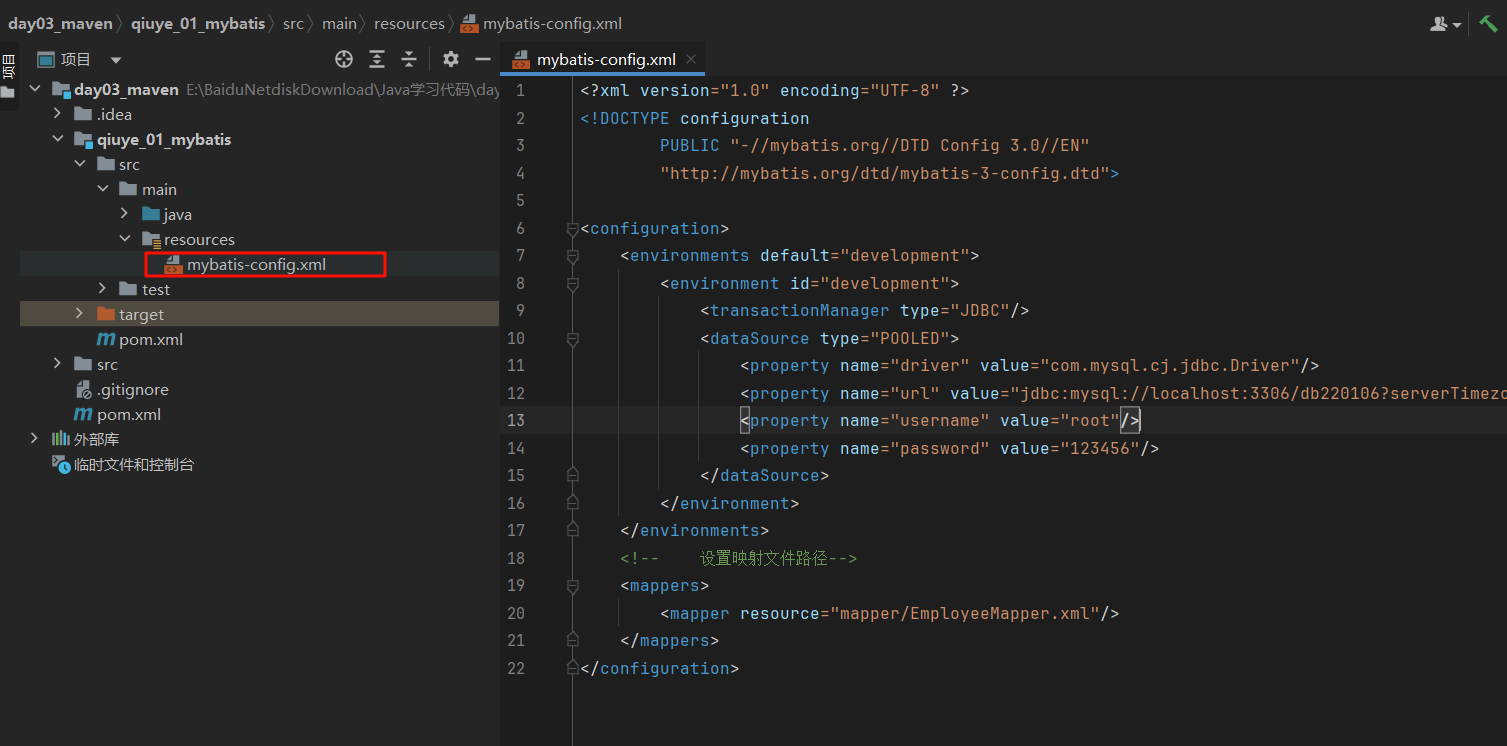
2.编写核心配置文件 【mybatis-config.xml】 1 2 3 4 5 6 7 8 9 10 11 12 13 14 15 16 17 18 19 20 21 22 23 24 25 26 <?xml version="1.0" encoding="UTF-8" ?> <!DOCTYPE configuration PUBLIC "-//mybatis.org//DTD Config 3.0//EN" "http://mybatis.org/dtd/mybatis-3-config.dtd" > <configuration > <environments default ="development" > <environment id ="development" > <transactionManager type ="JDBC" /> <dataSource type ="POOLED" > <property name ="driver" value ="com.mysql.jdbc.Driver" /> <property name ="url" value ="jdbc:mysql://localhost:3306/db220106" /> <property name ="username" value ="root" /> <property name ="password" value ="root" /> </dataSource > </environment > </environments > <mappers > <mapper resource ="mapper/EmployeeMapper.xml" /> </mappers > </configuration >
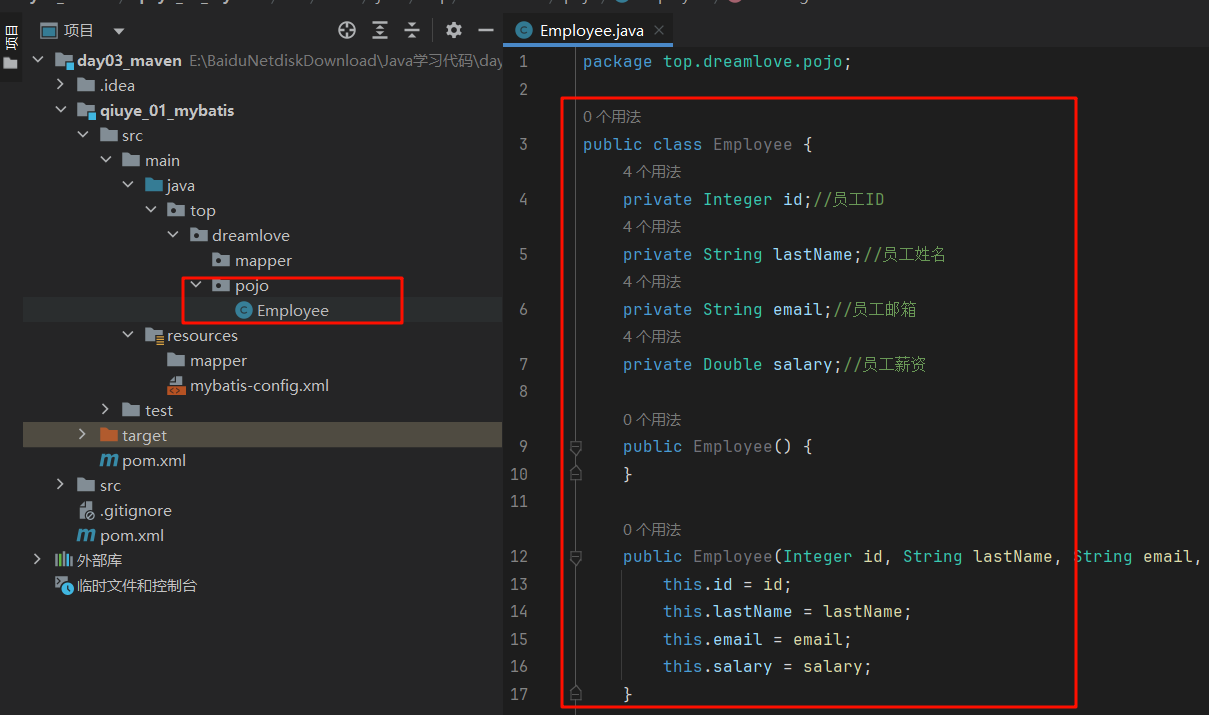
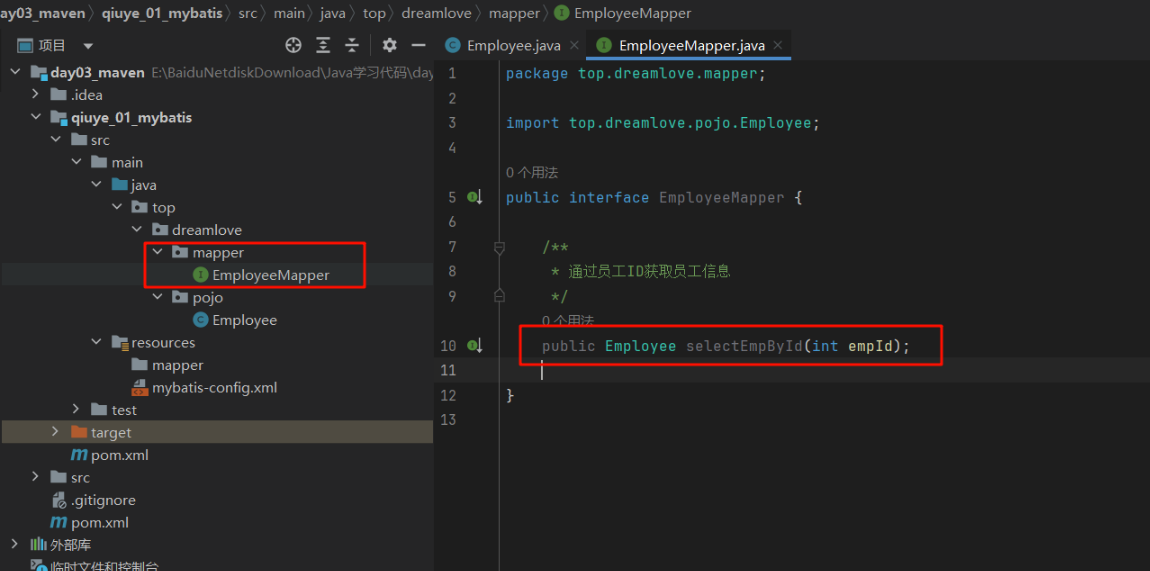
3.书写相关接口及映射文件
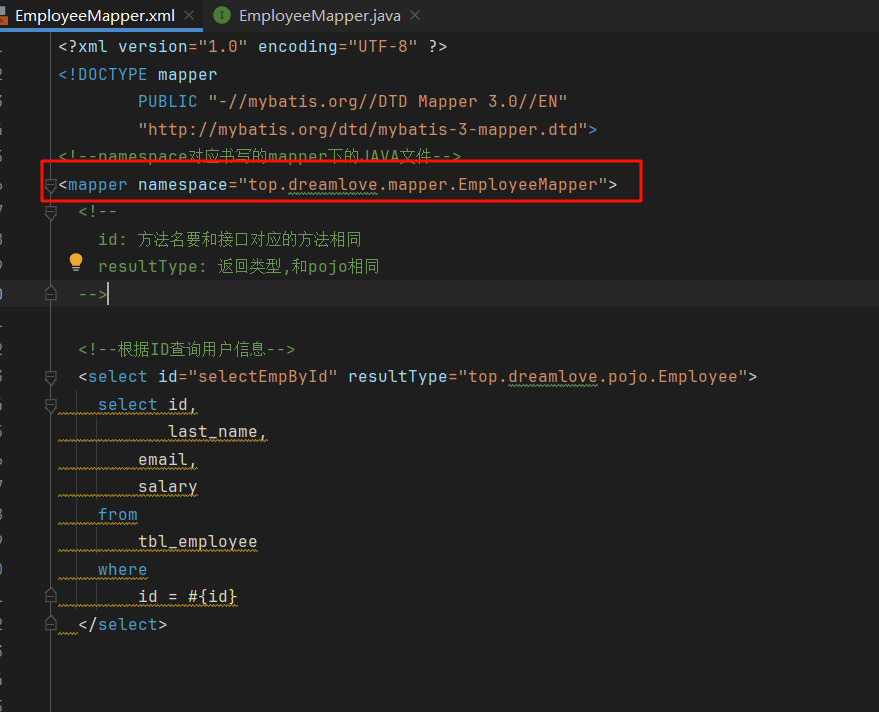
1 2 3 4 5 6 7 8 9 10 11 12 13 14 15 16 17 18 19 20 21 22 <?xml version="1.0" encoding="UTF-8" ?> <!DOCTYPE mapper PUBLIC "-//mybatis.org//DTD Mapper 3.0//EN" "http://mybatis.org/dtd/mybatis-3-mapper.dtd" > <mapper namespace ="top.dreamlove.mapper.EmployeeMapper" > <select id ="selectEmpById" resultType ="top.dreamlove.pojo.Employee" > select id, last_name lastName, email, salary from tbl_employee where id = #{id} </select > </mapper >
1 2 3 4 5 6 7 8 9 10 11 12 13 14 15 16 17 18 19 20 21 22 23 24 25 26 27 28 29 30 31 32 33 34 35 36 37 import org.apache.ibatis.session.SqlSession;import org.apache.ibatis.session.SqlSessionFactory;import org.apache.ibatis.session.SqlSessionFactoryBuilder;import org.junit.Test;import org.apache.ibatis.io.Resources;import top.dreamlove.mapper.EmployeeMapper;import top.dreamlove.pojo.Employee;import java.io.IOException;import java.io.InputStream;public class TestMybatis { @Test public void testMyBatis () { String resource = "mybatis-config.xml" ; try { InputStream inputStream = Resources.getResourceAsStream(resource); SqlSessionFactory sqlSessionFactory = new SqlSessionFactoryBuilder ().build(inputStream); SqlSession sqlSession = sqlSessionFactory.openSession(); EmployeeMapper employeeMapper = sqlSession.getMapper(EmployeeMapper.class); System.out.println("employeeMapper = " + employeeMapper); Employee employee = employeeMapper.selectEmpById(1 ); System.out.println("employee = " + employee.toString()); } catch (IOException e) { throw new RuntimeException (e); } } }
4.添加log4j日志jar包 1 2 3 4 5 6 7 <dependency > <groupId > log4j</groupId > <artifactId > log4j</artifactId > <version > 1.2.17</version > </dependency >
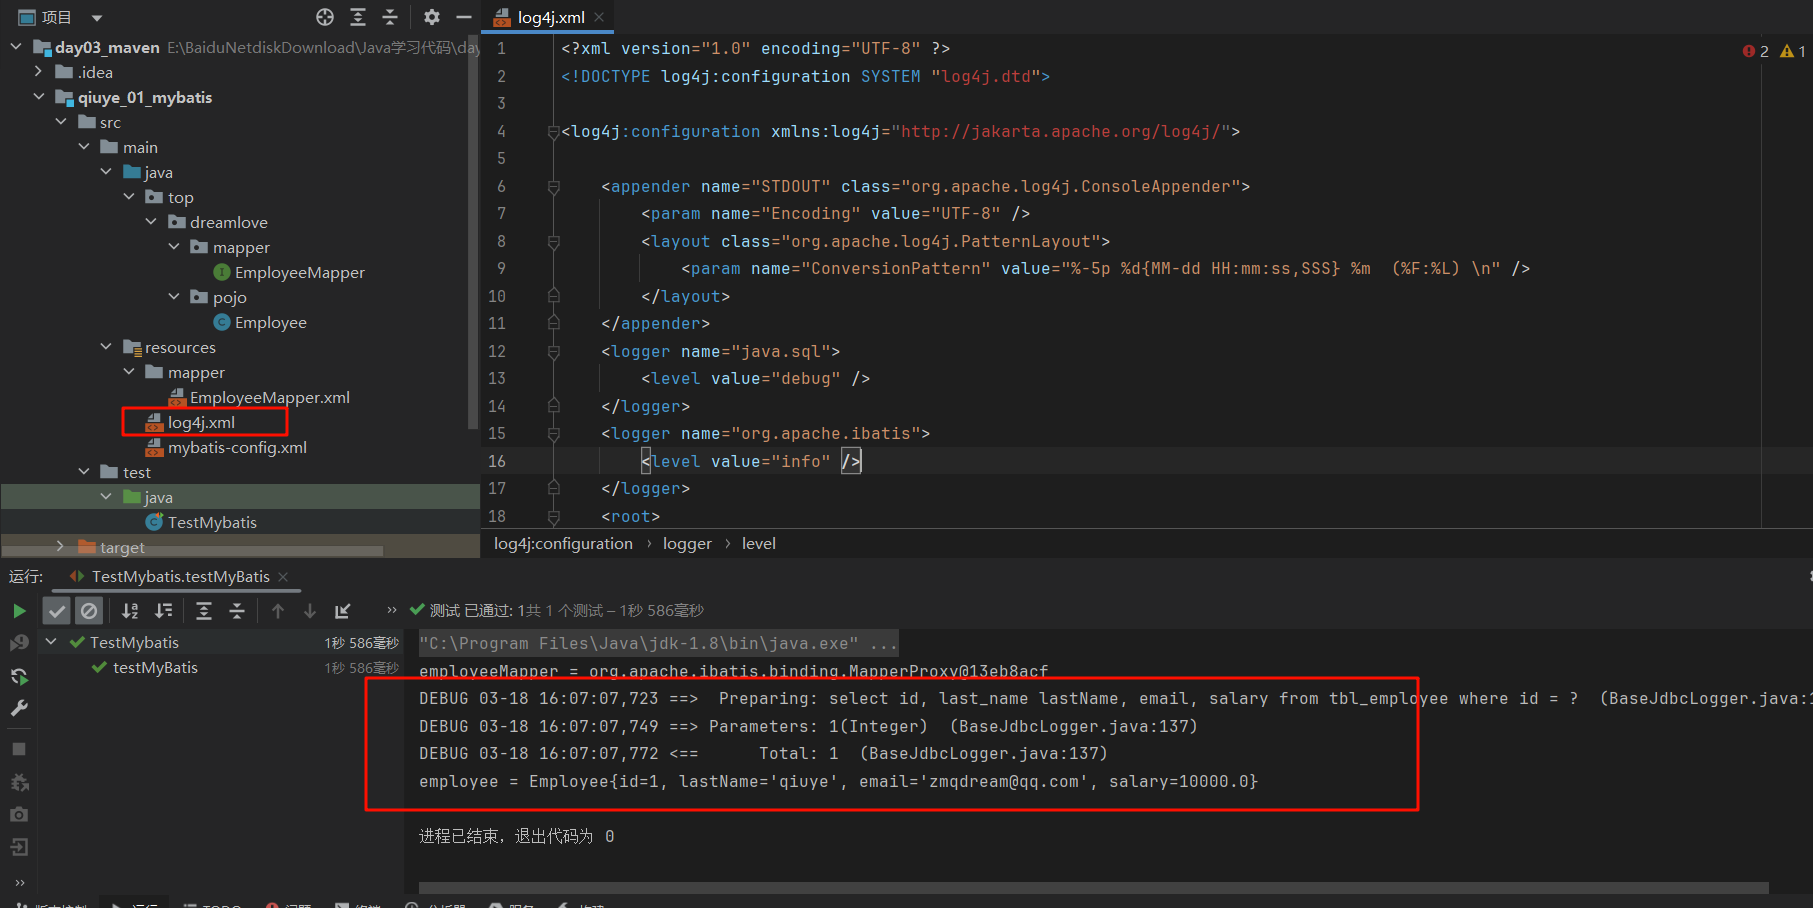
1 2 3 4 5 6 7 8 9 10 11 12 13 14 15 16 17 18 19 20 21 22 <?xml version="1.0" encoding="UTF-8" ?> <!DOCTYPE log4j :configuration SYSTEM "log4j.dtd" > <log4j:configuration xmlns:log4j ="http://jakarta.apache.org/log4j/" > <appender name ="STDOUT" class ="org.apache.log4j.ConsoleAppender" > <param name ="Encoding" value ="UTF-8" /> <layout class ="org.apache.log4j.PatternLayout" > <param name ="ConversionPattern" value ="%-5p %d{MM-dd HH:mm:ss,SSS} %m (%F:%L) \n" /> </layout > </appender > <logger name ="java.sql" > <level value ="debug" /> </logger > <logger name ="org.apache.ibatis" > <level value ="info" /> </logger > <root > <level value ="debug" /> <appender-ref ref ="STDOUT" /> </root > </log4j:configuration >
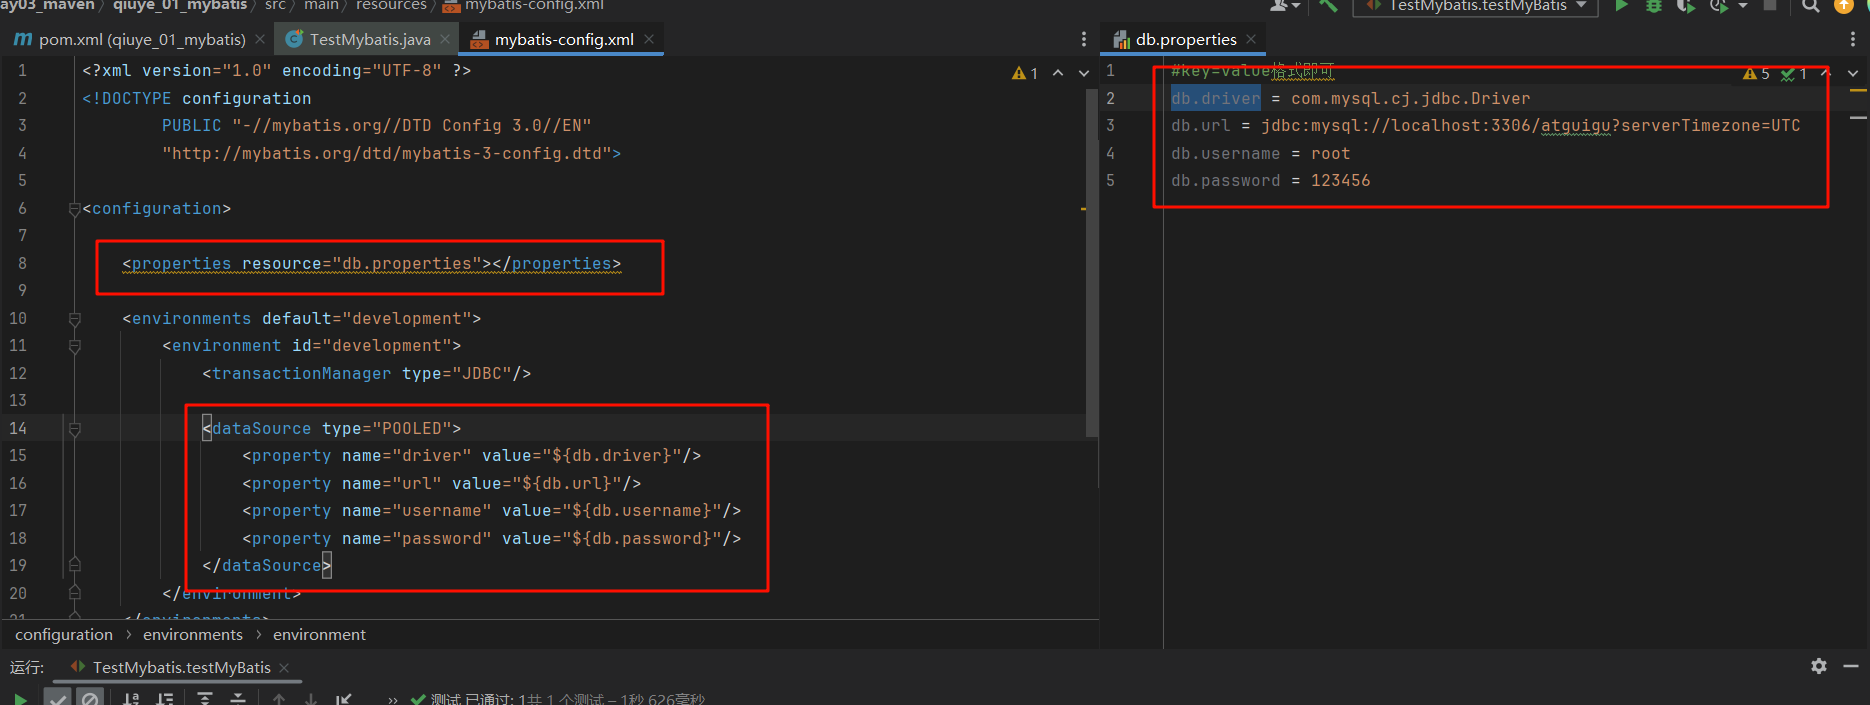
Mybatis配置 properties 可以通过resources来引入外部文件(基于类路径)
1 2 3 4 5 6 7 8 9 10 11 12 13 14 15 16 17 18 19 20 21 22 23 24 25 26 <?xml version="1.0" encoding="UTF-8" ?> <!DOCTYPE configuration PUBLIC "-//mybatis.org//DTD Config 3.0//EN" "http://mybatis.org/dtd/mybatis-3-config.dtd" > <configuration > <properties resource ="db.properties" > </properties > <environments default ="development" > <environment id ="development" > <transactionManager type ="JDBC" /> <dataSource type ="POOLED" > <property name ="driver" value ="${db.driver}" /> <property name ="url" value ="${db.url}" /> <property name ="username" value ="${db.username}" /> <property name ="password" value ="${db.password}" /> </dataSource > </environment > </environments > <mappers > <mapper resource ="mapper/EmployeeMapper.xml" /> </mappers > </configuration >
也可以通过url来引入(基于系统路径,盘符啥的) 也可以直接书写 1 2 3 4 5 6 7 8 9 10 11 12 <properties resource ="org/mybatis/example/config.properties" > <property name ="username" value ="dev_user" /> <property name ="password" value ="F2Fa3!33TYyg" /> </properties > 使用 <dataSource type ="POOLED" > <property name ="driver" value ="${driver}" /> <property name ="url" value ="${url}" /> <property name ="username" value ="${username}" /> <property name ="password" value ="${password}" /> </dataSource >
setting typeAliases 1 2 3 4 5 6 7 8 <typeAliases > <package name ="com.atguigu.mybatis.pojo" /> </typeAliases >
environments 1 2 3 4 5 6 7 8 9 10 11 12 13 14 15 16 <environments default ="development" > <environment id ="development" > <transactionManager type ="JDBC" /> <dataSource type ="POOLED" > <property name ="driver" value ="${db.driver}" /> <property name ="url" value ="${db.url}" /> <property name ="username" value ="${db.username}" /> <property name ="password" value ="${db.password}" /> </dataSource > </environment > </environments >
mappers子标签 1 2 3 4 5 6 <mappers > <mapper resource ="mapper/EmployeeMapper.xml" /> </mappers >
Mybatis映射 映射文件概述 MyBatis 的真正强大在于它的语句映射,这是它的魔力所在。 如果拿它跟具有相同功能的 JDBC 代码进行对比,你会立即发现省掉了将近 95% 的代码。 映射文件根标签 mapper标签 mapper中的namespace要求与接口的全类名一致
映射文件子标签 子标签共有9个,注意学习其中8大子标签
1 2 3 4 5 6 7 8 9 10 11 12 13 14 15 16 <?xml version="1.0" encoding="UTF-8" ?> <!DOCTYPE mapper PUBLIC "-//mybatis.org//DTD Mapper 3.0//EN" "http://mybatis.org/dtd/mybatis-3-mapper.dtd" > <mapper namespace ="top.dreamlove.mapper.EmployeeMapper" > <insert id ="addEmployee" > insert into tbl_employee(last_name,email,salary) values(#{lastName},#{email},#{salary}) </insert > </mapper >
1 2 3 4 5 6 7 8 9 10 11 12 13 14 15 <?xml version="1.0" encoding="UTF-8" ?> <!DOCTYPE mapper PUBLIC "-//mybatis.org//DTD Mapper 3.0//EN" "http://mybatis.org/dtd/mybatis-3-mapper.dtd" > <mapper namespace ="top.dreamlove.mapper.EmployeeMapper" > <delete id ="deleteEmployee" > delete from tbl_employee where id = #{empId} </delete > </mapper >
1 2 3 4 5 6 7 8 9 10 11 12 13 14 15 16 <?xml version="1.0" encoding="UTF-8" ?> <!DOCTYPE mapper PUBLIC "-//mybatis.org//DTD Mapper 3.0//EN" "http://mybatis.org/dtd/mybatis-3-mapper.dtd" > <mapper namespace ="top.dreamlove.mapper.EmployeeMapper" > <update id ="updateEmployee" > update tbl_employee set last_name=#{lastName},email=#{email},salary=#{salary} where id = #{id}; </update > </mapper >
1 2 3 4 5 6 7 8 9 10 11 12 13 14 15 <?xml version="1.0" encoding="UTF-8" ?> <!DOCTYPE mapper PUBLIC "-//mybatis.org//DTD Mapper 3.0//EN" "http://mybatis.org/dtd/mybatis-3-mapper.dtd" > <mapper namespace ="top.dreamlove.mapper.EmployeeMapper" > <select id ="selectAllEmployee" resultType ="top.dreamlove.pojo.Employee" > select id,last_name,email,salary from tbl_employee </select > </mapper >
sql标签:定义可重用的SQL语句块 cache标签:设置当前命名空间的缓存配置 cache-ref标签:设置其他命名空间的缓存配置 resultMap标签: 描述如何从数据库结果集中加载对象resultType解决不了的问题,交个resultMap。 获取主键自增数据 1 2 3 4 5 6 7 8 9 10 11 12 13 14 15 16 17 <?xml version="1.0" encoding="UTF-8" ?> <!DOCTYPE mapper PUBLIC "-//mybatis.org//DTD Mapper 3.0//EN" "http://mybatis.org/dtd/mybatis-3-mapper.dtd" > <mapper namespace ="top.dreamlove.mapper.EmployeeMapper" > <insert id ="addEmployee" useGeneratedKeys ="true" keyProperty ="id" > insert into tbl_employee(last_name,email,salary) values(#{lastName},#{email},#{salary}) </insert > </mapper >
1 2 3 4 Employee employee1 = new Employee (null ,"李白" ,"zmqdream@qq.com" ,1000.0 );employeeMapper.addEmployee(employee1); System.out.println(employee1.getId());
获取数据库受影响行数 直接将接口中方法的返回值设置为int或boolean即可
int:代表受影响行数 booleantrue:表示对数据库有影响 false:表示对数据库无影响 Mybatis参数传递问题 单个参数 单个普通参数 可以任意使用:参数数据类型、参数名称不用考虑当然,不建议这样,接口的参数名称是什么名称,一般映射当中就要什么名称 1 2 3 4 5 6 7 8 9 10 11 12 13 Employee selectEmpById (int empId) ; <!--根据ID查询用户信息--> <select id="selectEmpById" resultType="top.dreamlove.pojo.Employee" > select id, last_name, email, salary from tbl_employee where id = #{abcdefff} </select>
多个普通参数 Mybatis底层封装Map结构,封装key为param1、param2….【支持:arg0、arg1、…】 1 2 3 4 5 6 7 8 9 10 11 12 13 14 15 16 17 <?xml version="1.0" encoding="UTF-8" ?> <!DOCTYPE mapper PUBLIC "-//mybatis.org//DTD Mapper 3.0//EN" "http://mybatis.org/dtd/mybatis-3-mapper.dtd" > <mapper namespace ="top.dreamlove.mapper.EmployeeMapper" > <select id ="selectEmployName" resultType ="top.dreamlove.pojo.Employee" > select * from tbl_employee where last_name = #{param1} and email = #{param2} </select > </mapper >
1 2 3 4 5 6 7 8 9 10 11 12 13 14 15 package top.dreamlove.mapper;import top.dreamlove.pojo.Employee;import java.util.List;public interface EmployeeMapper { Employee selectEmployName (String name,String email) ; }
POJO参数 Mybatis支持POJO【JavaBean】入参,参数key是POJO中属性 也就是这个对象里面的属性可以直接拿来用(有点类似于前端的自动帮你解构赋值了) 多个普通参数(命名参数) 1 2 3 4 5 6 public List<Employee> selectEmpByNamed (@Param("lName") String lastName, @Param("salary") double salary) ;
1 2 3 4 5 6 7 8 9 10 11 12 13 14 15 16 17 18 <select id ="selectEmpByNamed" resultType ="employee" > SELECT id, last_name, email, salary FROM tbl_employee WHERE last_name=#{param1} AND salary=#{param2} </select > 或者不适用param1 <select id ="selectEmployName" resultType ="top.dreamlove.pojo.Employee" > select * from tbl_employee where last_name = #{lName} and email = #{salary} </select >
Map参数 Mybatis支持直接Map入参,map的key=参数key 1 Employee selectEmployName (Map<String,Object> map) ;
1 2 3 Map<String,Object> map = new HashMap <>(); map.put("Name" ,"李白" ); map.put("Email" ,"zmqdream@qq.com" );
1 2 3 <select id ="selectEmployName" resultType ="top.dreamlove.pojo.Employee" > select * from tbl_employee where last_name = #{Name} and email = #{Email} </select >
#与$使用场景 1 2 3 4 public List<Employee> selectEmpByDynamitTable (@Param("tblName") String tblName) ;
1 2 3 4 5 6 7 8 9 <select id ="selectEmpByDynamitTable" resultType ="employee" > SELECT id, last_name, email, salary FROM ${tblName} </select >
select查询返回值情况 查询单行数据返回Map集合resultType写一个map就可以,因为底层有别名的存在
Map<String key,Object value>
字段作为Map的key,查询结果作为Map的Value 1 2 3 4 5 public Map<String,Object> selectEmpReturnMap (int empId) ;
1 2 3 4 5 6 7 8 9 10 11 12 <select id ="selectEmpReturnMap" resultType ="map" > SELECT id, last_name, email, salary FROM tbl_employee WHERE id=#{empId} </select >
1 2 3 4 5 6 7 8 9 10 @MapKey("id") public Map<Integer,Employee> selectEmpsReturnMap () ;
1 2 3 4 5 6 7 8 9 <select id ="selectEmpsReturnMap" resultType ="map" > SELECT id, last_name, email, salary FROM tbl_employee </select >
Mybatis中自动映射与自定义映射 自动映射【resultType】
自定义映射【resultMap】
8.1 自动映射与自定义映射 自动映射【resultType】:指的是自动将表中的字段与类中的属性进行关联映射自动映射解决不了两类问题多表连接查询时,需要返回多张表的结果集 单表查询时,不支持驼峰式自动映射【不想为字段定义别名】 自定义映射【resultMap】:自动映射解决不了问题,交给自定义映射 注意:resultType与resultMap只能同时使用一个 8.2 自定义映射-级联映射 1 2 3 4 5 6 7 8 9 10 11 12 13 14 15 16 17 18 19 20 21 22 23 24 25 26 27 28 <resultMap id ="empAndDeptResultMap" type ="employee" > <id column ="id" property ="id" > </id > <result column ="last_name" property ="lastName" > </result > <result column ="email" property ="email" > </result > <result column ="salary" property ="salary" > </result > <result column ="dept_id" property ="dept.deptId" > </result > <result column ="dept_name" property ="dept.deptName" > </result > </resultMap > <select id ="selectEmpAndDeptByEmpId" resultMap ="empAndDeptResultMap" > SELECT e.`id`, e.`email`, e.`last_name`, e.`salary`, d.`dept_id`, d.`dept_name` FROM tbl_employee e, tbl_dept d WHERE e.`dept_id` = d.`dept_id` AND e.`id` = #{empId} </select >
8.3 自定义映射-association映射 特点:解决一对一映射关系【一对多】
示例代码
1 2 3 4 5 6 7 8 9 10 11 12 13 14 15 16 17 18 19 20 21 22 23 24 25 26 27 <resultMap id ="deptAndempResultMap" type ="dept" > <id property ="deptId" column ="dept_id" > </id > <result property ="deptName" column ="dept_name" > </result > <collection property ="empList" ofType ="com.atguigu.mybatis.pojo.Employee" > <id column ="id" property ="id" > </id > <result column ="last_name" property ="lastName" > </result > <result column ="email" property ="email" > </result > <result column ="salary" property ="salary" > </result > </collection > </resultMap > <select id ="selectDeptAndEmpByDeptId" resultMap ="deptAndempResultMap" > SELECT e.`id`, e.`email`, e.`last_name`, e.`salary`, d.`dept_id`, d.`dept_name` FROM tbl_employee e, tbl_dept d WHERE e.`dept_id` = d.`dept_id` AND d.dept_id = #{deptId} </select >
8.5 ResultMap相关标签及属性 resultMap标签:自定义映射标签
resultMap子标签
id标签:定义主键字段与属性关联关系 result标签:定义非主键字段与属性关联关系column属性:定义表中字段名称 property属性:定义类中属性名称 association标签:定义一对一的关联关系property:定义关联关系属性 javaType:定义关联关系属性的类型 select:设置分步查询SQL全路径 colunm:设置分步查询SQL中需要参数 collection标签:定义一对多的关联关系property:定义一对一关联关系属性 ofType:定义一对一关联关系属性类型 8.6 Mybatis中分步查询 为什么使用分步查询【分步查询优势】?将多表连接查询,改为【分步单表查询】,从而提高程序运行效率 MBG MyBatisGenerator:简称MBG
是一个专门为MyBatis框架使用者定制的代码生成器
可以快速的根据表生成对应的映射文件,接口,以及bean类。
只可以生成单表CRUD,但是表连接、存储过程等这些复杂sgl的定义需要我们手工编写
Mybatis中分页插件 Spring 1 2 3 4 5 6 7 8 9 10 public void test1 () { ApplicationContext iocObj = new ClassPathXmlApplicationContext ("applicationContext.xml" ); Student student = (Student) iocObj.getBean("qiuyeStu" ); System.out.println("student = " + student); }
1 2 3 4 5 6 7 8 9 10 11 12 <?xml version="1.0" encoding="UTF-8" ?> <beans xmlns ="http://www.springframework.org/schema/beans" xmlns:xsi ="http://www.w3.org/2001/XMLSchema-instance" xsi:schemaLocation ="http://www.springframework.org/schema/beans http://www.springframework.org/schema/beans/spring-beans.xsd" > <bean id ="qiuyeStu" class ="top.dreamlove.pojo.Student" > <property name ="id" value ="100" /> <property name ="name" value ="libai" /> </bean > </beans >
Spring中getBean()三种方式 getBean(String beanId):通过beanId获取对象
getBean(Class clazz):通过Class方式获取对象
getBean(String beanId,Clazz clazz):通过beanId和Class获取对象
Spring依赖注入数值问题 1 2 3 <bean id="qiuyeStu1" class="top.dreamlove.pojo.Student" > <property name="name" value="<西游记>" /> </bean>
1 2 3 4 5 <bean id ="qiuyeStu1" class ="top.dreamlove.pojo.Student" > <property name ="name" > <value > <![CDATA[<红楼梦>]]> </value > </property > </bean >
语法:<![CDATA[]]> 作用:在xml中定义特殊字符时 ,使用CDATA区 SpringBoot HelloWorld 1 2 3 4 5 6 7 8 9 10 11 package top.dreamlove.boot;import org.springframework.boot.SpringApplication;import org.springframework.boot.autoconfigure.SpringBootApplication;@SpringBootApplication public class MainController { public static void main (String[] args) { SpringApplication.run(MainController.class,args); } }
1 2 3 4 5 6 7 8 9 10 11 12 package top.dreamlove.boot.controller;import org.springframework.web.bind.annotation.RequestMapping;import org.springframework.web.bind.annotation.RestController;@RestController public class HelloController { @RequestMapping("/hello") public String handle01 () { return "hello,wordl" ; } }
1 2 3 4 5 6 7 8 9 10 11 12 13 14 15 16 17 18 19 20 21 22 23 24 25 26 27 28 29 30 31 32 33 <?xml version="1.0" encoding="UTF-8" ?> <project xmlns ="http://maven.apache.org/POM/4.0.0" xmlns:xsi ="http://www.w3.org/2001/XMLSchema-instance" xsi:schemaLocation ="http://maven.apache.org/POM/4.0.0 https://maven.apache.org/xsd/maven-4.0.0.xsd" > <modelVersion > 4.0.0</modelVersion > <groupId > com.example</groupId > <artifactId > myproject</artifactId > <version > 0.0.1-SNAPSHOT</version > <parent > <groupId > org.springframework.boot</groupId > <artifactId > spring-boot-starter-parent</artifactId > <version > 2.7.18</version > </parent > <dependencies > <dependency > <groupId > org.springframework.boot</groupId > <artifactId > spring-boot-starter-web</artifactId > </dependency > </dependencies > <build > <plugins > <plugin > <groupId > org.springframework.boot</groupId > <artifactId > spring-boot-maven-plugin</artifactId > </plugin > </plugins > </build > </project >
1 2 3 4 5 1、查看spring-boot-dependencies里面规定当前依赖的版本 用的 key。 2、在当前项目里面重写配置 <properties > <mysql.version > 5.1.43</mysql.version > </properties >
主程序所在包及其下面的所有子包里面的组件都会被默认扫描进来 无需以前的包扫描配置 @Configuration @Conditional 可以对类使用,当满足条件,则类里面的所有会被注入, 也可以对某一个方法使用,当满足,这个方法才会被注入 @ImportResource @PathVariable 1 2 3 4 5 6 7 8 9 10 11 12 13 14 @RestController public class ParamController { @GetMapping("/car/{id}/owner/{userName}") public Map<String,Object> getInfo (@PathVariable("id") String id, @PathVariable("userName") String username ) { Map<String,Object> map = new HashMap <>(); map.put("id" ,id); map.put("userName" ,username); return map; } }
1 2 3 4 { "id" : "3" , "userName" : "libai" }
@RequestParam 1 2 3 4 5 6 7 8 9 10 11 12 13 14 15 16 17 @RestController public class ParamController { @GetMapping("/car/{id}/owner/{userName}") public Map<String,Object> getInfo (@PathVariable("id") String id, @PathVariable("userName") String username, @RequestParam("age") Integer age, @RequestParam("hobby") List<String> hobby ) { Map<String,Object> map = new HashMap <>(); map.put("id" ,id); map.put("userName" ,username); map.put("age" ,age); map.put("hobby" ,hobby); return map; } }
1 2 3 4 5 6 7 8 9 { "id" : "3" , "userName" : "libai" , "age" : 18 , "hobby" : [ "吃饭" , "睡觉" ] }
1 2 3 4 5 6 7 8 9 10 11 12 13 14 15 16 17 18 19 20 21 22 23 @RestController public class ParamController { @GetMapping("/car/{id}/owner/{userName}") public Map<String,Object> getInfo (@PathVariable("id") String id, @PathVariable("userName") String username, @RequestParam("age") Integer age, @RequestParam("hobby") List<String> hobby, @RequestHeader("User-Agent") String agent, @RequestHeader Map<String,String> header ) { Map<String,Object> map = new HashMap <>(); map.put("id" ,id); map.put("userName" ,username); map.put("age" ,age); map.put("hobby" ,hobby); map.put("agent" ,agent); map.put("所有请求头" ,header); return map; } }
1 2 3 4 5 6 7 8 9 10 11 12 13 14 15 16 17 18 19 20 21 22 23 24 25 26 27 28 { "agent" : "Mozilla/5.0 (Windows NT 10.0; Win64; x64) AppleWebKit/537.36 (KHTML, like Gecko) Chrome/123.0.0.0 Safari/537.36" , "所有请求头" : { "host" : "localhost:9909" , "connection" : "keep-alive" , "cache-control" : "max-age=0" , "sec-ch-ua" : "\"Google Chrome\";v=\"123\", \"Not:A-Brand\";v=\"8\", \"Chromium\";v=\"123\"" , "sec-ch-ua-mobile" : "?0" , "sec-ch-ua-platform" : "\"Windows\"" , "upgrade-insecure-requests" : "1" , "user-agent" : "Mozilla/5.0 (Windows NT 10.0; Win64; x64) AppleWebKit/537.36 (KHTML, like Gecko) Chrome/123.0.0.0 Safari/537.36" , "accept" : "text/html,application/xhtml+xml,application/xml;q=0.9,image/avif,image/webp,image/apng,*/*;q=0.8,application/signed-exchange;v=b3;q=0.7" , "sec-fetch-site" : "none" , "sec-fetch-mode" : "navigate" , "sec-fetch-user" : "?1" , "sec-fetch-dest" : "document" , "accept-encoding" : "gzip, deflate, br, zstd" , "accept-language" : "zh-CN,zh;q=0.9,en;q=0.8" , "cookie" : "Idea-8296f2b3=4f2c3186-368f-495a-91d3-c900f7982eb4" } , "id" : "3" , "userName" : "libai" , "age" : 18 , "hobby" : [ "吃饭" , "睡觉" ] }
@CookieValue 1 2 3 4 5 6 7 8 9 10 11 12 13 14 15 16 17 18 19 20 21 22 23 24 25 26 27 28 @RestController public class ParamController { @GetMapping("/car/{id}/owner/{userName}") public Map<String,Object> getInfo (@PathVariable("id") String id, @PathVariable("userName") String username, @RequestParam("age") Integer age, @RequestParam("hobby") List<String> hobby, @RequestHeader("User-Agent") String agent, @RequestHeader Map<String,String> header, @CookieValue("Idea-8296f2b3") String Cookie1, @CookieValue("Idea-8296f2b3") Cookie cookie2 ) { Map<String,Object> map = new HashMap <>(); map.put("id" ,id); map.put("userName" ,username); map.put("age" ,age); map.put("hobby" ,hobby); map.put("agent" ,agent); map.put("所有请求头" ,header); map.put("cookie1" ,Cookie1); map.put("cookie2" ,cookie2.getValue()); return map; } }
1 2 3 4 5 6 7 8 9 10 11 12 13 14 15 16 17 18 19 20 21 22 23 24 25 26 27 28 29 30 31 { "agent" : "Mozilla/5.0 (Windows NT 10.0; Win64; x64) AppleWebKit/537.36 (KHTML, like Gecko) Chrome/123.0.0.0 Safari/537.36" , "所有请求头" : { "host" : "localhost:9909" , "connection" : "keep-alive" , "pragma" : "no-cache" , "cache-control" : "no-cache" , "sec-ch-ua" : "\"Google Chrome\";v=\"123\", \"Not:A-Brand\";v=\"8\", \"Chromium\";v=\"123\"" , "sec-ch-ua-mobile" : "?0" , "sec-ch-ua-platform" : "\"Windows\"" , "upgrade-insecure-requests" : "1" , "user-agent" : "Mozilla/5.0 (Windows NT 10.0; Win64; x64) AppleWebKit/537.36 (KHTML, like Gecko) Chrome/123.0.0.0 Safari/537.36" , "accept" : "text/html,application/xhtml+xml,application/xml;q=0.9,image/avif,image/webp,image/apng,*/*;q=0.8,application/signed-exchange;v=b3;q=0.7" , "sec-fetch-site" : "none" , "sec-fetch-mode" : "navigate" , "sec-fetch-user" : "?1" , "sec-fetch-dest" : "document" , "accept-encoding" : "gzip, deflate, br, zstd" , "accept-language" : "zh-CN,zh;q=0.9,en;q=0.8" , "cookie" : "Idea-8296f2b3=4f2c3186-368f-495a-91d3-c900f7982eb4" } , "id" : "3" , "userName" : "libai" , "cookie1" : "4f2c3186-368f-495a-91d3-c900f7982eb4" , "age" : 18 , "hobby" : [ "吃饭" , "睡觉" ] , "cookie2" : "4f2c3186-368f-495a-91d3-c900f7982eb4" }
@RequestAttribute 获取request域属性 既可以通过注解获取,也可以通过request.getAttribute()方法获取 拦截器 1 2 3 4 5 6 7 8 9 10 11 12 13 14 15 16 17 18 19 20 21 22 package top.dreamlove.admin.config;import org.springframework.context.annotation.Configuration;import org.springframework.web.servlet.config.annotation.InterceptorRegistry;import org.springframework.web.servlet.config.annotation.WebMvcConfigurer;import top.dreamlove.admin.interceptor.LoginInterceptor;@Configuration public class AdminWebConfig implements WebMvcConfigurer { @Override public void addInterceptors (InterceptorRegistry registry) { registry.addInterceptor(new LoginInterceptor ()) .addPathPatterns("/**" ) .excludePathPatterns("/" , "/login" , "/css/**" , "/fonts/**" , "/images/**" , "/js/**" ); } }
1 2 3 4 5 6 7 8 9 10 11 12 13 14 15 16 17 18 19 20 21 22 23 24 25 26 27 28 29 30 31 32 33 34 35 36 37 38 39 40 41 42 43 44 45 46 47 48 49 package top.dreamlove.admin.interceptor;import lombok.extern.slf4j.Slf4j;import org.springframework.web.servlet.HandlerInterceptor;import org.springframework.web.servlet.ModelAndView;import javax.servlet.http.HttpServletRequest;import javax.servlet.http.HttpServletResponse;import javax.servlet.http.HttpSession;@Slf4j public class LoginInterceptor implements HandlerInterceptor { @Override public boolean preHandle (HttpServletRequest request, HttpServletResponse response, Object handler) throws Exception { HttpSession session = request.getSession(); String requestURI = request.getRequestURI(); if (session.getAttribute("user" ) == null ){ log.info("拦截" + session.getAttribute("user" ) + "地址:" + requestURI); request.setAttribute("msg" ,"请登录" ); request.getRequestDispatcher("/" ).forward(request,response); return false ; }else { return true ; } } @Override public void postHandle (HttpServletRequest request, HttpServletResponse response, Object handler, ModelAndView modelAndView) throws Exception { HandlerInterceptor.super .postHandle(request, response, handler, modelAndView); } @Override public void afterCompletion (HttpServletRequest request, HttpServletResponse response, Object handler, Exception ex) throws Exception { HandlerInterceptor.super .afterCompletion(request, response, handler, ex); } }
MyBatis-plus 默认情况下名称和表名对应,可以通过@TableName("user_tabl")来指定表名 基本 window版本的redis redis是区分大小写的 如果需要显示中文,登录的时候redis-cli --raw即可 菜鸟笔记记的很好,我这边只是自己看看 字符串 get key
set key
setnx key value
del key
exists key
keys pattern
flushall
ttl key
expire key second
列表(list)-命令l开头 元素是可以重复的
lpush key value1,value2,value3,…valueN
rpush key value1,value2,value3,…valueN
lrange key start stop
start为起始位置,stop为结束位置(以0开始) lrange letter 0 -1从开始获取到最后(获取所有)lpop key count
rpop key count
llen key
LTRIM key start stop
对一个列表进行修剪(trim),就是说,让列表只保留指定区间内的元素,不在指定区间之内的元素都将被删除。 集合(set)-命令s开头 无序的,且元素不可以重复
sadd key member1,member2,…,memberN,
smembers key
sismember key member
srem key member
集合运算
有序集合(sortedset或zset)-命令以z开头 有序集合的每个元素,都会关联一个浮点类型的分数,然后按照这个分数,来对集合中的元素进行从小到大 的排序,有序集合的成员是唯一的 ,但是分数是可以重复的 ,
zadd key 分数 成员,分数 成员,分数 成员
zrange key start stop
技巧:zrange key 0 -1 获取所有元素 如果需要输出分数,需要zrange key 0 -1 withscores zscore key member
zrank key member
查看某个成员分数的排名(从小到大 的顺序排列的排名),0开始排 zrevrank key member
查看某个成员分数的排名(从大到小 的顺序排列的排名) 0开始排 zrem key member
哈希(hash)-命令以h开头 哈希是一个字符类型的字段和值的映射表,简单来说就是一个键值对的集合,特别适合用来存储对象
hset key field value [field value…]
hgetall key
hdel key field
hexist key field
hkeys key
hlens key
发布订阅模式 publish命令来将消息发送到指定的频道
subscribe来订阅这个频道
subscribe channel 订阅
publish channel message
消息队列(Stream)-命令以x开头 redis5.0版本引入的一个新的数据结构
可以解决发布订阅消息无法持久化,无法记录历史记录等
XADD key ID field value [field value …]
key :队列名称,如果不存在就创建ID :消息 id,我们使用 * 表示由 redis 生成,可以自定义,但是要自己保证递增性。field value : 记录。XLEN key
使用 XLEN 获取流包含的元素数量,即消息长度,语法格式: XRANGE key start end [COUNT count]
使用 XRANGE 获取消息列表,会自动过滤已经删除的消息 ,语法格式: 开始和结束可以分别使用-和+ xdel
xtrim
xgroup
技巧 GetMapping(“/“),GetMapping( value = “/“),多个值GetMapping( value = {“/“,”/login”} )
Controller和RestController的区别
thymeleaf如果是行内,则需要使用[[${变量}]]
Arrays.asList()
slf4j可以用占位符
1 2 3 4 Log .info ("上传的信息:email={},username={},headerImg={},photos={}" ,email,username,headerImg.getSize (),photos.length );上传的信息:emai1=534096094 @qq.c0m ,username=admin,headerImg=43535 ,phot0s=2
C:\Users\Administrator\AppData\Local\Temp\tomcat.8080.3393410858019601440\work\Tomcat\localhost\ROOT\upload_52f25625_bd8b_400f_a069_c10bd66bdb8f_00000002.tmp (系统找不到指定的文件。)
可以直接使用MapperScan这样就不需要我们手动为每一个Mapper添加@Mapper注解了
Ctrl + f12做什么用的?
技巧
2023创建Servlet的快捷方式 跳转值root.html页面request.getRequestDispatcher(s:"root.html").forward(request,response); lib包必须要在WEB-INFO下 2023添加javaEE项目
1 2 3 4 req.getRequestDispatcher ("/list" ).forward (req,resp); resp.sendRedirect (req.getContextPath () + "/list" );


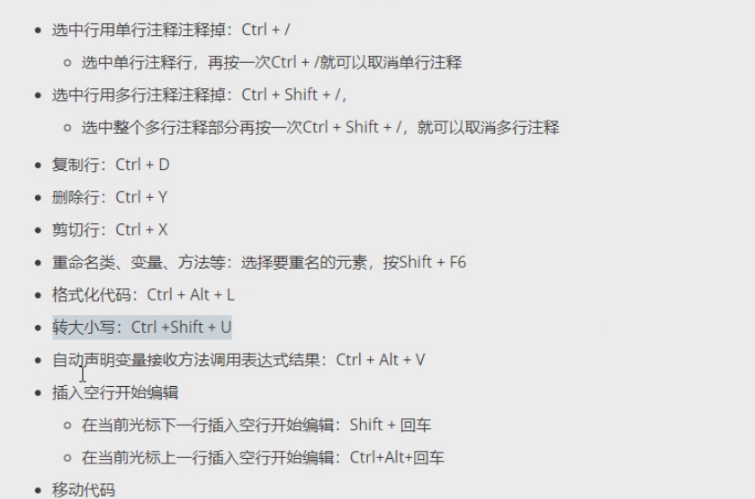
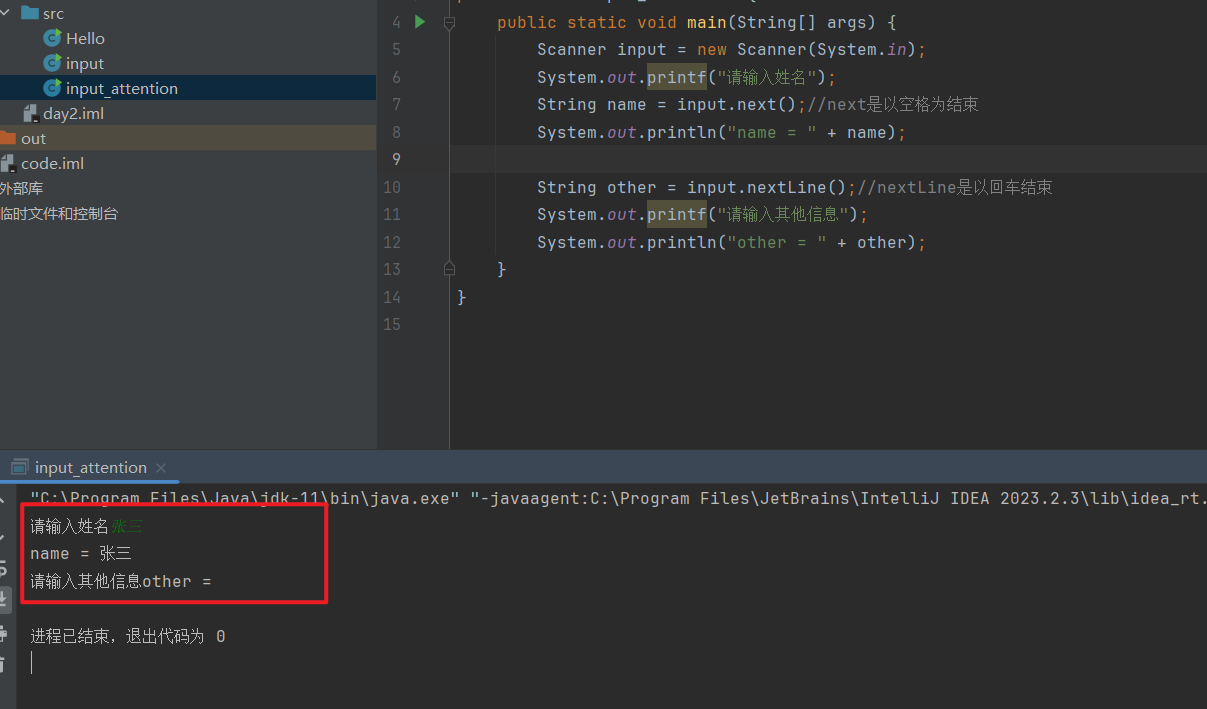
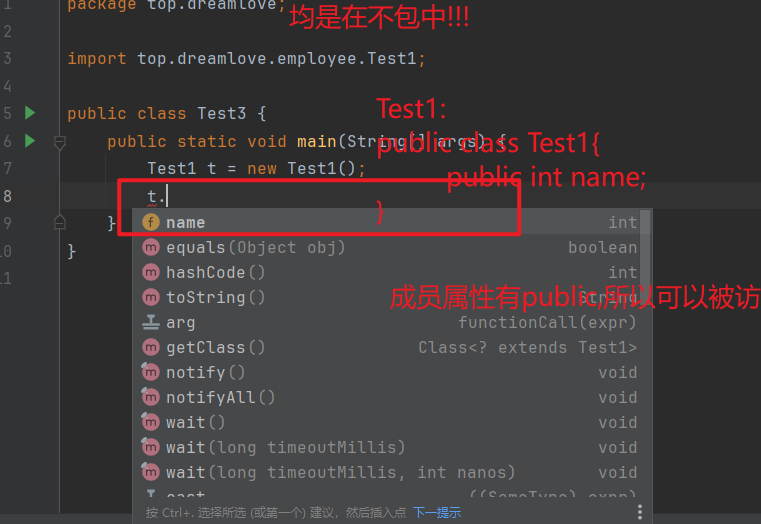
 :A类的父类和子类
 :A类的父类
 :A类的所有子类