微信小程序模块化、组件传值、添加data,menthods类型等-持续更新
组件模块化
基本概括
- 模块化一般分为二种,页面和模块。页面由模块构成。
- 我们拆分模块化可能是这样子的
- modules(页面模块)
- pageA
- A1模块
- A2模块
- pageB
- B1模块
- B2模块
- pageA
- pages(页面)
- pageA
- pageB
- modules(页面模块)
- 在小程序当中
- 我们使用
Page注册小程序中的一个页面@官方文档-page说明 - 使用
Component创建自定义组件@官方文档-Component说明- 注意下,通过
Component创建的组件里面的样式,只会应用于当前组件,比如组件A内部设置了类A,那么在外部即使设置了同样的类名,也不会被应用相同的类名
- 注意下,通过
- 所以我们创建页面使用
Page,创建模块使用Component
- 我们使用
- 模块化后需要注意的点(官方API拷贝过来的)
- 因为 WXML 节点标签名只能是小写字母、中划线和下划线的组合,所以自定义组件的标签名也只能包含这些字符。
- 自定义组件也是可以引用自定义组件的,引用方法类似于页面引用自定义组件的方式(使用
usingComponents字段)。 - 自定义组件和页面所在项目根目录名不能以“wx-”为前缀,否则会报错。
- 出于性能考虑,使用
usingComponents时,setData内容不会被直接深复制,即this.setData({ field: obj })后this.data.field === obj。(深复制会在这个值被组件间传递时发生。)
页面使用模块化组件
- 其实,小程序官网已经给出示例了,这里就不废话了,直接看他的代码片段就可以
组件父子传值
父亲给儿子值
小程序官方代码片段
父亲需要做的
- 就是像vue一样传递参数给儿子就可以,其他什么不用管了
1 | vue时候 |
- 儿子需要做的
- 就是需要添加
properties属性,并未其添加对应的属性说明即可
- 就是需要添加
1 | //小程序 |
儿子给父亲值
- 方式1: triggerEvent
- 方式2: 双向绑定
方式1:triggerEvent
资料
父亲需要做的
- 通过
bind:自定义事件名=回调函数传递给儿子 - 注意,父亲通过
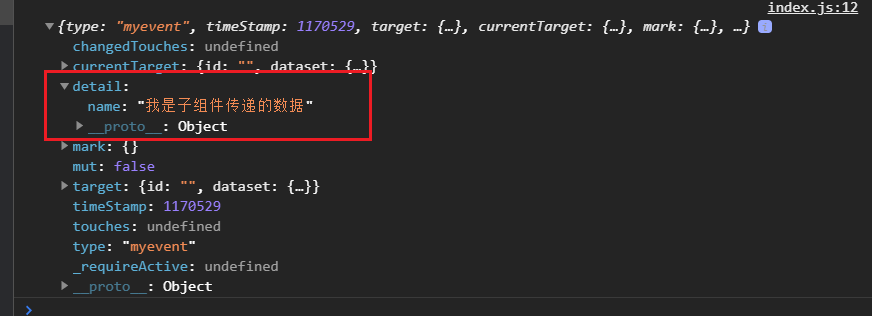
triggerEvent接收的参数不单单是子组件传递过来的数据,还有很多其他的数据,子组件传递过来的数据仅仅是在其中的detail字段里面 - 输出查看儿子传递过来的数据,可以看到,儿子传递过来的
name数据被微信小程序放在了detail对象当中
- 通过
1 | // Father.wxml |
- 儿子需要做的
- 通过
this.triggerEvent调用
- 通过
1 | // Son.wxml |
方式2:双向绑定
todo todo todo todo todo todo todo todo todo todo
获取组件实例对象和组件自定义返回结果
- 学习学习~
获取组件示例对象同时调用组件实例
小程序的组件实例调用比较简单,不需要像vue一样
defineExpose步骤
- 父组件为子组件标注id属性(当然,其他的也可以) selector 语法参考文档https://developers.weixin.qq.com/miniprogram/dev/api/wxml/SelectorQuery.select.html
1
<componentA id="abcdef"/>
- 父组件通过
this.selectComponent("#xxx")即可获取到组件的实例对象并通过实例对象调用子组件当中的方法
1
2
3
4
5// 使用选择器选择组件实例节点,返回匹配到的第一个组件实例对象(会被 wx://component-export 影响)
const childremA = this.selectComponent('#abcdef');
// 调用实例方法
childremA.sayHello();代码片段
组件自定义返回结果
看官方文档吧,这里不赘叙了
为Component/Page指明Data类型,Method类型(ts)
- 感觉小程序ts挺乱的吧….话不多说
Page页面指明
- types.ts(类型文件)
1 |
|
- index.ts(每一个page都有的入口文件)
1 | import {Data,Methods} from "./types"; |
Component组件指明
和
Page有一点不一样,因为Component多了一个properties不过这个properties可以要,也可以不要types.ts(类型文件)
1 | import MethodOption = WechatMiniprogram.Component.MethodOption; |
- index.ts(每一个Component都有的入口文件)
1 | import {Data,Props,Methods} from "./types"; |
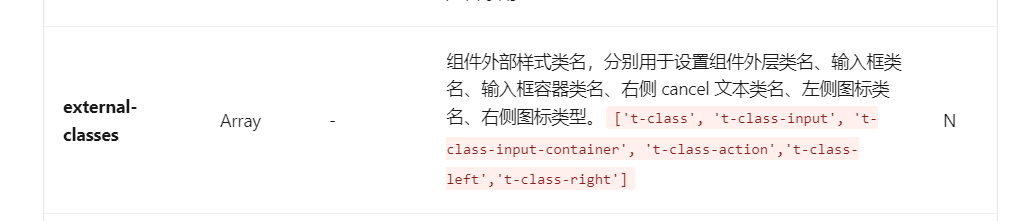
外部样式类
启用来源于一个
t-design吧,要设置search的背景颜色,发现没有props,但是有external-classes,所以就来学习学习
- 有时,组件希望接受外部传入的样式类。此时可以在
Component中用externalClasses定义段定义若干个外部样式类。这个特性可以用于实现类似于view组件的hover-class属性:页面可以提供一个样式类,赋予view的hover-class,这个样式类本身写在页面中而非view组件的实现中。
注意:在同一个节点上使用普通样式类和外部样式类时,两个类的优先级是未定义的,因此最好避免这种情况。(意思就是你在组件内部通过这个类名设置了样式,又在外部通过暴露的类名设置了样式,当样式发生重叠的时候,优先使用谁的不确定,但是可以使用important来强制)
代码示例:
- 组件
1 | /* 组件 custom-component.js */ |
1 | <!-- 组件 custom-component.wxml --> |
- 页面
1 | <!-- 页面的 WXML --> |
1 | /* 页面的 */ |
组件的插槽
- 如果是默认插槽,直接使用就可以,不需要其他做法
1 | <!-- 组件模板 --> |
- 默认情况下,一个组件的 wxml 中只能有一个 slot 。需要使用多 slot 时,可以在组件 js 中声明启用
1 | Component({ |
- 然后在组件当中就可以以不同的
name来区分插槽,并且父组件也可以使用了
1 | <!-- 组件模板 --> |
路由传参 todo
小程序登录 todo
- 登录流程如图所示
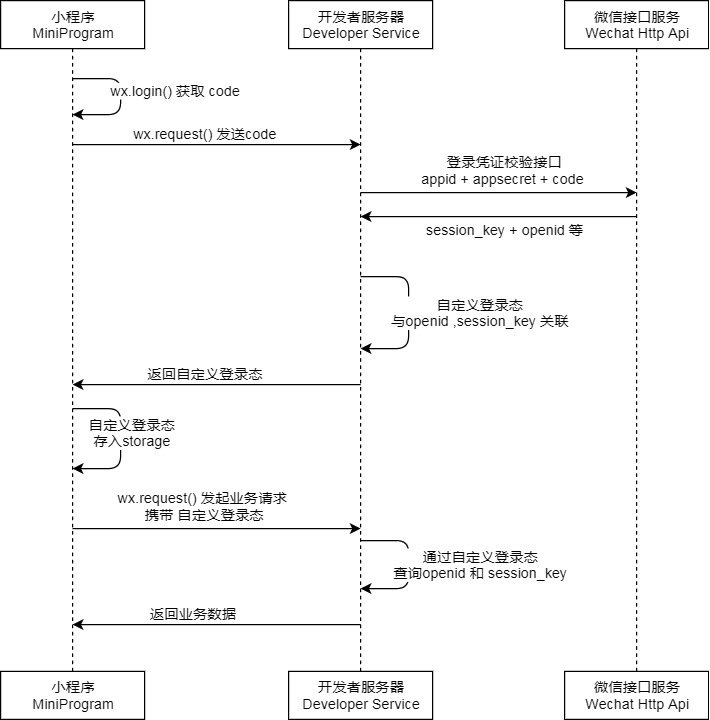
- 巴拉巴拉,就不赘叙了,前端一般都是调用wx.login然后向自己的后端提供的接口发送请求就完成,然后存储token
小程序获取用户信息(正确应该叫头像昵称填写能力)
小程序获取手机号
- 文档
- 由于非个人开发者才会开发此接口,这里没办法继续下去了
1 | <button open-type="getPhoneNumber" bindgetphonenumber="getPhoneNumber">获取手机号</button> |
小程序骨架屏
参考文章
本博客所有文章除特别声明外,均采用 CC BY-NC-SA 4.0 许可协议。转载请注明来自 梦洁小站-属于你我的小天地!
相关推荐


评论
