
知乎日报项目学习笔记
项目完工
- 前端源码地址:https://github.com/superBiuBiuMan/-zhuhu_daily
- 后端源码地址:https://github.com/superBiuBiuMan/zhihu-daily-admin
- 学习地址:Bilibili
初始化项目
ts方式(此项目以ts运行)
1 | create-react-app zhihu-daily --template typescript |
- 没有安装create-react-app的同学,请使用npx命令
1 | npx create-react-app zhihu-daily --template typescript |
js方式
- 删除后面的
typescript即可
Rem响应式处理
手动处理
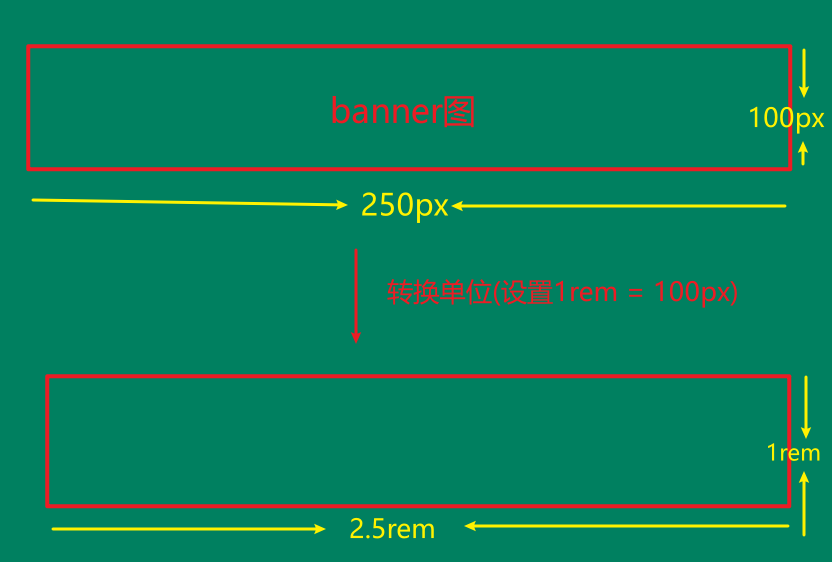
我们制作移动端网页的时候,需要考虑兼容性,比如我们UI给出的原型图是以
iPhone5/6或者其他手机尺寸为参考的,这里就设置设计稿的宽度为375px,同时为了方便计算,我们设置1rem = 100px然后我们测量UI图的尺寸的时候,就**默认除以100,**这样子就得到了rem单位
- 但是呢,每一人的手机不一定是
375px宽度,我们在375宽度下设置了1rem = 100px,其他手机宽度的转换公式就如下

- 最后就可以得到在不同手机上
1rem应该等于多少px计算公式( 设备宽度 x 100 / 375 = ?px )

- 知道了原理,书写下代码
1 | <html lang="en"> |
自动处理
- postcss-pxtorem:将px转换为px
- amfe-flexible:为html、body添加font-size,窗口调整时候重新设置font-size
- 安装
1 | npm install amfe-flexible -S |
- 在主入口文件引入
amfe-flexible
1 | import React from 'react'; |
配置postcss-pxtorem,可
vue.config.js、.postcssrc.js、postcss.config.js其中之一配置,权重从左到右降低,没有则新建文件,只需要设置其中一个即可:如果是react项目一开始没有eject,就需要安装下
CRACO,这里就以这个为例子(好像还有react-app-rewired)
1 | npm install @craco/craco --save |
- 在项目根目录下创建配置文件craco.config.js,并根据实际情况完善配置
1 | module.exports = { |
- 修改
package.json中的scripts
1 | "scripts": { |
- 最终可以看到进行了更改
1 | .App { |

package.json列表
1 | { |
参考
万字长文详解react项目使用craco进行配置并集成Prettier、Eslint、husky、lint-staged
https://zhuanlan.zhihu.com/p/528295053?utm_id=0
- 好像提到了
CRA5版本
- 好像提到了
使用reduxjs/toolkit
- 安装
1 | yarn add reduxjs/toolkit react-redux |
使用起来也很方便,先抛弃一切redux的,这里只有切片,我们除了创建切片和一个主入口文件,其他什么都没有了
创建切片
src\store/slice/base/index.ts
1 | import { createSlice } from "@reduxjs/toolkit"; |
- 主入口文件
src\store/index.ts
1 | import { configureStore } from "@reduxjs/toolkit"; |
- 传递各个组件
1 | import { Provider } from "react-redux"; |
组件使用
- 获取设置的state参数
const { useSelector } from "react-redux"
1
2
3
4
5
6import {useSelector} from "react-redux"
const selectProjectModalOpen = state => state.projectList.projectModalOpen;
const showModal = useSelector(selectProjectModalOpen);
//等同于 const showModal = useSelector((state) => state.projectList.projectModalOpen)- 调用设置的方法
const { useDispatch } from "react-redux"
1
2
3
4const { useDispatch } from "react-redux";
import {projectListSliceActions} from "../projectList/projectList.slice";
const dispatch = useDispatch();//不需要传入任何参数,react-redux会自动去处理store
<button onClick={() => dispatch(projectListSliceActions.closeProjectModal())}>点击我关闭</button>- 获取设置的state参数
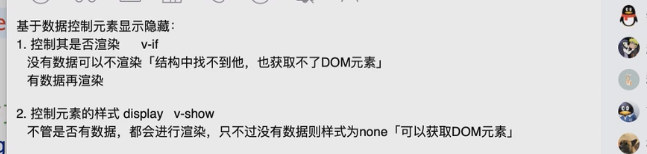
元素隐藏/显示

详情页
可以利用useEffect来实现并发操作
1 | useEffect(() => { |
React渲染html字符串
dangerouslySetInnerHTML={{ __html: 内容 }}- @官网介绍
1 | function createMarkup() { |
创建的css样式放置到document.head当中
1 | const handleStyle = () => { |
使用flushSync
- 通俗来说这里的用法就是插队更新,让其更新完毕在执行后续代码
- 可以看看这篇文章
1 | import React, { useState } from 'react'; |
需要注意的是,如果通过
useEffect来,且依赖收集为一个空数组,那么就需要注意函数调用的state值的问题了- 初次渲染的时候,函数指向的是初始化时候的值,当有数据重新渲染的时候,如果不进行依赖收集去更新
useEffect当中函数的指向,那么就会导致useEffect指向的永远是初始化时候的函数,从而导致函数内部的state值永远为初始化时候的值 - 所以老师的解决办法如下
- 也就是传入参数的方式
1
2
3
4
5
6
7
8
9
10
11
12
13
14
15
16
17
18
19
20
21
22
23
24
25
26
27
28
29
30
31
32
33
34
35
36
37
38
39
40
41
42
43
44
45
46//老师解决办法
useEffect(() => {
(async () => {
//获取详情图
const result = await api.queryNewsInfo(id ?? '');
flushSync(() => {
setInfo(result)
handleStyle(result);
})
handleImage(result);
})()
},[])
//下面这种是错误的,handleStyle和handleImage无法获取到最新的state值
useEffect(() => {
(async () => {
//获取详情图
const result = await api.queryNewsInfo(id ?? '');
flushSync(() => {
setInfo(result)
handleStyle();
})
//保证DOM可以获取到
handleImage();
})()
},[])
//顺带一提,输出结果为 1,2,3,4
useEffect(() => {
(async () => {
//获取详情图
const result = await api.queryNewsInfo(id ?? '');
console.log(1)
flushSync(() => {
console.log(2)
setInfo(result)
console.log(3)
})
console.log(4,info)
handleStyle(result);
//保证DOM可以获取到
handleImage(result);
})()
},[])- 初次渲染的时候,函数指向的是初始化时候的值,当有数据重新渲染的时候,如果不进行依赖收集去更新
设置图片
- 图片设置
- 为了更加好的体验,加入了
onload和onerror事件
- 为了更加好的体验,加入了
1 | /* 处理大图 */ |
登录页面
- reduxjs/toolkit
reduxjs/toolkit使用异步-方法1
缺点是需要使用
@ts-ignore,否者会报A computed property name must be of type 'string', 'number', 'symbol', or 'any'.警告异步函数
1 | import {createAsyncThunk} from "@reduxjs/toolkit"; |
- store基本步骤
1 | import {fetchUserDataAction} from "./actions"; |
- 使用
1 | import {fetchUserDataAction} from "@/store/slice/base/actions"; |

reduxjs/toolkit使用异步-方法2
- 异步函数
1 | import {createAsyncThunk} from "@reduxjs/toolkit"; |
- store基本步骤
1 | import {fetchUserDataAction} from "./actions"; |
- 使用
1 | import {fetchUserDataAction} from "@/store/slice/base/actions"; |
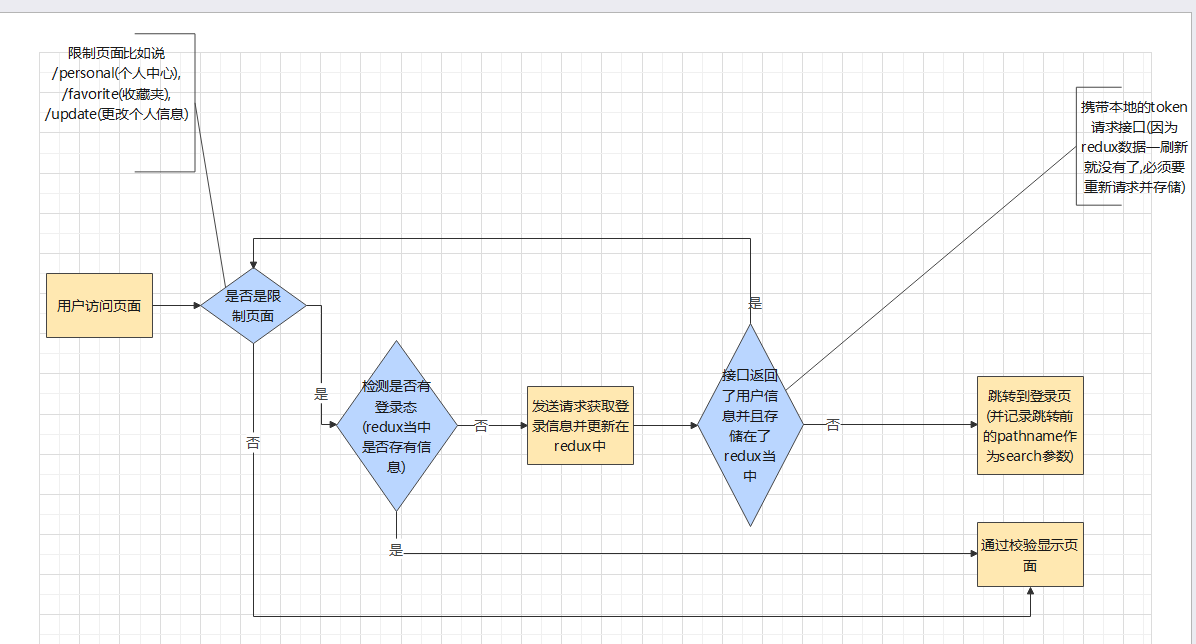
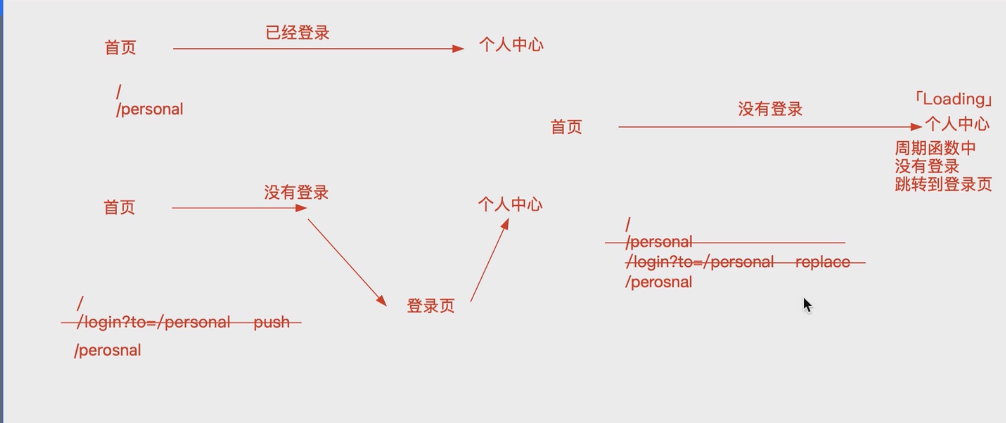
需要做的跳转处理

路由设置
- 类似于Vued的路由前置守卫
- 做法
- 看下图
- 代码这里借助一个hooks来书写
1 | * 路由校验-判断是否需要登录 */ |
- 顺带一提,直接在
useEffect当中使用async也是不被允许的
1 | // 错误写法 |
收藏/取消收藏
- 需要注意的是,如果我们想携带params参数和search参数,就需要自己组合了
- 当然,你也可以使用
window.location.href获取完整的路径信息,不过需要自己对http://localhost做处理
- 当然,你也可以使用

- 所以我解决办法就是,使用组合
1 | props.navigate({ |
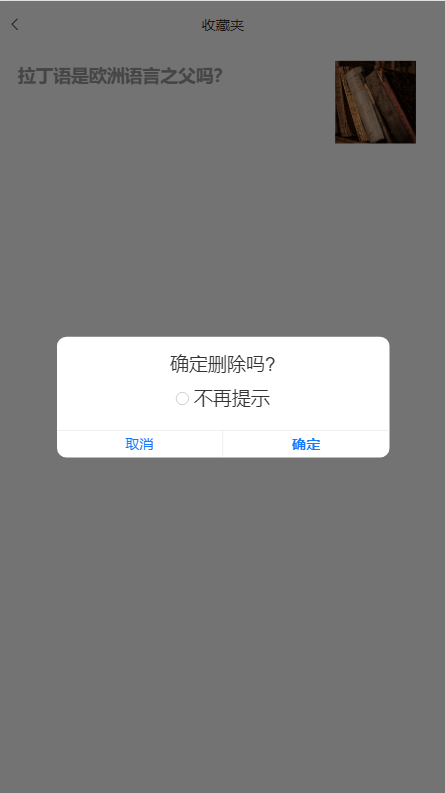
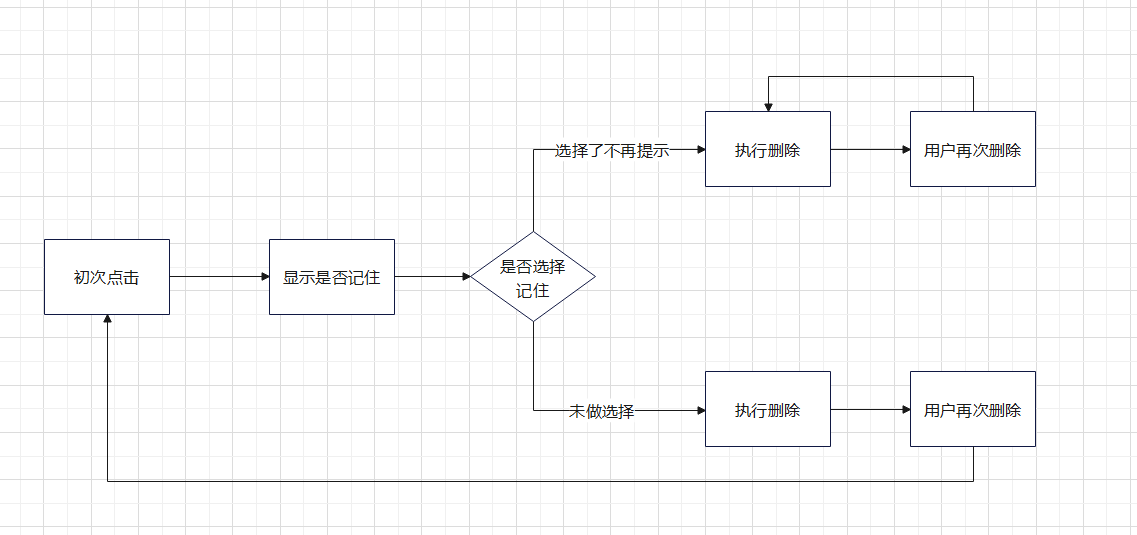
收藏夹
- 就添加了确认弹窗操作
实现组件的缓存
- 缓存的方式
1 | 主流思想上: |
老师用的是一个老师的组件,这里就使用cjy0208大佬的react-activation(毕竟下载人数多嘛)- 好吧,此组件react18当中bug太多了………………并且需要使用老的ReactDOM.render写法,就不使用了
1 | yarn add react-activation |
- 跳过……………..
修改个人信息-文件上传
- 一开始纠结文件上传失败后还显示图片,后面解决办法很简单
1 | 在uplod中上传失败之后抛出异常 |
遇到的问题
无法解析scss/sass提示create-react-app Cannot find module ‘sass’
- 使用 create-react-app 的创建的项目,其默认的 webpack.config.js (这个文件默认隐藏,要查看需要运行 npm run eject,运行这个命令前需要本地 commit 代码)的文件中,可以看到是默认配置了 sass-loader 的选项的,所以在 react 项目中使用 sass 还是比较方便的。虽然默认配置了 sass-loader,但要使用 sass 还是需要先安装一下的,不然就会像我一样出现
create-react-app Cannot find module 'sass'
1 | npm install sass -D |
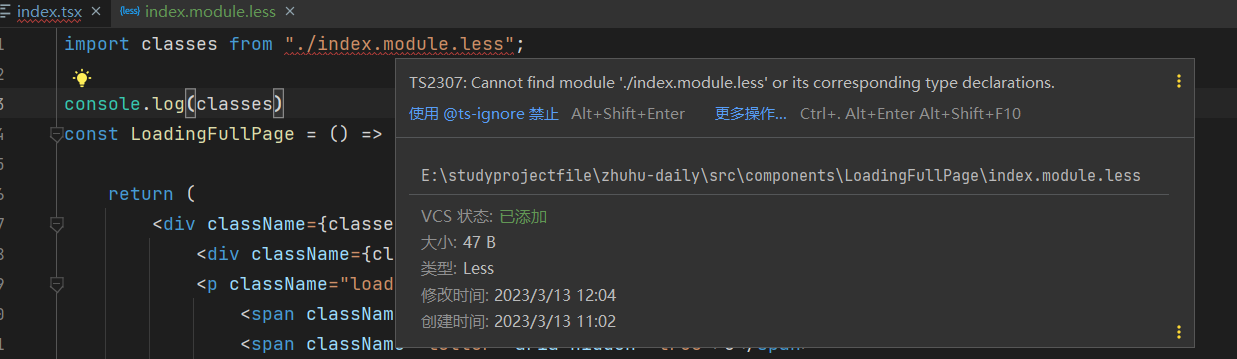
无法解析less或提示Cannot find module ‘./index.module.less’ or its corresponding type declarations
- 安装
1 | npm install craco-less -D |
- 编辑
craco.config.js
1 | const CracoLessPlugin = require('craco-less'); |
- 这样我们就可以使用下面命令来使用less了
1 | import "./index.less" |
- 可能会出现下面问题
Cannot find module './index.module.less' or its corresponding type declarations.
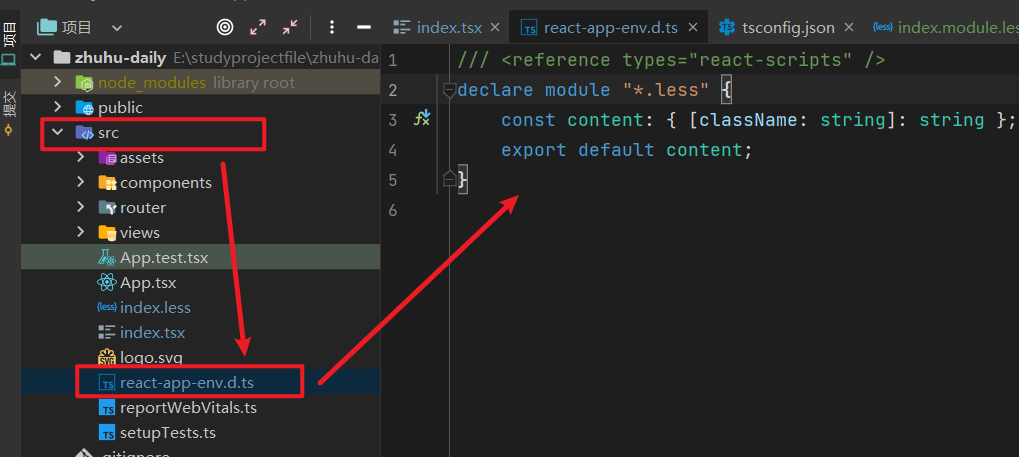
- 找到
src\react-app-env.d.ts,添加如下内容
1 | declare module "*.less" { |
配置别名
- 更改
craco.config.js
1 | const path = require('path'); |
- 然后就可以使用了
1 | //component:lazy(() => import("../views/Login")), |
- 不过可能会出现
Cannot find module '@/views/Login' or its corresponding type declarations.- 可以在 项目的根目录创建一个
jsconfig.json或者tsconfig.json,添加如下内容即可
- 可以在 项目的根目录创建一个
1 | { |
- 更改完成记得重启服务,如果上述服务都没有用,可以试试看
craco-alias(不过这个库已经被废弃了)
依赖收集导致无法获取到最新state值
- 在做下拉加载组件的时候,下面的代码有问题
1 | const { onBottom,options,style } = props; |
- 导致父组件当中
1 | /* 执行到底部的回调 */ |
- 所以需要添加依赖
1 | const { onBottom,options,style } = props; |
dispatch出现Argument of type ‘AsyncThunkAction{ age: string; }, void, AsyncThunkConfig>’ is not assignable to parameter of type ‘AnyAction’
- 方法1:设置为any
1 | import {fetchUserDataAction} from "@/store/slice/base/actions"; |
- 方法2:暴露Store当中的dispatch类型
1 | import { configureStore } from "@reduxjs/toolkit"; |
小知识点
stylesheet引入html文档的外部样式表
1 | rel="styleSheet" |
React默认Event类型可以使用React.MouseEvent来指明
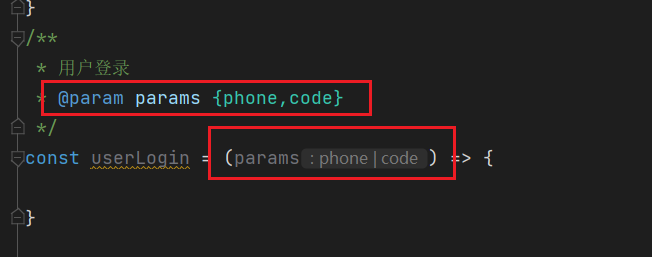
解构赋值省略掉部分参数
1 | // 解构赋值省略掉部分参数 |
才发现注释可以标明类型
- 在非ts的情况下
标准React组件的类型
- 可以使用
React.ReactNode
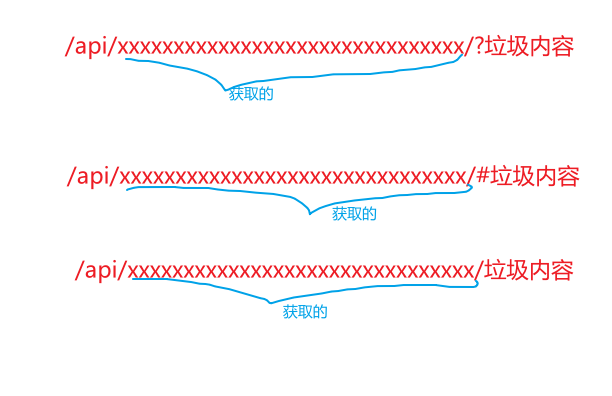
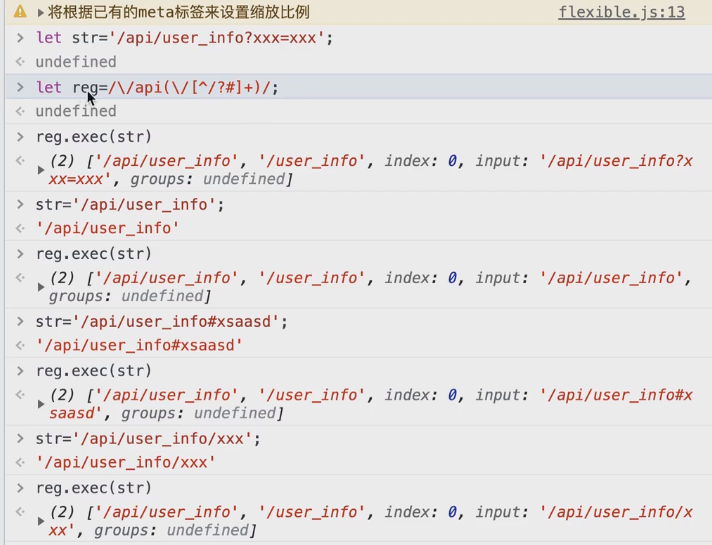
老师正则的意思
- 老师写了一个正则
let reg = /\/api(\/[^/?#]+)/ - 如果不考虑转义的问题和首尾固定的
/ /这二个符号,这个正则就可以简写为下面这种
1 | /api(/[^/?#]) |
- 如果不考虑分组捕获,可以再简化
- 含义: 匹配字符串当中具有
/api内容的,并且获取后面内容不是?或者是#或者是/的字符内容
- 含义: 匹配字符串当中具有
1 | /api/[^/?#] |
- 图示
- 分组捕获添加上去后老师的演示代码
less文件引入图片
- 前提有别名~才可以这样子,否者要一层一层找下去
1 | background-image: url("~@/assets/images/personBg.png"); |
自定义虚线
- 示例1
1 | //自定义虚线 |
- 示例2
1 | background: linear-gradient( |
指明传入props当中的回调类型提示: Type ‘Function’ is not assignable to type ‘MouseEventHandler<HTMLDivElement>‘.
本博客所有文章除特别声明外,均采用 CC BY-NC-SA 4.0 许可协议。转载请注明来自 梦洁小站-属于你我的小天地!
相关推荐


评论
